//code by Ranjith Reddy
//email me at : meetranjithreddy@gmail.com
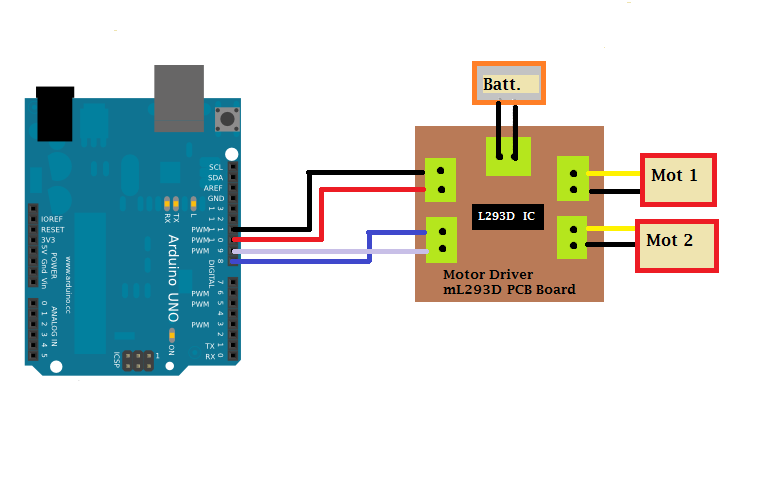
//connect motordriver to 8,9,10,11 digitial pins of arduino
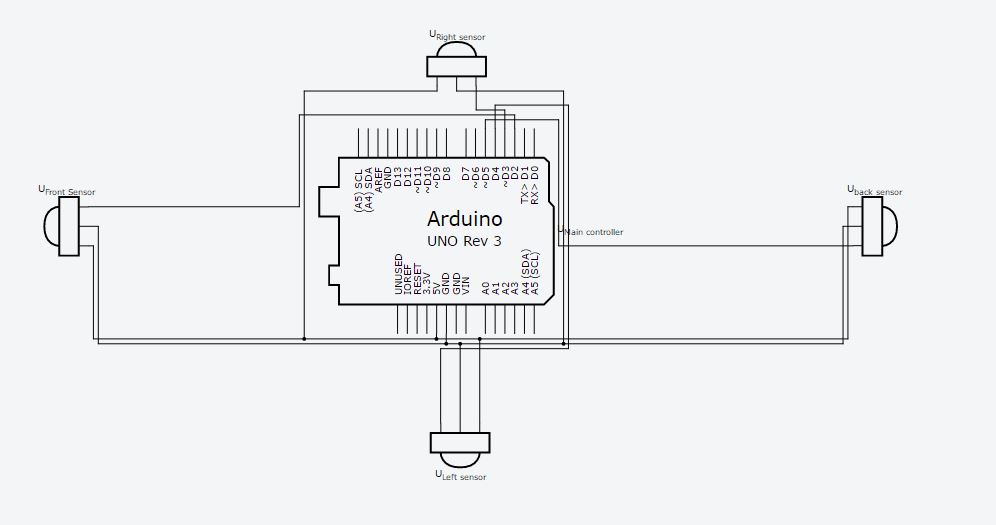
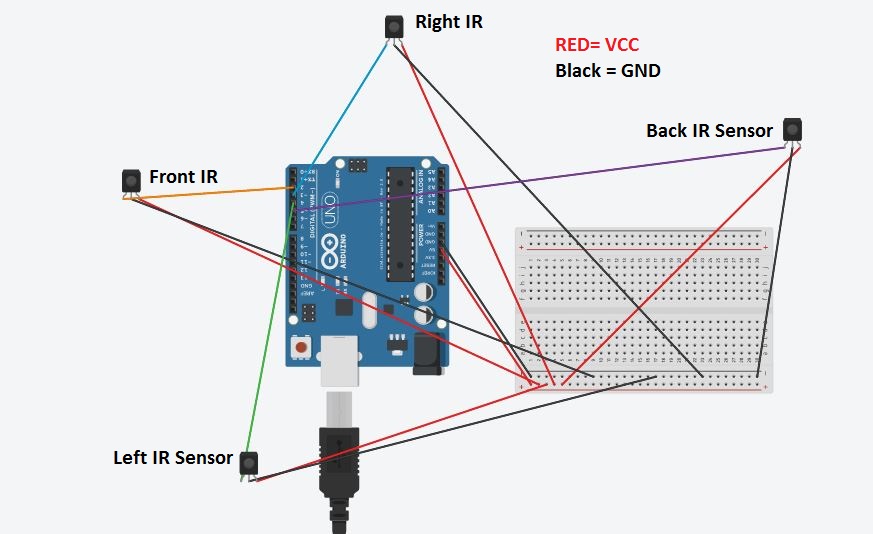
//connect front ir sensor to 2 digitial pin of arduino
//connect right ir sensor to 3 digitial pin of arduino
//connect back ir sensor to 4 digitial pin of arduino
//connect left ir sensor to 5 digitial pin of arduino
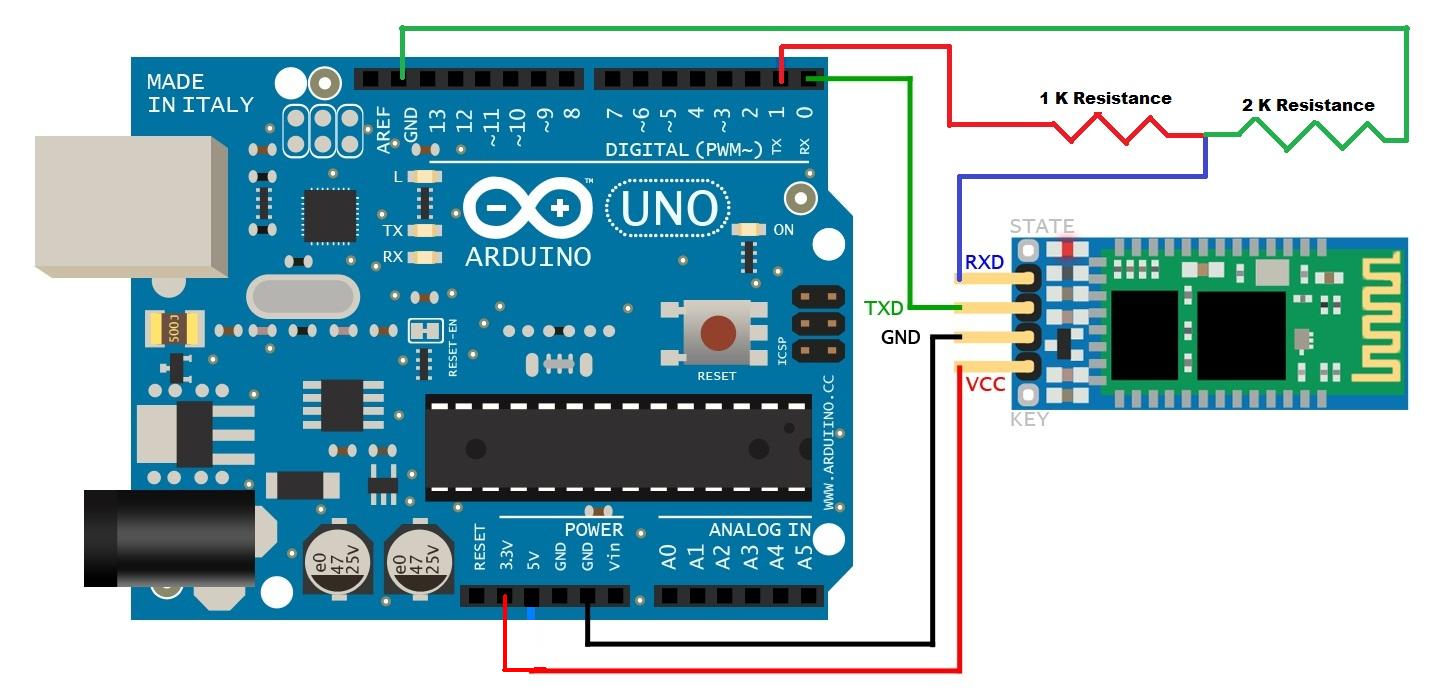
////connect Rx pin of arduino to Tx pin of hc-05 bluetooth trans-reciever
////connect Tx pin of arduino to Rx pin of hc-05 bluetooth trans-reciever


int LmotorUp = 10; //initialising Arduino port 10 be be called as LmotorUp
int LmotorDn = 11; //initialising Arduino port 11 be be called as LmotorDn
int RmotorUp = 8;  //initialising Arduino port 8 be be called as RmotorUp
int RmotorDn = 9;  //initialising Arduino port 9 be be called as RmotorDn
int ir1 = 2;
int ir2 = 3;
int ir3 = 4;
int ir4 = 5;
int ir11 = HIGH;
int ir12 = HIGH;
int ir13 = HIGH;
int ir14 = HIGH;

void setup()
{
  Serial.begin(9600);
  pinMode(LmotorUp,OUTPUT);//Setting ports as OUTPUTS as they
  pinMode(LmotorDn,OUTPUT);//supply signal values to motor driver
  pinMode(RmotorUp,OUTPUT);
  pinMode(RmotorDn,OUTPUT);
  pinMode(ir1,INPUT);
  pinMode(ir2,INPUT);
  pinMode(ir3,INPUT);
  pinMode(ir4,INPUT);
  Serial.println("<Robot name> Welcomes you"); //begining statement because i can :P
  delay(1000);
}


void loop()
{
  if(Serial.available()>0)//Checking is Serial data available
  ir11= digitalRead(ir1);
  ir12= digitalRead(ir2);
  ir13= digitalRead(ir3);
  ir14= digitalRead(ir4);
  {
    int input = Serial.read(); //Storing value of read data into variable assigned

    switch(input)
    {
     case 'w' : MoveF(); //Calling respective functions if mathced with case label
     break;
     case 's' : MoveB(); // here is it important to use '' as that stores the ASCII value is the letter in the variable
     break;
     case 'a' : MoveL(); // and hence we can use the int keyword
     break;
     case 'd' : MoveR();
     break;
     case 'x' : Stop();
     break;
     default : break;
    }
  }
  delay(50);
}

void MoveF()
{
  ir11 = digitalRead(ir1);
  if (ir11 == HIGH )
  {
  Serial.println("<Robot Name> Forward");
  digitalWrite(LmotorUp,HIGH); //As said in video we are writing a Digital HIGH to the upper left pin of the motor driver
  digitalWrite(LmotorDn,LOW); //As said in video we are writing a Digital LOW to the lower left pin of the motor driver
  digitalWrite(RmotorUp,HIGH); //As said in video we are writing a Digital HIGH to the upper right pin of the motor driver
  digitalWrite(RmotorDn,LOW); //As said in video we are writing a Digital LOW to the lower right pin of the motor driver

   delay (2000);
   digitalWrite(LmotorUp,LOW);//Writing a digital LOW to all pins associated with movement of motor driver causes all motors to stop
  digitalWrite(LmotorDn,LOW);
  digitalWrite(RmotorUp,LOW);
  digitalWrite(RmotorDn,LOW);


  }
  else {

Serial.println("<Robot Name> forward obstricle");
}
}
void MoveB()
{
ir13 = digitalRead(ir3);
  if (ir13 == LOW )
{
  Serial.println("<Robot Name> Backward");
  digitalWrite(LmotorUp,LOW); //Reverse logic of above
  digitalWrite(LmotorDn,HIGH);
  digitalWrite(RmotorUp,LOW);
  digitalWrite(RmotorDn,HIGH);
  delay (2000);
   digitalWrite(LmotorUp,LOW);//Writing a digital LOW to all pins associated with movement of motor driver causes all motors to stop
  digitalWrite(LmotorDn,LOW);
  digitalWrite(RmotorUp,LOW);
  digitalWrite(RmotorDn,LOW);

}
else {

Serial.println("<Robot Name> backward obstricle");
}
}
void MoveL()
{
ir14 = digitalRead(ir4);
  if (ir14 == LOW )
 {
  Serial.println("<Robot Name> Left");
  digitalWrite(LmotorUp,LOW); //we are completely stopping the left motor and allowing the right motor to move forward
  digitalWrite(LmotorDn,LOW); //this will cause the robot to move left
  digitalWrite(RmotorUp,HIGH);
  digitalWrite(RmotorDn,LOW);
  delay (1000);
   digitalWrite(LmotorUp,LOW);//Writing a digital LOW to all pins associated with movement of motor driver causes all motors to stop
  digitalWrite(LmotorDn,LOW);
  digitalWrite(RmotorUp,LOW);
  digitalWrite(RmotorDn,LOW);

}
else {

Serial.println("<Robot Name> Leftside obstricle");
}

}
void MoveR()
{
ir12 = digitalRead(ir2);
  if (ir12 == LOW )
 {  Serial.println("<Robot Name> Right");
  digitalWrite(LmotorUp,HIGH);//we are completely stopping the right motor and allowing the left motor to move forward
  digitalWrite(LmotorDn,LOW);//this will cause the robot to move right
  digitalWrite(RmotorUp,LOW);
  digitalWrite(RmotorDn,LOW);
delay (1000);
   digitalWrite(LmotorUp,LOW);//Writing a digital LOW to all pins associated with movement of motor driver causes all motors to stop
  digitalWrite(LmotorDn,LOW);
  digitalWrite(RmotorUp,LOW);
  digitalWrite(RmotorDn,LOW);

}
else {

Serial.println("<Robot Name> Rightside obstricle");
}

}

void Stop()
{
  Serial.println("<Robot Name> Stop");
  digitalWrite(LmotorUp,LOW);//Writing a digital LOW to all pins associated with movement of motor driver causes all motors to stop
  digitalWrite(LmotorDn,LOW);
  digitalWrite(RmotorUp,LOW);
  digitalWrite(RmotorDn,LOW);
}


_ztBMuBhMHo.jpg?auto=compress%2Cformat&w=48&h=48&fit=fill&bg=ffffff)




Comments
Please log in or sign up to comment.