Timers are useful in many scenarios. Whether you need to make sure that your cookies in the oven do not burn, that your child does not spend more time watching TV than allotted, or that you can beat your friends in a burrito-eating competition and stuff as many burritos into your system within the time limit as possible (I don't know why you would do that, but you do you), timers are important in ensuring that you keep track of time in an effective way.
This is why we were inspired (and low-key forced) to create this wonderful project. This project allows for you to have a beautiful, functional, efficient timer, embellished with LEDs and an annoying alarm-sound-making-thing (see also: piezo) for when the timer runs out.
Wiring:First, take a look at all of the necessary components. Make sure that you are able to attain each of these, for they are all crucial to the functionality of this timer.
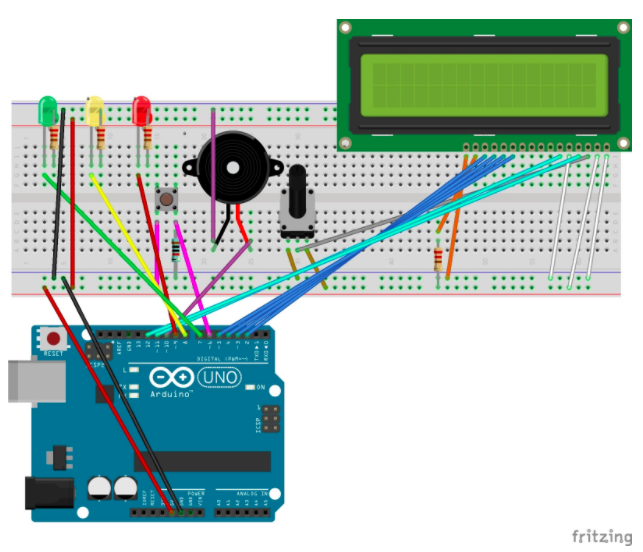
Next, take a look at the Fritzing diagram we have included. It gives you a nice, easy-to-understand view of the wiring and placement of components. Follow that diagram perfectly, and you should be fine. If you still encounter any problems or are confused by the jumble of wires and are not sure where a wire would go based on the diagram, refer to the pictures below. If you are still having trouble, we encourage you to try your best and use your knowledge and intuition to figure it out!
The end product should look like this:
Then, take a look at the code we included. It is relatively simple and short, though it may seem somewhat complicated. Copy it down word for word and read the comments, and you should be good. If not, here's a valuable tip: Don't forget those semicolons! ;)
Additional Notes:Note: We did not further decorate or design our timer for lack of time. However, if you wish to create something that would make the timer appear more like an actual timer instead of just an LCD screen, random components, and a bunch of wires everywhere on a breadboard, go for it! Let your imagination run wild!!! XD
Note: We hope that this timer is useful and worth the time it takes to construct. If, for some reason, you are utterly displeased about something in this tutorial, or have a question, please feel free to leave a comment below! Not that we'll necessarily look at it or anything (we are American high-schoolers who did this for a good grade; be realistic) but you are still entirely free to leave comments. I suppose, then, that if you found anything absolutely superb about our project, also feel free to leave a comment and do a bit of free marketing for us!
Note: We thank you for reading through this huge story and hope you have a fantabulous day till the end of time!


_ztBMuBhMHo.jpg?auto=compress%2Cformat&w=48&h=48&fit=fill&bg=ffffff)


_3u05Tpwasz.png?auto=compress%2Cformat&w=40&h=40&fit=fillmax&bg=fff&dpr=2)
Comments
Please log in or sign up to comment.