


Hardware components | ||||||
 |
| × | 1 | |||
| × | 1 | ||||
| × | 1 | ||||
| × | 1 | ||||
 |
| × | 1 | |||
Software apps and online services | ||||||
| ||||||
| ||||||
Hand tools and fabrication machines | ||||||
| ||||||
 |
| |||||
When I get stressed, two things that I tend to overindulge in are candy and card games. Too much candy results in unhealthily high blood sugar levels and susception to cavities, while too much time spent on card games results in procrastination and brain fatigue. This inspired me to create Ready, Set, Nerds! In this project, Ready, Set, Nerds! allows users to play a 2 minute round of Set and if they end with a score of 10 or higher, they get rewarded with a pre-measured amount of Nerds. The time limit of the game prevents users from spending an infinite amount of time playing Set, and the pre-measured amount of Nerds prevents users from overconsuming the small balls of sugar. Further details can be refined, such as adding a daily limit for how many times the game can be played, adding a sensor to detect when the candy needs to be refilled, and finalizing game logic.
Instructions for SetIn order to play the game, please familiarize yourself with the rules of Set. Here is a link made by PlayMonster with the overall rules of card characteristics, what makes a Set, and examples: https://www.setgame.com/sites/default/files/instructions/SET%20INSTRUCTIONS%20-%20ENGLISH.pdfMy game is slightly modified in that there is a "New Cards" button that allows users to replace 3 cards (at random) with new cards. This, however, results in a score deduction of 1. Thus, the user should only press "New Cards" when they feel there isn't a possible set and/or don't want to spend extraneous time finding a difficult set. This adds an element of luck and risk/benefit analysis to the game.
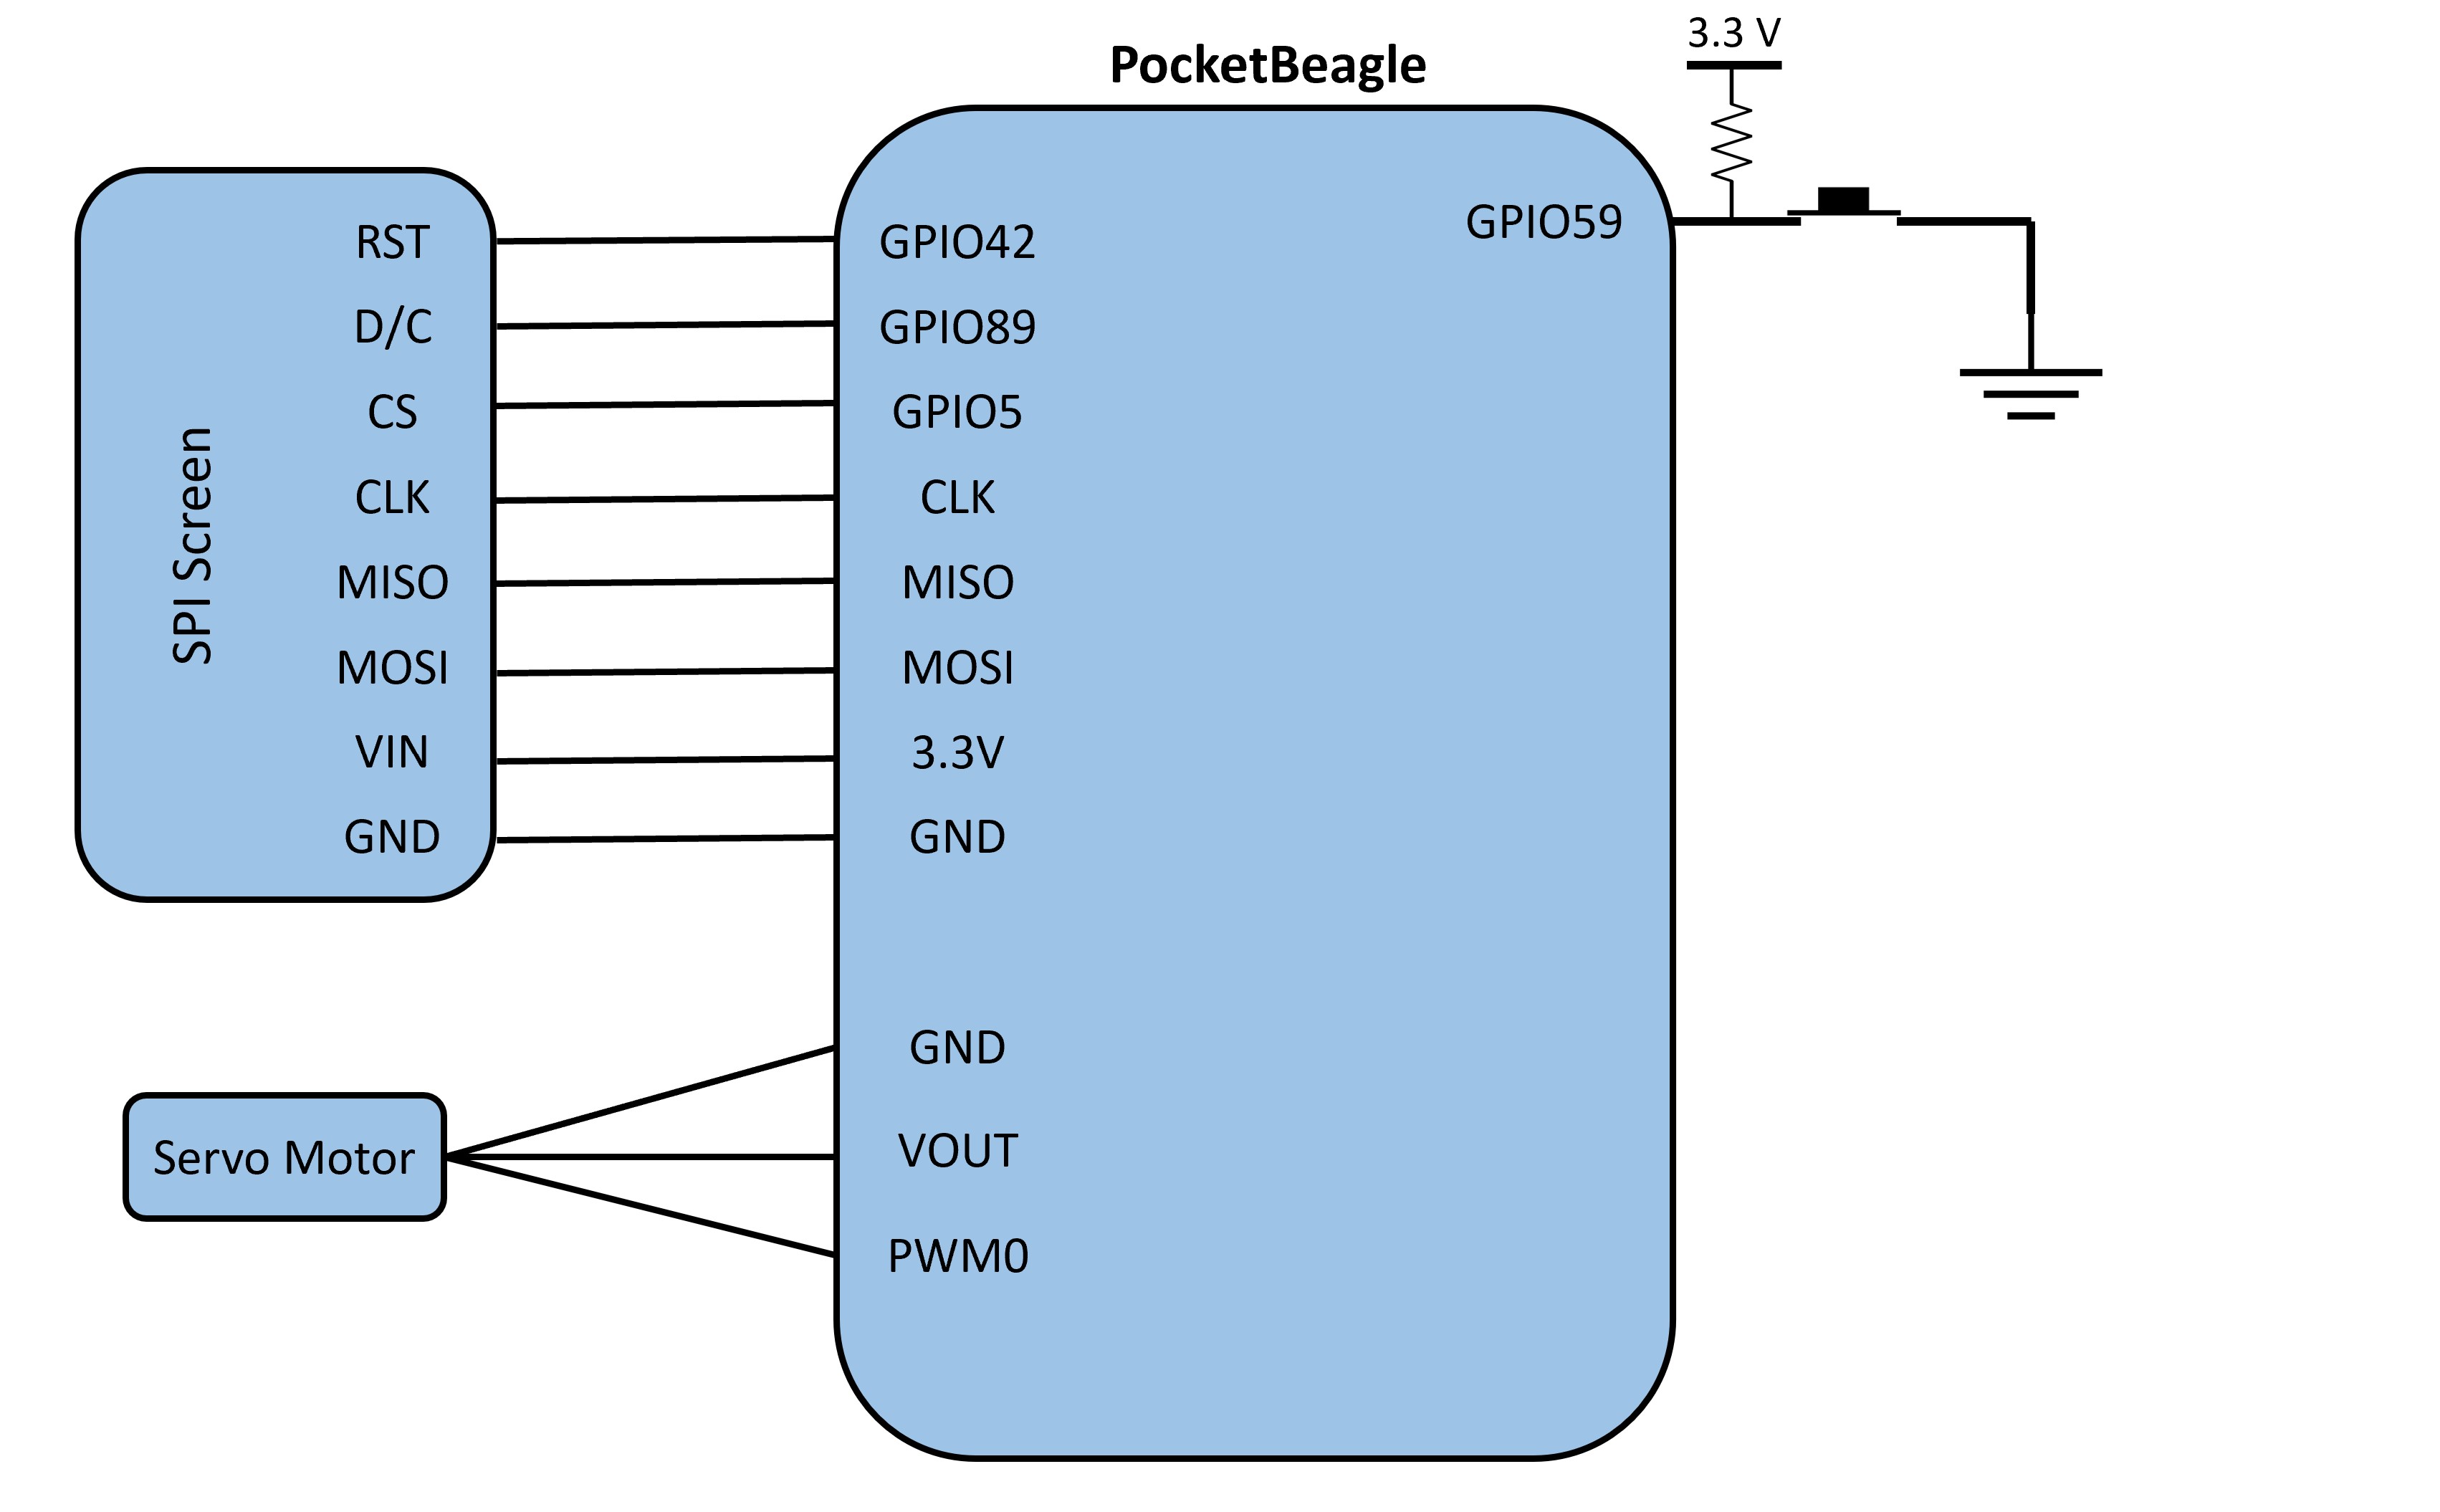
Video Demonstrating FunctionalityHardwareMost of this project's hardware components revolve around the PocketBeagle, so please refer to this pinout diagram to ensure proper connections.
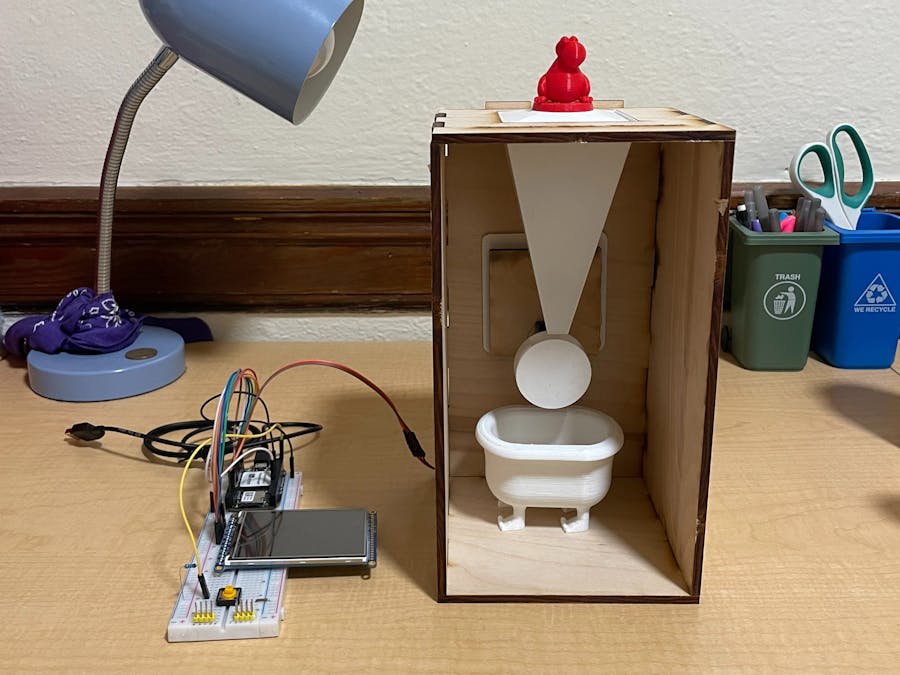
1. Laser Cut Box
For easy access to the candy after it's been dispensed and to see the motor turn, I designed an open faced box to house the other components of this project (excluding the SPI screen and button). The file for the exact box can be found at the bottom under "CandyBox.ai".
The file was designed in Adobe Illustrator and then laser cut onto 5 mm thick wood using the EPILOG Fusion M2 40. One issue that was run into, however, was that the hole on the back panel was not large enough to fit the motor's wires through initially. Thus, a second hole was drilled with a 1 cm diameter underneath the original hole.
2. SPI Screen
For the SPI screen, I followed these connections:
- GND (black): GND (P1_16)
- VIN (white): 3.3V (P1_14)
- CLK (yellow): CLK (P_8)
- MISO (green): MISO (P1_10)
- MOSI (blue): MOSI (P1_12)
- CS (orange): GPIO5 (P_6)
- D/C (red): GPIO89 (P1_4)
- RST (brown): GPIO26 (P1_34)
Once connected properly, the SPI screen should light up a bright white, even before running any code or booting up Cloud9.
3. Button
For the button, I connected it to the + rail using a 1k Ohm resistor (although any value from 1-10k Ohms would work) and I connected it to the - rail through a wire. Make sure the + and - rails are connected to a voltage source 3.3V (P2_23) and to GND (P2_15), respectively. The button was then connected to GPIO59 (P2_2).
4. Motor
For the continuous servo motor, I followed these connections:
- Brown (ground): P1_22
- Red (VCC): P1_24
- Orange (PWM): P1_36
Here is a video demonstrating the button press and motor turn.
5.Nerds Dispenser Components
After I ensured that the SPI screen, button, and motor were working individually, I began assembling them into their parts within the container. This mainly pertained to the motor and its relevant components since the SPI screen and button remained outside the box.
For the motor, I AutoCadded and 3D printed a circular module that had a quarter of it hollow to fill up and dispense the nerds when rotated. I then superglued it to the servo motor as an attachment point. I also AutoCadded and 3D printed a funnel to act as a storage container for the candy and a lid with a nerd character handle. The nerds template was taken from mathias42 on Thingiverse. The top of the funnel had the same dimensions as the hole that was laser cut from the top of the wood box, so I just hotglued it on and the lid also fit snuggly in the funnel. After securing the position of the funnel, I then figured out where I needed to place the motor in order for the circular module to fit properly. I wanted the circular module to pick up nerds when it was under the funnel, and for no nerds to fall out from the funnel when the motor was rotating. As seen in the picture below, I had to glue some wood on the back panel of the box to place the motor at the correct horizontal position.
Finally, I also 3D printed a bathtub with feet (taken from lilfish06 on Thingiverse) as a container for the nerds to dispense into.
To download the code for this game, please refer to my Ready, Set, Nerds! GitHub repository. Downloadable files and detailed instructions can be found there.
Playing the GameAlthough the code for the game is primarily functional, the touchscreen for the SPI screen has not been incorporated. Thus, if you want to play this version of Ready, Set, Nerds!, first run the "SetGameCodeOnly.py" on Visual Studio and then if you win the game, run "ButtonMotorCode.py" on Cloud9 to trigger the motor to rotate and dispense candy.
Once you run "SetGameCodeOnly.py, " a screen with a "Start playing" and "Instructions" button will pop up. "Instructions" will take you to a page with game rules and then "See examples" will show examples of sets. Both pages will have a "Back" button which will bring you back to the start page.
If you decide to start playing, click the "Start Playing" button which will take you to the game screen, with cards on one side and numerous buttons on the other side. The cards form a 4 x 3 grid, and the buttons on the other side include "New Game" which resets the board, time, and score, "New Cards" replaces 3 random cards with new cards from the deck, and "End Game" closes the GUI screen. To select a card, you click it and it'll light up red. You can deselect it by clicking it again. After you select 3 cards, if they form a set, they will be replaced and the score will increase by one. If they do not form a set, they will automatically deselect. The timer continues until it runs out, and if you score above 10 points in 2 minutes, you will see the "Congrats" screen. Then, you can press the button to dispense candy.
After coding the majority of the game on python in Visual Studio Code, most of the challenges came from syncing up the displays from tkinter onto the SPI screen. In Visual Studio Code, I coded the game using root in the tkinter package and to display the game on a pop-up window. Then, for the cards and visuals, I made almost everything into buttons. This presented a challenge because in order for what I coded to pop up on the SPI screen, I had to import additional packages and start an X session. More detailed steps are detailed in the Ready, Set, Nerds! Github. After getting the SPI screen to display the tkinter GUI, I was unable to progress to the next screen due to the SPI screen not having the touchscreen wired up. I connected the SPI screen's X+, X-, Y+, and Y- ports to the proper PocketBeagle ports, but wasn't able to get the x- and y-coordinates without additional code. In the time given, I was unable to figure out how to do so with accuracy, but a future improvement would be to get the touchscreen working so that the game buttons work properly. This could also done by adding the Adafruit Resistive Touch Screen Controller, but even then, due to the small size of the buttons, a larger screen or more specific touchscreen will likely be needed.
Some more future improvements could be adding different difficulties (easy: score 3 points, medium: score 5 points, hard: score 10 points), setting a daily limit for how many times you can play the game, and adding an IR beam sensor into the candy storage funnel to alert the player when to refill the funnel.
Overall, this project has allowed to immensely improve my coding and electrical engineering skills and how fun it is to do both. Thank you to Professor Erik Welsh for helping troubleshoot my project and provide guidance and help along the way.


Comments
Please log in or sign up to comment.