


Hardware components | ||||||
 |
| × | 1 | |||
 |
| × | 2 | |||
 |
| × | 2 | |||
 |
| × | 1 | |||
 |
| × | 1 | |||
 |
| × | 1 | |||
 |
| × | 1 | |||
| × | 1 | ||||
| × | 1 | ||||
| × | 1 | ||||
| × | 1 | ||||
Software apps and online services | ||||||
 |
| |||||
| ||||||
Hand tools and fabrication machines | ||||||
 |
| |||||
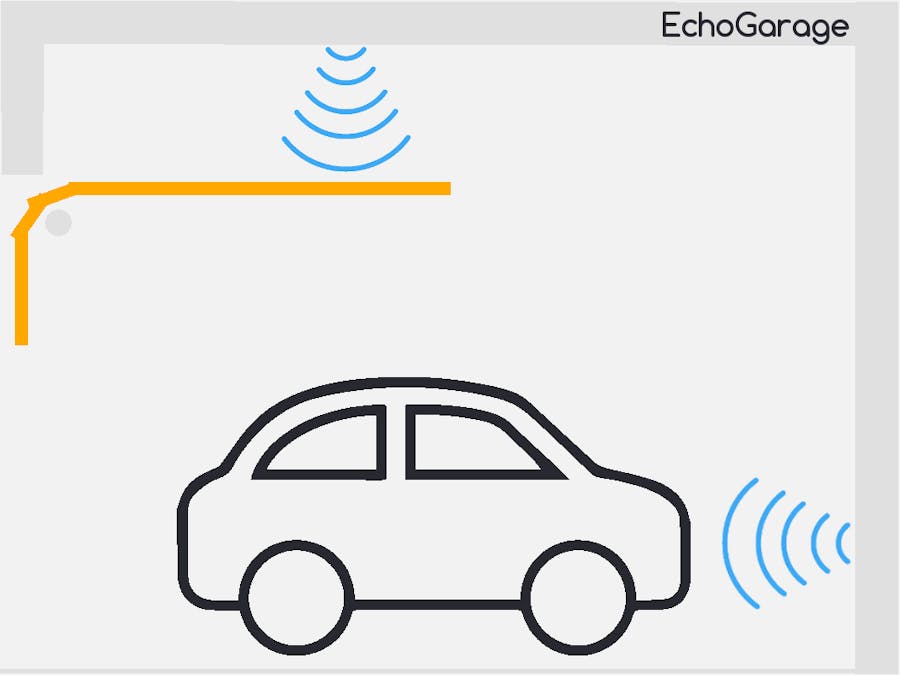
EchoGarage is a universal cloud-based garage controller with remote door opener and parking assistant. EchoGarage is powered by the ESP8266 chip and the Arduino IDE for programming. It supports remote access through the cloud-based thinger.io platform.
A wireless garage door opener is not a new concept. In fact, there are a handful of approaches out there. But garage is not only the door! There is also a car and a lot of stuffs around all usually packed in a very small place. So, it would be nice if we could monitor the door and at the same time we could have a parking assistant. Here is when the idea for EchoGarage came up!
Besides other aspects of technical details, the discussion about which type of monitoring sensors might serve a garage controller better has been very limited. I think that ultrasound sensors are very handy, flexible and reliable tools for garage monitoring. They can monitor both the door state and also the presence of your car. In addition they are the best solution if you want a garage parking assistance system.
So, if you want a portable, easy to install and reliable solution for remote controlling your garage then EchoGarage will be your next project!
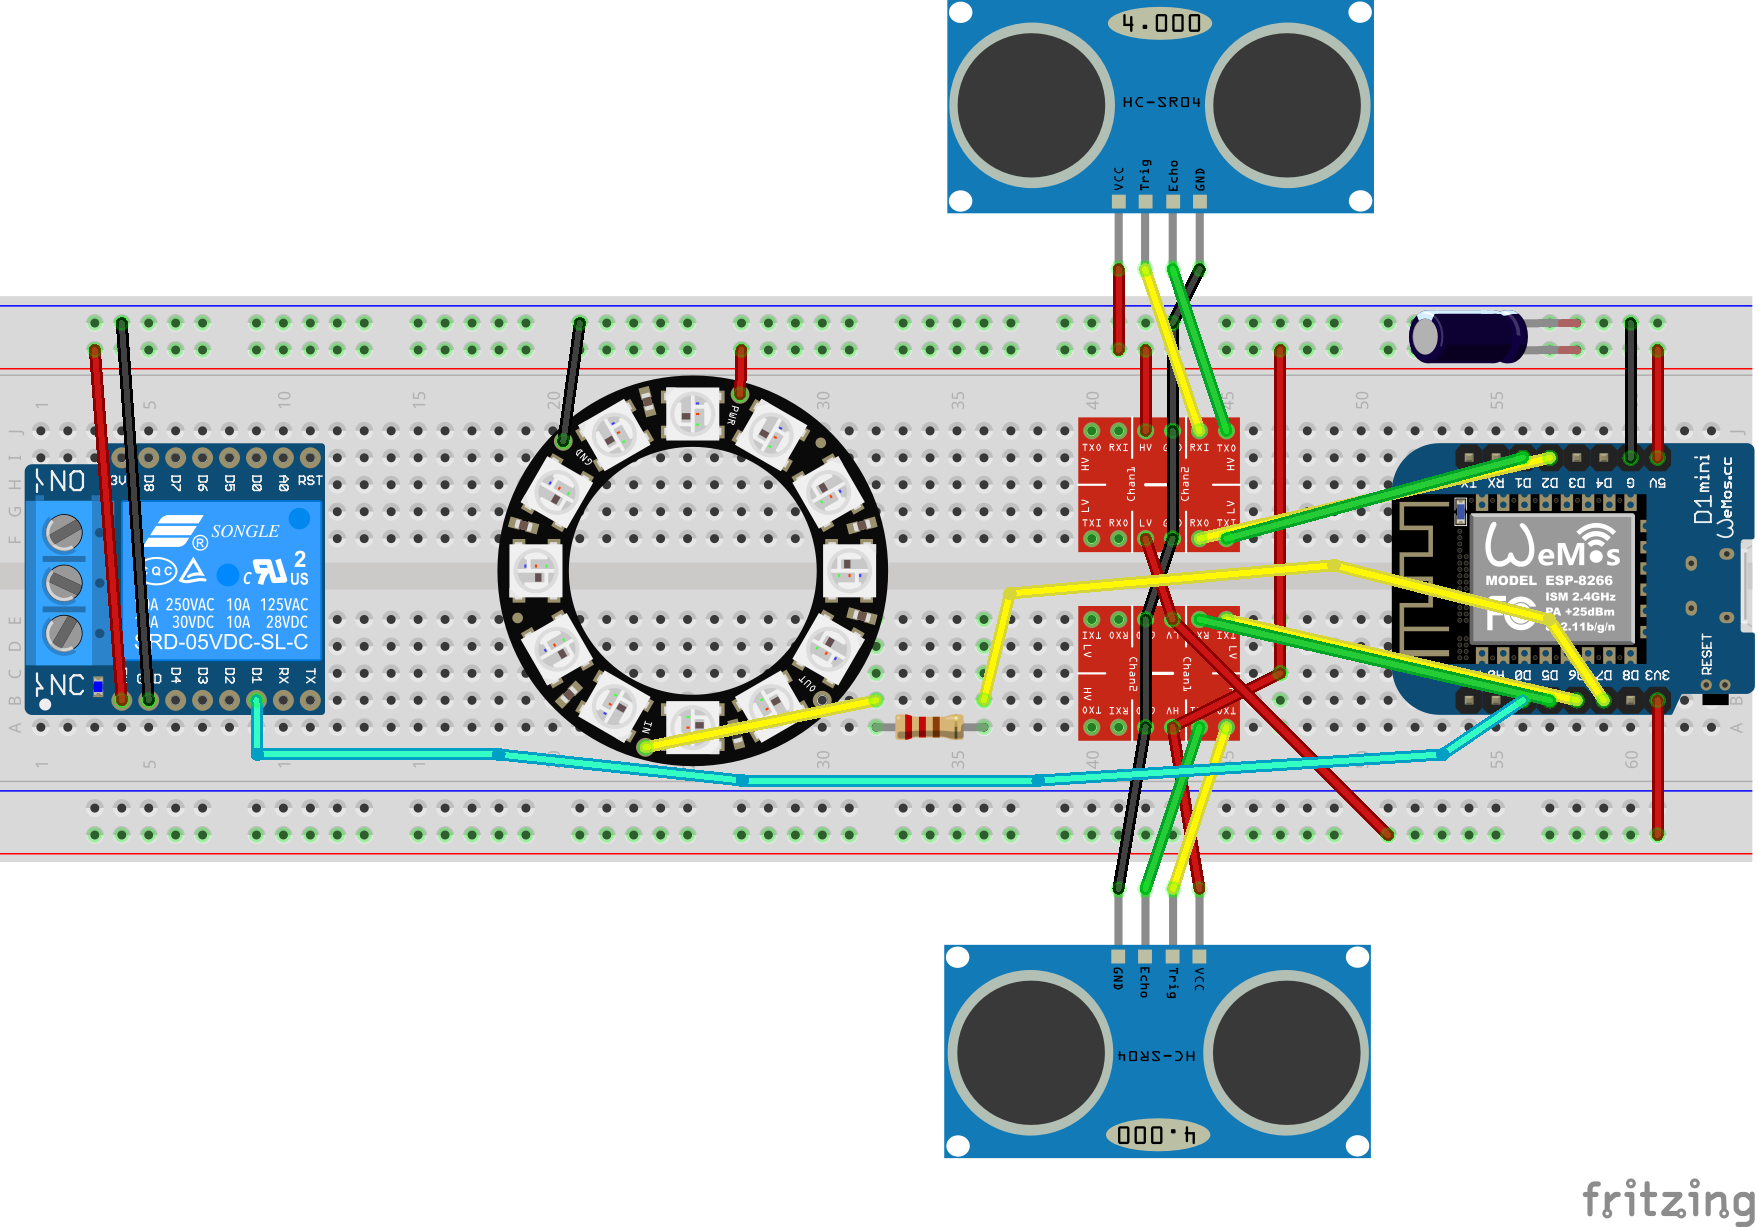
HardwareIs really simple. It consists of:
- WeMos D1 mini board based on ESP8266
- HC-SR04 ultrasonic distance sensors
- Logic Level Converters
- Relay board
- Neopixel ring
I followed a modular design approach for the ultrasonic sensors. They stands by themselves separate from the main controller using a long cat 5e ethernet cable. In my set-up I used 10 meter cable but I expect that they will work well in a distance up to 20 meters! This way it is very easy to find the ideal position for your sensors.
- Display of current door status plus time interval since door was opened.
- Display of current car status plus time interval since car was out.
- Door and car states changes over time (time series widget).
- Push button for triggering garage door actions.
- Email Alerts if door remains open for a certain period of time (configurable).
- Email Alerts if car remains out for a certain period of time (configurable).
- Auto-Close door feature (configurable).
- Data Storage plus Export (Logging of door and car states plus time-stamp).
- Secure SSL/TLS connection between ESP8266 and thinger.io server.
I used a beautiful neopixel ring as a visual aid for parking assistance. Every time your car approaches the right parking position the neopixel ring is flashing green with a nice theatre chase effect. When the car is too close to the wall the colour turns out red.
SoftwareThe first step to start building EchoGarage is to properly configure the Arduino IDE. I used the v1.8.1 for building this project, so I cannot guarantee that it will work with previous versions. Then, install Arduino core for ESP8266 WiFi chip using Boards Manager (v2.3.0):
- Start Arduino IDE and open Preferences window.
- Enter http://arduino.esp8266.com/stable/package_esp8266com_index.json into Additional Board Manager URLs field.
- Open Boards Manager from Tools > Board menu and install esp8266 platform (and don't forget to select WeMos D1 mini from Tools > Board menu after installation).
You will need to install some extra libraries into the Arduino IDE:
- WiFiManager.h (v0.12). Install through Arduino Library Manager or download from github repository https://github.com/tzapu/WiFiManager.
- ThingerWebConfig.h (v2.7.1). Install through Arduino Library Manager or download from github repository https://github.com/thinger-io/Arduino-Library.
- NewPing.h (v1.8). Download from http://playground.arduino.cc/Code/NewPing.
- SimpleTimer.h. Download from http://playground.arduino.cc/Code/SimpleTimer.
- Adafruit_NeoPixel.h (v1.0.6). Install through Arduino Library Manager or download from github repository https://github.com/adafruit/Adafruit_NeoPixel.
Now you are ready to upload the EchoGarage firmware to ESP8266. Just copy-paste my code into a new Arduino sketch and click upload (don’t forget to first connect EchoGarage into your PC USB port).
MountingThe door module is typically mounted to the ceiling at the garage, with the ultrasonic sensor facing down preferably near to the garage door. When the garage door is closed, it reads the distance to the ground. When the door opens and comes up, the sensor reads the distance to the door, which is a much smaller value. So by checking the distance value, it can tell if the door is open or closed. For door module to properly work you must adjust the Door Distance Threshold widget in order to reflect your garage setting. For example, if the distance between ultrasonic sensor (ceiling) and your garage door (open state) is 30cm you should set the Distance Threshold about 40cm (try and see for best results!). For roll-up garage doors, the ceiling mount would not work. Instead, you can mount it to the side of the door, with the sensor facing the outside. This way the logic is reversed: if the distance reading is small, it means the door is closed, and vice versa.
The car module is typically mounted to the wall just in front of your car parking position. Preferably you should adjust the ultrasonic sensor hight to line up with the car bumper. From inside the Dashboard you should configure the distance according to your car position. The logic is the same as with Door sensor. For example, if the distance between ultrasonic sensor (wall) and your car bumper is 40cm you should set the Distance Threshold about 50cm (try and see for best results!).
Interfacing with Garage Door System. EchoGarage uses a relay to simulate door button clicks. For most garage door systems, you can simply connect the two wires from the Relay output to where you would normally insert your door button wires into.
Initial Set-upBefore proceeding, it’s recommended that you create a thinger.io account, log in, and then register a device. Follow the instructions at http://docs.thinger.io/console/#-adding-devices, keep safe your device credentials (you’ll need these later). EchoGarage is powered by a microUSB cable. At default settings, it boots into Access Point (AP) mode, creating a WiFi network named Thinger-Device. Use your phone or a computer to connect to this network using “thinger.io” as WiFi password. Wait for the configuration window or open a browser and type in 192.168.4.1 to access the AP homepage. You will see a list of nearby WiFi networks scanned by the controller. Configure the wifi where the ESP8266 will be connected, and your thinger.io device credentials. Your EchoGarage should be now connected to the platform.
Thinger.io Console Set-upYou should login to your thinger.io account. Go to Dashboards page and create a new one. Add nine widgets and configure their settings accordingly (choose colours as you like!).
Door State widget:
Type = Text/Value, Text Value = From Device, Select Device = <Your Device>, Select Resource = door&car_states_timeIntervals, Select Value = Door, Refresh Mode = Sampling Interval (1s).
Car State widget:
Type = Text/Value, Text Value = From Device, Select Device = <Your Device>, Select Resource = door&car_states_timeIntervals, Select Value = Car, Refresh Mode = Sampling Interval (1s).
Distance widget:
Type = Time Series Chart, Chart Input = From Device, Select Device = <Your Device>, Select Resource = door&car_distances , Select Fields to Plot = Door & Car, Refresh Mode = Sampling Interval (1s), Time Period = 1 hour, Options = Axis & Legend & Fill Splines.
Push Button:
Type = on/off State, Select Device = <Your Device>, Resource name = relay.
Door Threshold widget:
Type = Slider, Select Device = <Your Device>, Resource name = maxDoorDistance , Min Value = 1, Max Value = 255, Step Width = 1.
Car Threshold widget:
Type = Slider, Select Device = <Your Device>, Resource name = maxCarDistance, Min Value = 1, Max Value = 255, Step Width = 1.
Door Alert widget:
Type = Slider, Select Device = <Your Device>, Resource name = doorAlertInterval, Min Value = 0, Max Value = 255, Step Width = 1.
Car Alert widget:
Type = Slider, Select Device = <Your Device>, Resource name = carAlertInterval, Min Value = 0, Max Value = 255, Step Width = 1.
Auto-Close widget:
Type = Slider, Select Device = <Your Device>, Resource name = autoCloseInterval , Min Value = 0, Max Value = 255, Step Width = 1.
Then, go to Endpoints page and add two new ones with the following settings:
Endpoint Identifier = doorAlert, Endpoint Type = Email, Email Address = <Your email>, Email Body = Send device data as JSON.
Endpoint Identifier = carAlert, Endpoint Type = Email, Email Address = <Your email>, Email Body = Send device data as JSON.
Finally, you should go to Data Buckets page and add a new one with the following settings:
Bucket id = bucket_1, Enabled = Yes, Data Source = From Write Call.
Enjoy!!


_3u05Tpwasz.png?auto=compress%2Cformat&w=40&h=40&fit=fillmax&bg=fff&dpr=2)
Comments
Please log in or sign up to comment.