Flowerpot SmokerTo build the basic smoker you will need a large ceramic flower pot, the largest you can find. The idea of using a flower pot is that the ceramic walls retain moisture as well as heat — which is ideal for slow cooking. You will need a lid for the smoker too: a matching base will do fine, but a ceramic bowl of the right width or duplicate flowerpot turned upside down will allow taller objects on the grate.
Prop the flower pot on ceramic feet or otherwise arrange it so that air can come up through the drain hole. Then take a single ring electric burner. Remove the element from its casing and reconnect the spade connectors directly to the electric cord, bypassing the temperature dial. Put the burner in the bottom of the flower pot and feed the cord out of the drain hole. You may need to lay the element on a brick to get it level. Next put a metal tray of wood chips on the burner. A pie pan will do fine, but avoid anything with a nonstick surface. Finally prop a circular BBQ grate inside the flower pot. Watch this video to see the master at work:
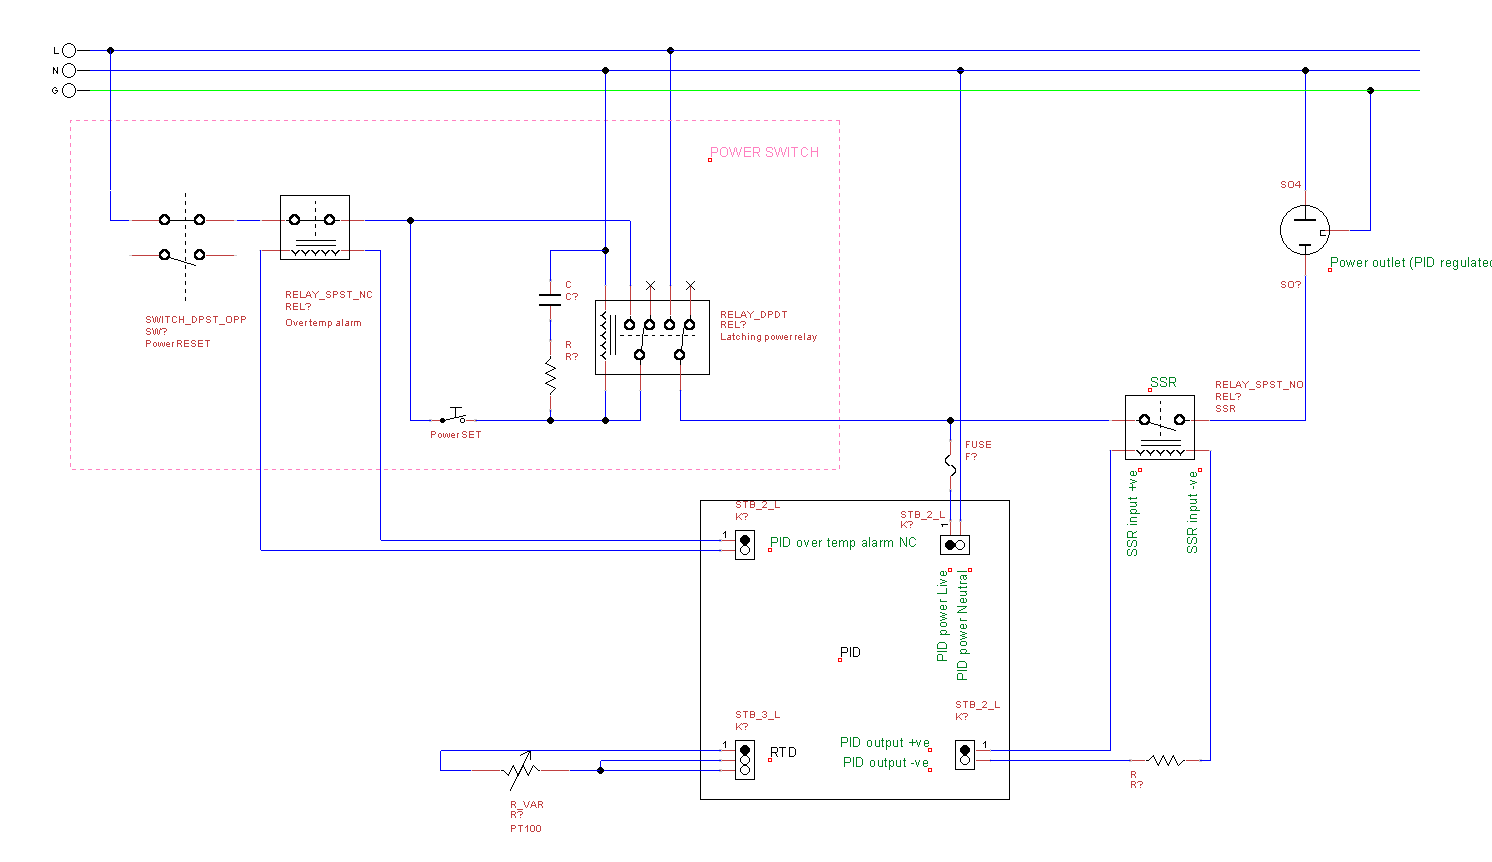
Temperature ControllerThe heating element will be governed by a PID controller that is connected to a solid state relay (SSR). A PT100 temperature probe measures the temperature inside the flowerpot. Check to see that the controls will fit in a 6" x 6" x 4" PVC junction box. Once you have figured out where everything will go, cut a hole for the SSR heatsink so that it can be mounted on the outside. You will also need to drill or cut holes for the PID panel, a receptacle to plug in the burner, the power cord, a fuse to protect the controller, on/off switches, and the temperature probe. I used separate on and off switches connected via a power relay, but a simple rocker switch will do fine as long as it is rated for 110 V and 15 A. Female and male 3 pin XLR connectors are great for attaching the probe using microphone cable. I recommend protecting the outlet receptacle from the weather with an in-use cover.
To assemble the controller box, use the circuit schematic below. If you don't already have them, you will need a soldering iron and a crimper to make the electrical connections and a multimeter to test them. An electric drill will be useful for making holes in the box and attaching screws.
Get CookingWith automatic heating you can take the fiddling and guesswork out of using your smoker...and still have an excuse to hang out in the garden drinking beer. Put damp wood chips in the pan, slap your favorite cut of meat on the grate, and set the required temperature on the controller. Then sit back until the food is ready. A probe thermometer can be used to monitor the internal temperature of the meat.
Perhaps try customizing the smoker to your personal requirements. A simple way to ventilate the smoker is to drill small holes in the lid using a masonry bit and cover them when necessary with stones. While you're at it, make another hole for the temperature probe. A handle for the lid is a very useful feature. To make a mobile BBQ station, cut a circular hole in a butcher block using a jigsaw or router and mount the flowerpot inside.
Did you know? You can also use the PID controller to cook sous vide using a crockpot or electric kettle.
SafetyPlease remember to use mains electricity safely. The controller is designed to provide some protection against the weather, but it is not completely waterproof. Always plug the controller into a GFCI protected receptacle when cooking. Undercooked food can cause illness: calibrate your probe if what you are cooking requires accurate temperature measurement.
Construction tipsThis project requires specialist knowledge. Do not attempt to build the controller unless you can competently wire up electricity mains. The flowerpot smoker itself is easy to assemble. The 110 V supply is potentially dangerous.
In The Press 


Comments
Please log in or sign up to comment.