The Problem: Children are becoming more addicted to smartphones day by day and usually watch cartoons, youtube, and play games. In Bangladesh, kids spend over three to four hours a day on screens. A study found that screen time impacts the physical structure of children’s brains, as well as their emotional development and mental health. Unless we get control of the screens which now absorb so much of our kids’ time, it will indirectly destroy our future generation.
The Solution: Robot always attracts a child. With added voice interactivity a robot can be a dream machine for a child. Definitely, it will attract children more than a smartphone. To bring out the children from screen addiction I made a robot. The robot has the following features:
- It can be driven through voice command.
- Children can ask the robot to make different sounds like fire service cars, ambulance, police cars even the sound of different animals.
- A child can ask the robot to tell stories, poems, joke and play music.
- The robot is able to tell the surrounding environmental parameter like temperature, humidity, air pressure, and UV light.
- The robot can show different directions like east, west, north, south and also be able to align itself in a specific direction.
Different types of ready-made chassis are available in the market and you can buy one. I made one myself using the ebonite board and I added some pictures of how I made the chassis. I used one ball caster and two small sizes DC gear motor for the chassis. DC geared motors are fixed to the bottom plate using supper glow.
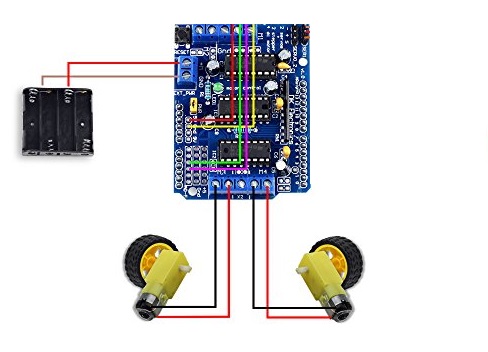
For driving the motors of the robot I used Adafruit Motor Shield v1.0 and Arduino Uno.
The driver is capable to drive 4 dc motors. I used M3 and M4 connector to drive two motors of my chassis. The Arduino will receive power from raspberry pi but motor drivers required an external power supply. I added two 18650 Li-ion cells for powering the motors.
For talking with the children the robot required speaker. I placed two 3W speaker with a mini amplifier board to the robot. The speakers will be connected to the Raspberry Pi through a 3.5mm audio port. We will connect Raspberry Pi in the next step.
Matrix Creator and Raspberry Pi are the two main hardware units for our project. Raspberry Pi will host the Snips voice platform and communicate with Arduino and Matrix Creator. Matrix creator act as a microphone of raspberry pi, provide sensor data and drive the led ring.
Matrix Creator case is 3D printed and the 3D file can be downloaded here: https://www.thingiverse.com/thing:2872527
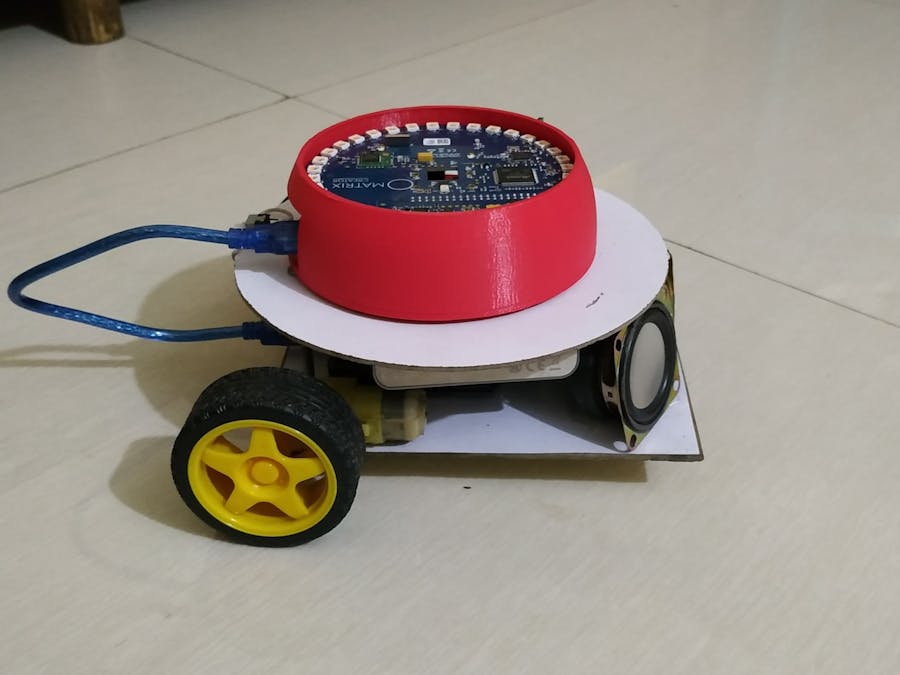
After placing the Raspberry Pi and Matrix Creator inside the case it looks like as follows:
Though Arduino drives the motors but for the directions, it depends on Raspberry Pi. Raspberry Pi sends the command through serial port and according to serial command Arduino sends the signal to motor driver. Arduino also receives the power from Raspberry Pi by the serial port.
Raspberry Pi required 5V stable power supply and the current capacity of the power supply should be at least 1.5A. I used a 2A power bank for providing power to Raspberry Pi.
The capacity of the power bank is 10000mAh. The audio amplifier also gets power from the power bank.
After completing all the connection the robot looks like the following pictures.
From the front side it looks like:
Side view of the robot:
For enabling the voice interaction I developed an application using the Snips platform. For making your own app go to https://console.snips.ai/ and develop one. It's Free.
I made five Intents for the app.
Every Intent has a dedicated slot and has several training examples.
You can install the app from the Snips app store using the following link:
https://console.snips.ai/store/en/skill_KpPYQxAwApk
For Raspberry Pi image I used MATRIX Kit image from the link: https://drive.google.com/file/d/1cTpKiyAIc9RxfF1shW3F1oBBJjAdkZu_/view?usp=sharing
Matrix Core is preinstalled in the image.
For developing action code I used Python. All the sources are added in the code section.
To learn how to make an App using Snips follow the link: https://docs.snips.ai/getting-started/quick-start-console
To configure Snips for Raspberry Pi follow the link:
https://docs.snips.ai/getting-started/quick-start-raspberry-pi
Python Template of the action code is here:
https://docs.snips.ai/articles/platform/create-an-app/python-template
Thanks for reading this tutorial. Thank MATRIX Creator and Hackster for providing me the Super Cool Matrix Creator.


_ztBMuBhMHo.jpg?auto=compress%2Cformat&w=48&h=48&fit=fill&bg=ffffff)


_3u05Tpwasz.png?auto=compress%2Cformat&w=40&h=40&fit=fillmax&bg=fff&dpr=2)
Comments
Please log in or sign up to comment.