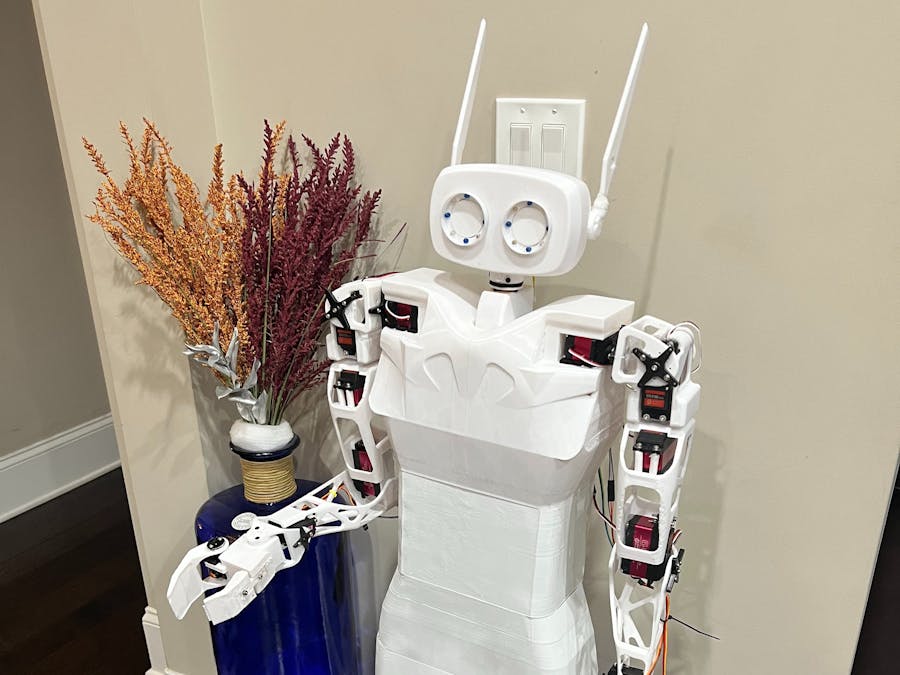
This project revolves around the creation of a humanoid robot, a pursuit I embarked upon due to my profound passion for this innovative technology. While scouring the internet, I realized a dearth of affordable and sizeable options in the field of humanoid robots, prompting me to take matters into my own hands. Consequently, I undertook the ambitious task of constructing one myself.
Given my status as a high school student, financial constraints and limited resources hindered my ability to engineer a walking humanoid robot. Therefore, I engineered a design where the robot moves via wheels, reminiscent of the renowned Pepper robot. The development process spanned approximately two months, encompassing phases of meticulous design, 3D printing, intricate wiring, and complex coding.
Remarkably, the total expenditure incurred in the creation of this robot hovers around the $500 range, rendering it remarkably accessible for many enthusiasts. Employing a CR-10 printer for the fabrication, it's worth noting that the printed parts might require some refining through sanding, as the design takes inspiration from the Poppy humanoid while featuring the distinctive Reachy Humanoid head.
While the robot boasts ROS (Robot Operating System) capabilities, my current lack of proficiency in ROS compelled me to opt for programming using an Arduino. Additionally, I integrated the potential to utilize a HiWonder servo controller, complemented by a PS2 handle, thereby enabling the programming of a myriad of functions and actions.
The robot does use some unorthodox methods like drilling a hole into the bottom of a servo to add a bolt:
The roller base for the robot is made from wood and has caster wheels at the end of it and there is a PVC pipe that runs through the body for extra support
SYSTEMS CONTROL:
In terms of systems control, it is capable of running ROS with a Raspberry pi. However as of now, I choose to run it on a Hiwonder 24 Channel Digital Servo Controller, this allows me to precode functions and then replay them with a PS2 handle. This choice is preferable for those who want to build robots but don't have the knowledge to code it.
In terms of assembly, i used a ender 3 and cr-10 to print the pieces, if you are going to use a ender 3 make sure to cut the pieces before printing. After printing when attaching the pieces, i used super glue and a soldering iron, where i super glued the pieces together then melted the 2 plastic pieces together in the back.
For the elbow of the robot, there is a little plate with a peg you will have to print and hot glue to the back of the servo, this is surprisingly structural enough.
To make the arm pivot right and left it is nessesary to cut some plastic off of then to add the circle horn and attach it to the shoulder piece
For the neck there is a servo cover to make the head rotate, you will first have to screw in the servo then hot glue the cover to the neck slot. And for the next there will be a little piece that fits into the neck and attaches to the servo horn, it will need to be screwed in to attach it firmly to the head.
Additional Info: https://www.instructables.com/Sparky-the-Open-Source-Humanoid-Robot/


Comments
Please log in or sign up to comment.