This project allows a swim coach to help the swimmers keep track of the interval through a web app connected to a Particle Photon. Implemented as a wearable, the coach can also monitor swimmer's performance.
Step 1: Start a Web ServerBecause we will be using a web interface, we need a web server to host the files. For development and testing we can use our local device, but if you want to use it outside you may want to setup a dedicated web server.
To get a web server running on your local machine, you can use the Python Simple HTTP Server module. Open up the command line and check to see if Python is installed. Type:
python --version
If that gives you a version number, then you're good to go! If not, download Python here.
Once you have Python installed, start the Simple HTTP Server. Type:
python -m SimpleHTTPServer
Now go to your favorite browser. In the address bar, type "localhost:8000". You should see something similar to this:
It should also show all your files in the current directory. Great! You now have a local web server running.
Step 2: Load the Files onto the Web ServerNow go to my GitHub repo with the code. Download the.ZIP file and unzip it. Now in the command line, cd into the folder with the code. It should look something like this:
cd Downloads
cd Swim-Console-master
Now start the web server like before.
python -m SimpleHTTPServer
Going back to the browser, you should now see the Swim Console page!
Step 3: Setup the PhotonIf your Photon is already connected to the cloud and linked to your account, you can skip this step. Otherwise, follow the instructions at particle.io/start.
In the Particle Web IDE, copy/paste the contents of the swim.ino file or the code below into the IDE. Give it a name, and then save it. Check if your Photon is powered, then flash the code.
//## setup variables
int buzzer = D7;
String valRounds;
String valInterval;
int interval = -1;
int rounds = -1;
int seconds = -1;
int minutes = -1;
int remain = -1;
//## setup functions
//## set rounds function
int setRounds(String arg) {
   valRounds = arg;
   //Particle.publish(valRounds);
   return 1;
}
//## set interval function
int setInterval(String arg) {
   valInterval = arg;
   //Particle.publish(valInterval);
   return 1;
}
//## actually start doing stuff function
int start(String arg) {
   //## more setup stuff
   interval = valInterval.toInt();
   rounds = valRounds.toInt();
   //Particle.publish("rounds",String(rounds));
   String strMinutes = valInterval;
   minutes = strMinutes.remove(2).toInt();
   //Particle.publish("minutes", String(minutes));
   String strSeconds = valInterval;
   seconds = strSeconds.remove(0,2).toInt();
   //Particle.publish("seconds", String(seconds));
   int milliseconds = (minutes*60000)+(seconds*1000);
   //Particle.publish("milliseconds",String(milliseconds));
   remain = rounds;
   //## actually doing stuff
   for (int i=0; i<rounds; i++ ){
       beep();
       remain = remain-1;
       delay(milliseconds);
   }
   //## so they won't think we are ignoring them
   return 1;
}
//## even more setup
void setup()
{
   //## just for debugging
   //String test = "1234";
   //Particle.publish(String(test.remove(0,2).toInt()));
   //## set pin mode
   pinMode(buzzer, OUTPUT);
   //## setup cloud functions and variables
   Particle.function("rounds", setRounds);
   Particle.function("interval", setInterval);
   Particle.function("start", start);
   Particle.variable("roundsGET", rounds);
   Particle.variable("intervalGET", interval);
   Particle.variable("remain", remain);
   //## just for good measure
   digitalWrite(buzzer, LOW);
}
//## beeping function
void beep(){
   digitalWrite(buzzer, HIGH);
   delay(1000);
   digitalWrite(buzzer,LOW);
}
void loop()
{
   //## nothing to see here!
}
Once the Photon is linked to your account, you should be able to see the device ID. In the Particle Web IDE, go to the 'Devices' tab. Click on the little arrow next to your Photon and copy the device ID.
Then, go back to the web server and update the 'script.js' file to reflect the device ID.
Do the same with the access token, found in the 'Settings' tab of the Web IDE.
Step 6: Test the Setup!Now let's test the whole thing. Plug the Photon into power and let it boot up. Then start the web server in the Swim-Console-master directory and navigate back to localhost:8000. Clicking 'Update' should show -1 for all values. Typing some set info into the fields and hitting 'Send' should send the data to the Photon. Then, when you hit 'Start Set', the Photon's built in LED should blink. Then, hitting 'Update' should update the information.
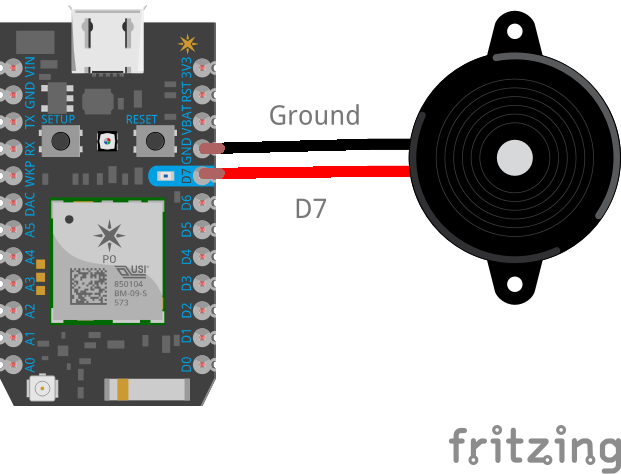
Now that everything works, you can add the buzzer to the Photon. Wire up ground to ground and positive to pin D7.
Great! You're all done!
Going FurtherThis project is fairly bare-bones and there is a lot you can add or change depending on your habits. Make it a wearable, and allow the coach to monitor heart rate, speed, or breathing rate. Make it so that it can monitor the lap time, or add a clock directly to it. All this and more can be done with a few modifications to the code and adding some hardware.


Comments
Please log in or sign up to comment.