


Hardware components | ||||||
_zhWsCcSEcl.jpg?auto=compress%2Cformat&w=48&h=48&fit=fill&bg=ffffff) |
| × | 3 | |||
 |
| × | 1 | |||
 |
| × | 1 | |||
 |
| × | 1 | |||
 |
| × | 3 | |||
 |
| × | 13 | |||
 |
| × | 1 | |||
| × | 1 | ||||
Software apps and online services | ||||||
 |
| |||||
 |
| |||||
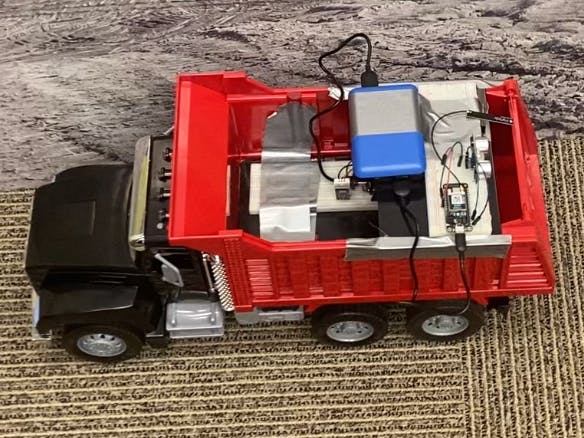
As kids, messing with RC cars was a common hobby for everyone in the group. Racing them, having them go as fast as possible, testing their durability, and tweaking the cars themselves in anyway to make them better. For our IOT project we decided to take a regular remote controlled truck and add temperature, humidity, and ultrasonic sensors. The main goal for this project was to have a car that could display the distance from an object and give accurate temperature readings. Also along with the ultrasonic sensor we have included an LED that will illuminate when the vehicle is within 20 cm of an object.
FirstStep: Creating the Circuits
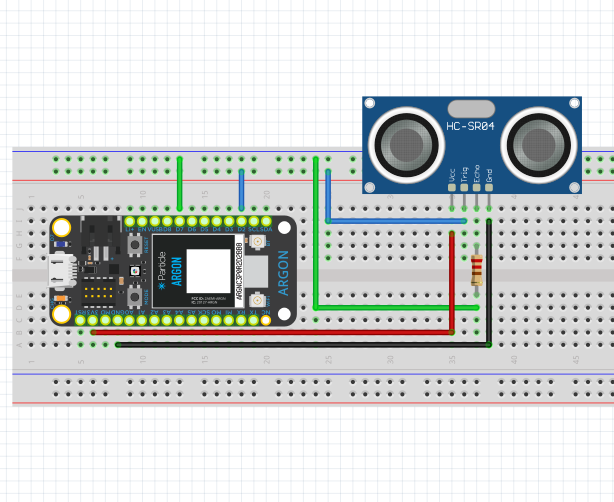
UltrasonicSensor:
The Ultrasonic Sensor is the model HC-SR04. The Vcc connects to the 3.3V pin and the trig pin connects to the D2 pin. The echo pin connects to a 220 ohm resistor to lower the voltage and minimize to possibility of damaging the sensor. The resistor then connects directly to the D6 pin. Finally the GND pin on the sensor connects to the GND pin on the Argon.
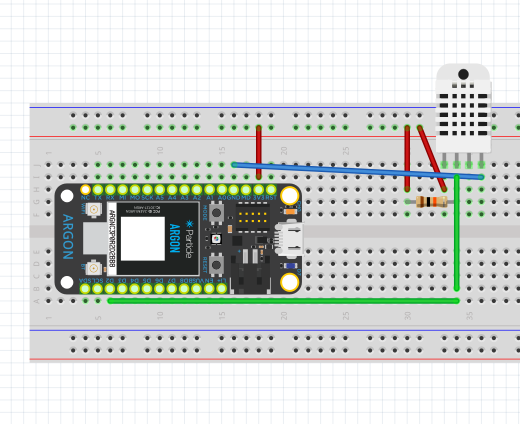
Temperature and Humidity Sensor:
The DHT sensor is the model AM2302 (same specs as the DHT22 sensor, just no NULL pin), with the pins +, OUT, and -. The - pin connects directly to the GND pin on the argon. The OUT pin connects directly to the D2 pin on the argon. The OUT pin also connects in series with a 10k ohm resistor, the + pin, and the 3V3 pin on the argon.
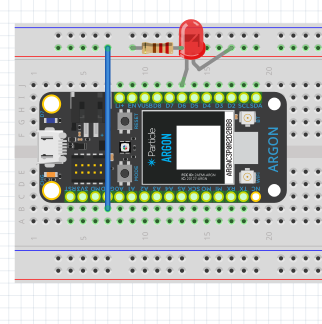
LEDcircuit:
Using a breadboard, the particle argon is situated into the breadboard. The LED is placed on the same rail as D6 of the argon along with a 220 ohm resistor to drawn down the voltage. Doing this helps regulate the voltage to the LED since and LED can only handle voltage between 1.8 and 3.3 volts.
SecondStep: Writing the Code
UltrasonicSensor:
The code for the HC-SR04 sensor includes the ThingSpeak code from the Particle Community Library. The code begins by defining the pins, echo and trig, and the variables, duration and distance. The Channel Number and Write API Key for the ThingSpeak channel also need to be defined for the data to be graphed in real time. In the void setup you need to begin the ThingSpeak client and set the trig pin as output and echo pin to input. You also need to set the rate that data is sent using serial.begin. In the void loop you need to set the trig pin digitalWrite LOW with a 2 microsecond delay and then a digitalWrite HIGH with a 10 microsecond delay. This triggers the ultrasonic sound pulse. Set the duration as the pulse of the echo to get the time between producing the sound wave and receiving the sound wave after it reflects off an object. Multiplying the duration by (.034/2) converts the duration to distance in centimeters. Next insert the an if statement to detect if the distance is less than 20 centimeters. If the distance is less 20 centimeters it will particle publish a function to the led Argon that will turn on a red led. If the distance is greater than 20 it will particle publish a function to turn on the led. Create the ThingSpeak.writeField to plot the data onto the thingSpeak graph. Particle publish the distance to send the data to the particle cloud, and set a delay of 20000 microseconds to collect data every 20 seconds.
Temperature and Humidity Sensor:
The code for this sensor initially includes an Adafruit DHT sensor code and Thingspeak code from the library, as these were important for building the foundation of the circuit's function, as well as its mapping capabilities. The data writing interval was made 20 seconds because the Thingspeak program takes around 15 seconds to update with new data. Thing speak was the tool we used in order to graph the data taken from the sensor. The data includes the API key and the channel ID for both the temperature and humidity data. The data was also published to Particle Publish, however this information was only used to check the data from the sensor in the intermediate stages.
LEDcircuit:
To get the LED to flash on when the ultrasonic sensor reads a value of 20 cm or less, the argon needs to be able to receive data through the particle cloud. The ultrasonic sensor makes use of particle.publish() to send the data to the cloud. From there the code for the LED uses particle.subscribe() to receive the data and once the output of the sensor reads 20 cm or less the LED will flash on.
Flow Chart: This chart describes the general direction of traffic between each particle argon and towards the live data connection service, Thingspeak.
FinalStep: Putting Everything together and Demonstrating the outcome
Temperature and Humidity Graphs:
Temperature Live Graph: https://thingspeak.com/channels/1942926
Humidity Live Graph: https://thingspeak.com/channels/1957059
Proximity Graph:
Proximity Live Graph: https://thingspeak.com/channels/1944966
Temperature-Humidity Sensor Circuit
Ultrasonic Sensor Circuit


Comments
Please log in or sign up to comment.