Suraj GehlotDhiraj Gehlot
Published

Swarm Bots: Assembly and Co-operative Transport

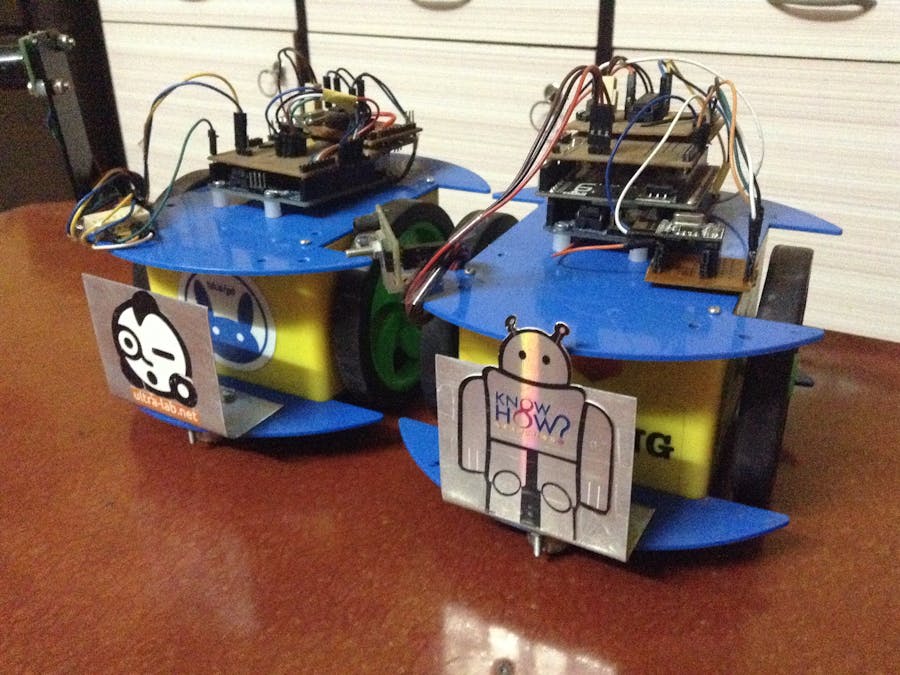
Objective of the Swarm-bots project is to study controlling the bot so assemble themselves, avoid obstacle and synchronization between bots.

BeginnerFull instructions provided14,950
Swarm Bots: Assembly and Co-operative Transport

Things used in this project

Hardware components

Arduino UNO
Arduino UNO
The master and slave are two arduino based bots, which cooperate together to carry out the desired task- in our case transportation of heavy objects. The master controls the movement and actions of the slave through the RF module.
×1
1Sheeld
1Sheeld
Gamepad control application in 1sheeld is use to control master bot.
×1
nRF24 module
The communication between the master and the slave takes place through the RF module. The Master sends the desired command through the transmitter module, which is received and followed by the Slave through the receiver module attached to it.
×1
Photodiode+LED
This is the eye of the bots. Obstacle avoider helps the bots to avoid unwanted obstacles and also prevents collision against each other. It comprises of a system of photodiodes and LEDs, which are placed on the master and the slave respectively
×1
LV-MaxSonar
Ultrasonic sensors are in air, non-contact object detection and ranging sensors that detect objects within an area. These sensors are not affected by the color or other visual characteristics of the detected object. Ultrasonic sensors use high frequency sound to detect and localize objects in a variety of environments.
×1

Story

Read more

Schematics

PCB shield: Interfaced all component in pcb

All components are interfaced in one pcb

Top

Code

Swarm Transmitter

C/C++
/*
   1 - GND
   2 - VCC 3.3V !!! NOT 5V
   3 - CE to Arduino pin 9
   4 - CSN to Arduino pin 10
   5 - SCK to Arduino pin 13
   6 - MOSI to Arduino pin 11
   7 - MISO to Arduino pin 12
   8 - UNUSED
   - 
   Analog Joystick or two 10K potentiometers:
   GND to Arduino GND
   VCC to Arduino +5V
   X Pot to Arduino A0
   Y Pot to Arduino A1
   
 - V1.00 11/26/13
   Based on examples at http://www.bajdi.com/
   Questions: terry@yourduino.com */

/*-----( Import needed libraries )-----*/
#include <OneSheeld.h>

#include <SPI.h>
#include <nRF24L01.h>
#include <RF24.h>
/*-----( Declare Constants and Pin Numbers )-----*/
#define CE_PIN   9
#define CSN_PIN 10
#define JOYSTICK_X A0
#define JOYSTICK_Y A1
int LeftMotorForward = 7; // Pin 10 has Left
int LeftMotorReverse = 6; // Pin 9 has Left Motor
int RightMotorForward = 5; // Pin 12 has Right
int RightMotorReverse = 4; // Pin 13 has Right
// NOTE: the "LL" at the end of the constant is "LongLong" type
const uint64_t pipe = 0xE8E8F0F0E1LL; // Define the transmit pipe
float Inch=0.00;
float cm=0.00;
int SonarPin=A5;
int  sensorValue;

/*-----( Declare objects )-----*/
RF24 radio(CE_PIN, CSN_PIN); // Create a Radio
/*-----( Declare Variables )-----*/
int joystick[1];  // 2 element array holding Joystick readings


void setup()   /****** SETUP: RUNS ONCE ******/
{
    OneSheeld.begin();

//  Serial.begin(57600  );
 pinMode(LeftMotorForward, OUTPUT); //initialize the pin as an output.
pinMode(RightMotorForward, OUTPUT); //initialize the pin as an output.
pinMode(LeftMotorReverse, OUTPUT); // initializethe pin as an output.
pinMode(RightMotorReverse, OUTPUT); //initialize the pin as an output.
    
    pinMode(SonarPin,INPUT);
//Serial.begin(9600);
  radio.begin();
  radio.openWritingPipe(pipe);
}//--(end setup )---


void loop()   /****** LOOP: RUNS CONSTANTLY ******/
{


 /* Blink the cursor and for 5 seconds. */
    sensorValue=analogRead(SonarPin);
Inch= (sensorValue*0.497);
cm=Inch*2.54;


 if(GamePad.isUpPressed())
  {
   // forward();
   if(cm<30)
  {
    //for(int i=0;i<1000;i++)
    {
      joystick[0]=3;
    left();
   
    delay(1500);
    }


   // Serial.println("p=0");
  }
  else
  {
    forward();
    joystick[0]=8;
    
   // Serial.println("forward");

  }
  }
  /* If down is pressed, move the car backwards. */
  else if (GamePad.isDownPressed())
  {
   if(cm<30)
  {
  
    {
    left();

        joystick[0]=3;

    delay(1500);
    }


   // Serial.println("p=0");
  }
  else
  {back();
  
        joystick[0]=2;
}
    // Serial.println("back");
}
    
  
  /* If right is pressed, turn the car to the right. */
  else if (GamePad.isRightPressed())
  {
    if(cm<30)
  {
  
    {
              joystick[0]=3;

    left();

    delay(1500);
    }


   // Serial.println("p=0");
  }
  else
  {
            joystick[0]=6;

    right();
   
  }
  }
    /* If left is pressed, turn the car to the left. */
  else if(GamePad.isLeftPressed())
  {
    if(cm<30)
  {
  
    {
              joystick[0]=3;

    left();
 
    delay(1500);
    }


   // Serial.println("p=0");
  }
  else
  {
            joystick[0]=3;

   left();
  
  }
  }
  /* If nothing is pressed stop all motors. */
  else 
  {
  // forward();
          joystick[0]=5;

   Stop();
  
  }

  
 radio.write( joystick, sizeof(joystick) );
 Serial.println(joystick[0]); 


}
//--(end main loop )---

/*-----( Declare User-written Functions )-----*/

//NONE
//*********( THE END )***********
void forward()
{
digitalWrite(RightMotorForward, HIGH); // turnthe Right Motor ON
digitalWrite(LeftMotorForward, HIGH); 
}

void back()
{
  digitalWrite(RightMotorReverse, HIGH); // turnthe Right Motor ON
digitalWrite(LeftMotorReverse, HIGH); 

}
void Stop()
{
 digitalWrite(RightMotorForward,LOW); // turn Right Motor OFF
 digitalWrite(LeftMotorForward, LOW);  
}

void left()
{
  digitalWrite(RightMotorForward,LOW); // turn Right Motor OFF
 digitalWrite(LeftMotorForward, HIGH);  
}

void right()
{
  digitalWrite(RightMotorForward,HIGH); // turn Right Motor OFF
 digitalWrite(LeftMotorForward, LOW);  
}

void softright()
{
digitalWrite(RightMotorForward,HIGH); // turn Right Motor OFF
 digitalWrite(LeftMotorReverse, HIGH);   
}
void softleft()
{
digitalWrite(RightMotorReverse,HIGH); // turn Right Motor OFF
 digitalWrite(LeftMotorForward, HIGH);   
}

Swarm Receiver

C/C++
/* YourDuinoStarter Example: nRF24L01 Receive Joystick values

 - WHAT IT DOES: Receives data from another transceiver with
   2 Analog values from a Joystick or 2 Potentiometers
   Displays received values on Serial Monitor
 - SEE the comments after "//" on each line below
 - CONNECTIONS: nRF24L01 Modules See:
 http://arduino-info.wikispaces.com/Nrf24L01-2.4GHz-HowTo
   1 - GND
   2 - VCC 3.3V !!! NOT 5V
   3 - CE to Arduino pin 9
   4 - CSN to Arduino pin 10
   5 - SCK to Arduino pin 13
   6 - MOSI to Arduino pin 11
   7 - MISO to Arduino pin 12
   8 - UNUSED
   
 - V1.00 11/26/13
   Based on examples at http://www.bajdi.com/
   Questions: terry@yourduino.com */

/*-----( Import needed libraries )-----*/
#include <SPI.h>
#include <nRF24L01.h>
#include <RF24.h>
/*-----( Declare Constants and Pin Numbers )-----*/
#define CE_PIN   9
#define CSN_PIN 10
int LeftMotorForward = 7; // Pin 10 has Left
int LeftMotorReverse = 6; // Pin 9 has Left Motor
int RightMotorForward = 5; // Pin 12 has Right
int RightMotorReverse = 4; // Pin 13 has Right
int p = 3;

// NOTE: the "LL" at the end of the constant is "LongLong" type
const uint64_t pipe = 0xE8E8F0F0E1LL; // Define the transmit pipe


/*-----( Declare objects )-----*/
RF24 radio(CE_PIN, CSN_PIN); // Create a Radio
/*-----( Declare Variables )-----*/
int joystick[1];  // 2 element array holding Joystick readings

void setup()   /****** SETUP: RUNS ONCE ******/
{
   pinMode(LeftMotorForward, OUTPUT); //initialize the pin as an output.
pinMode(RightMotorForward, OUTPUT); //initialize the pin as an output.
pinMode(LeftMotorReverse, OUTPUT); // initializethe pin as an output.
pinMode(RightMotorReverse, OUTPUT); //initialize the pin as an output.
pinMode(p, INPUT);

  Serial.begin(9600);
  delay(1000);
  Serial.println("Nrf24L01 Receiver Starting");
  radio.begin();
  radio.openReadingPipe(1,pipe);
  radio.startListening();;
}//--(end setup )---


void loop()   /****** LOOP: RUNS CONSTANTLY ******/
{
  if ( radio.available() )
  {
    // Read the data payload until we've received everything
    bool done = false;
    while (!done)
    {
      // Fetch the data payload
      done = radio.read( joystick, sizeof(joystick) );
      //Serial.println("X = ");
     /* if(joystick[0]==10)
      {
        digitalWrite(2,HIGH);
      }*/
      Serial.println(joystick[0]);
      //Serial.print(" Y = ");      
      //Serial.println(joystick[1]);*/


       if(joystick[0]==8)
  {
     forward();
  
  if(digitalRead(p)==0)
{
  left();
}
   
  }
  /* If down is pressed, move the car backwards. */
  else if (joystick[0]==2)
  {
   back();
        
}
    // Serial.println("back");


  /* If right is pressed, turn the car to the right. */
  else if (joystick[0]==6)
  {
   

   // Serial.println("p=0");
         

    right();
  
  }
    /* If left is pressed, turn the car to the left. */
  else if(joystick[0]==4)
  {
            

   left();
  
  }
  else if (joystick[0]==3)
  {
   left();
        
}
  /* If nothing is pressed stop all motors. */
  else 
  {
  // forward();

   Stop();
  }


    }
  }
  else
  {    
      Serial.println("No radio available");
              digitalWrite(2,LOW);

  }

}//--(end main loop )---

/*-----( Declare User-written Functions )-----*/

//NONE
//*********( THE END )***********
void forward()
{
digitalWrite(RightMotorForward, HIGH); // turnthe Right Motor ON
digitalWrite(LeftMotorForward, HIGH); 
}

void back()
{
  digitalWrite(RightMotorReverse, HIGH); // turnthe Right Motor ON
digitalWrite(LeftMotorReverse, HIGH); 

}
void Stop()
{
 digitalWrite(RightMotorForward,LOW); // turn Right Motor OFF
 digitalWrite(LeftMotorForward, LOW);  
}

void left()
{
  digitalWrite(RightMotorForward,LOW); // turn Right Motor OFF
 digitalWrite(LeftMotorForward, HIGH);  
}

void right()
{
  digitalWrite(RightMotorForward,HIGH); // turn Right Motor OFF
 digitalWrite(LeftMotorForward, LOW);  
}

void softright()
{
digitalWrite(RightMotorForward,HIGH); // turn Right Motor OFF
 digitalWrite(LeftMotorReverse, HIGH);   
}
void softleft()
{
digitalWrite(RightMotorReverse,HIGH); // turn Right Motor OFF
 digitalWrite(LeftMotorForward, HIGH);   
}

Credits

Suraj Gehlot

Suraj Gehlot

1 project • 5 followers
Dhiraj Gehlot

Dhiraj Gehlot

2 projects • 16 followers
I'm an Electronics Engineer A innovator/ tinkerer/ Maker/ Sketch artist?Guitarist/ Cube crazy.

Comments