


Hardware components | ||||||
 |
| × | 1 | |||
 |
| × | 1 | |||
 |
| × | 1 | |||
 |
| × | 1 | |||
_ztBMuBhMHo.jpg?auto=compress%2Cformat&w=48&h=48&fit=fill&bg=ffffff) |
| × | 1 | |||
Software apps and online services | ||||||
 |
| |||||
Hand tools and fabrication machines | ||||||
| ||||||
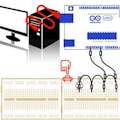
In this project, we will learn how to make an LCD screen "respond" to you when you type something into the Serial Monitor. First and foremost, make sure you have everything you need (see above). Next, go into the Arduino IDE app and click "Serial Monitor" in the top right corner (see below), then paste the code into the IDE. Last, build the project from the schematics, and plug your Arduino into the computer. Now run the program, and type something into the Serial Monitor. You can change the text that appears on-screen, by changing the text in ("Hello"), ("World"). You can also add more fields under the Hello World by copying each block and pasting it below the World block.
To download the schematics, you will have to download the Fritzing program. To download it, go to this link: http://fritzing.org/download/ and click no donation. Then click download, and follow the instructions. (note: it is kind of hard to unzip the file, so let me know if I need to post instructions).
Now for a bit of an explanation. At the beginning there is a line of code that says "#include <LiquidCrystal.h>." This line simply loads the library needed to run the LCD screen. If you are ever using the LCD screen in your project, you MUST have this library included.
On the next line with code, we have "String a;." This creates a new blank sting named "a" that we will use later.
In the const int, we define the pins that the LCD screen is plugged into. Do not change these unless you set up your LCD screen differently. Similarly, the next line uses the LiquidCrystal library to set up the pins that we just defined and to give it a unique name (well I mean it's name is "lcd" but whatever).
In the setup void, it starts with "lcd.begin(16, 2);." This will set up your LCD screen and define how many segments it has (in the case of mine, it has 16 across and 2 down). You can change this if you have a bigger LCD screen.
The "Serial.begin(9600);" will set up the Serial Monitor and define that you are using 9600 baud format on the serial monitor (make sure to input that in the serial monitor like it is on mine).
Next, we have "lcd.write("stuffyouwanttoprint")" (well honestly it doesn't say that specifically but that's how it works).
The "lcd.setCursor(val, val)" line can be very useful if you want to print on multiple lines before clearing the screen. The values work like this: (horizontalvalue, verticalvalue). In this instance we are printing on the next line, so we use (0 (first horizontal segment), 1 (second vertical segment)). In case you haven't noticed yet, 0 means 1 and 1 means 2. Well sort of anyway. That's how it works in this case.
In the loop void we start with clearing all previous stuff and then writing "Awaiting Commands" yet again. This means that at the end (or more like beginning) of every loop it will print that on the LCD screen.
Next you will see it says "if (Serial.available())" which basically senses if you have inputted anything at all into the Serial Monitor bar. Then "a = readString();" will now define the "a" String that we created earlier. Then as more of a debug function, it prints the inputted value back to you.
In the next if that we have here, this will check if the "a" String starts with our activation code which is (um) "Activate." Then it waits a moment and starts doing a boatload of functions that we talked about earlier.
In the other if (at the bottom of the code), it is basically the opposite of the previous if. The "!" before the "a" turns the value negative. This means if "a" DOESN'T start with "Activate" then it returns "Incorrect Code" on the LCD screen.
Anyway, I hope you have learned some good stuff from this project. It took me a while to figure out the readstring thing with the Serial Monitor, but here you go! The finished product! Hope that this works for you! If it doesn't, please message me in the comments below! The copy-able code is below.
Comments
Please log in or sign up to comment.