STEMpedia
Published © CC BY

IoT Based Home Automation Using Arduino

This project will show you how to develop a DIY IoT based home automation system.

AdvancedFull instructions provided3 hours1,017
IoT Based Home Automation Using Arduino

Things used in this project

Hardware components

evive IoT Kit
STEMpedia evive IoT Kit
×1

Software apps and online services

Arduino IDE
Arduino IDE

Story

Read more

Schematics

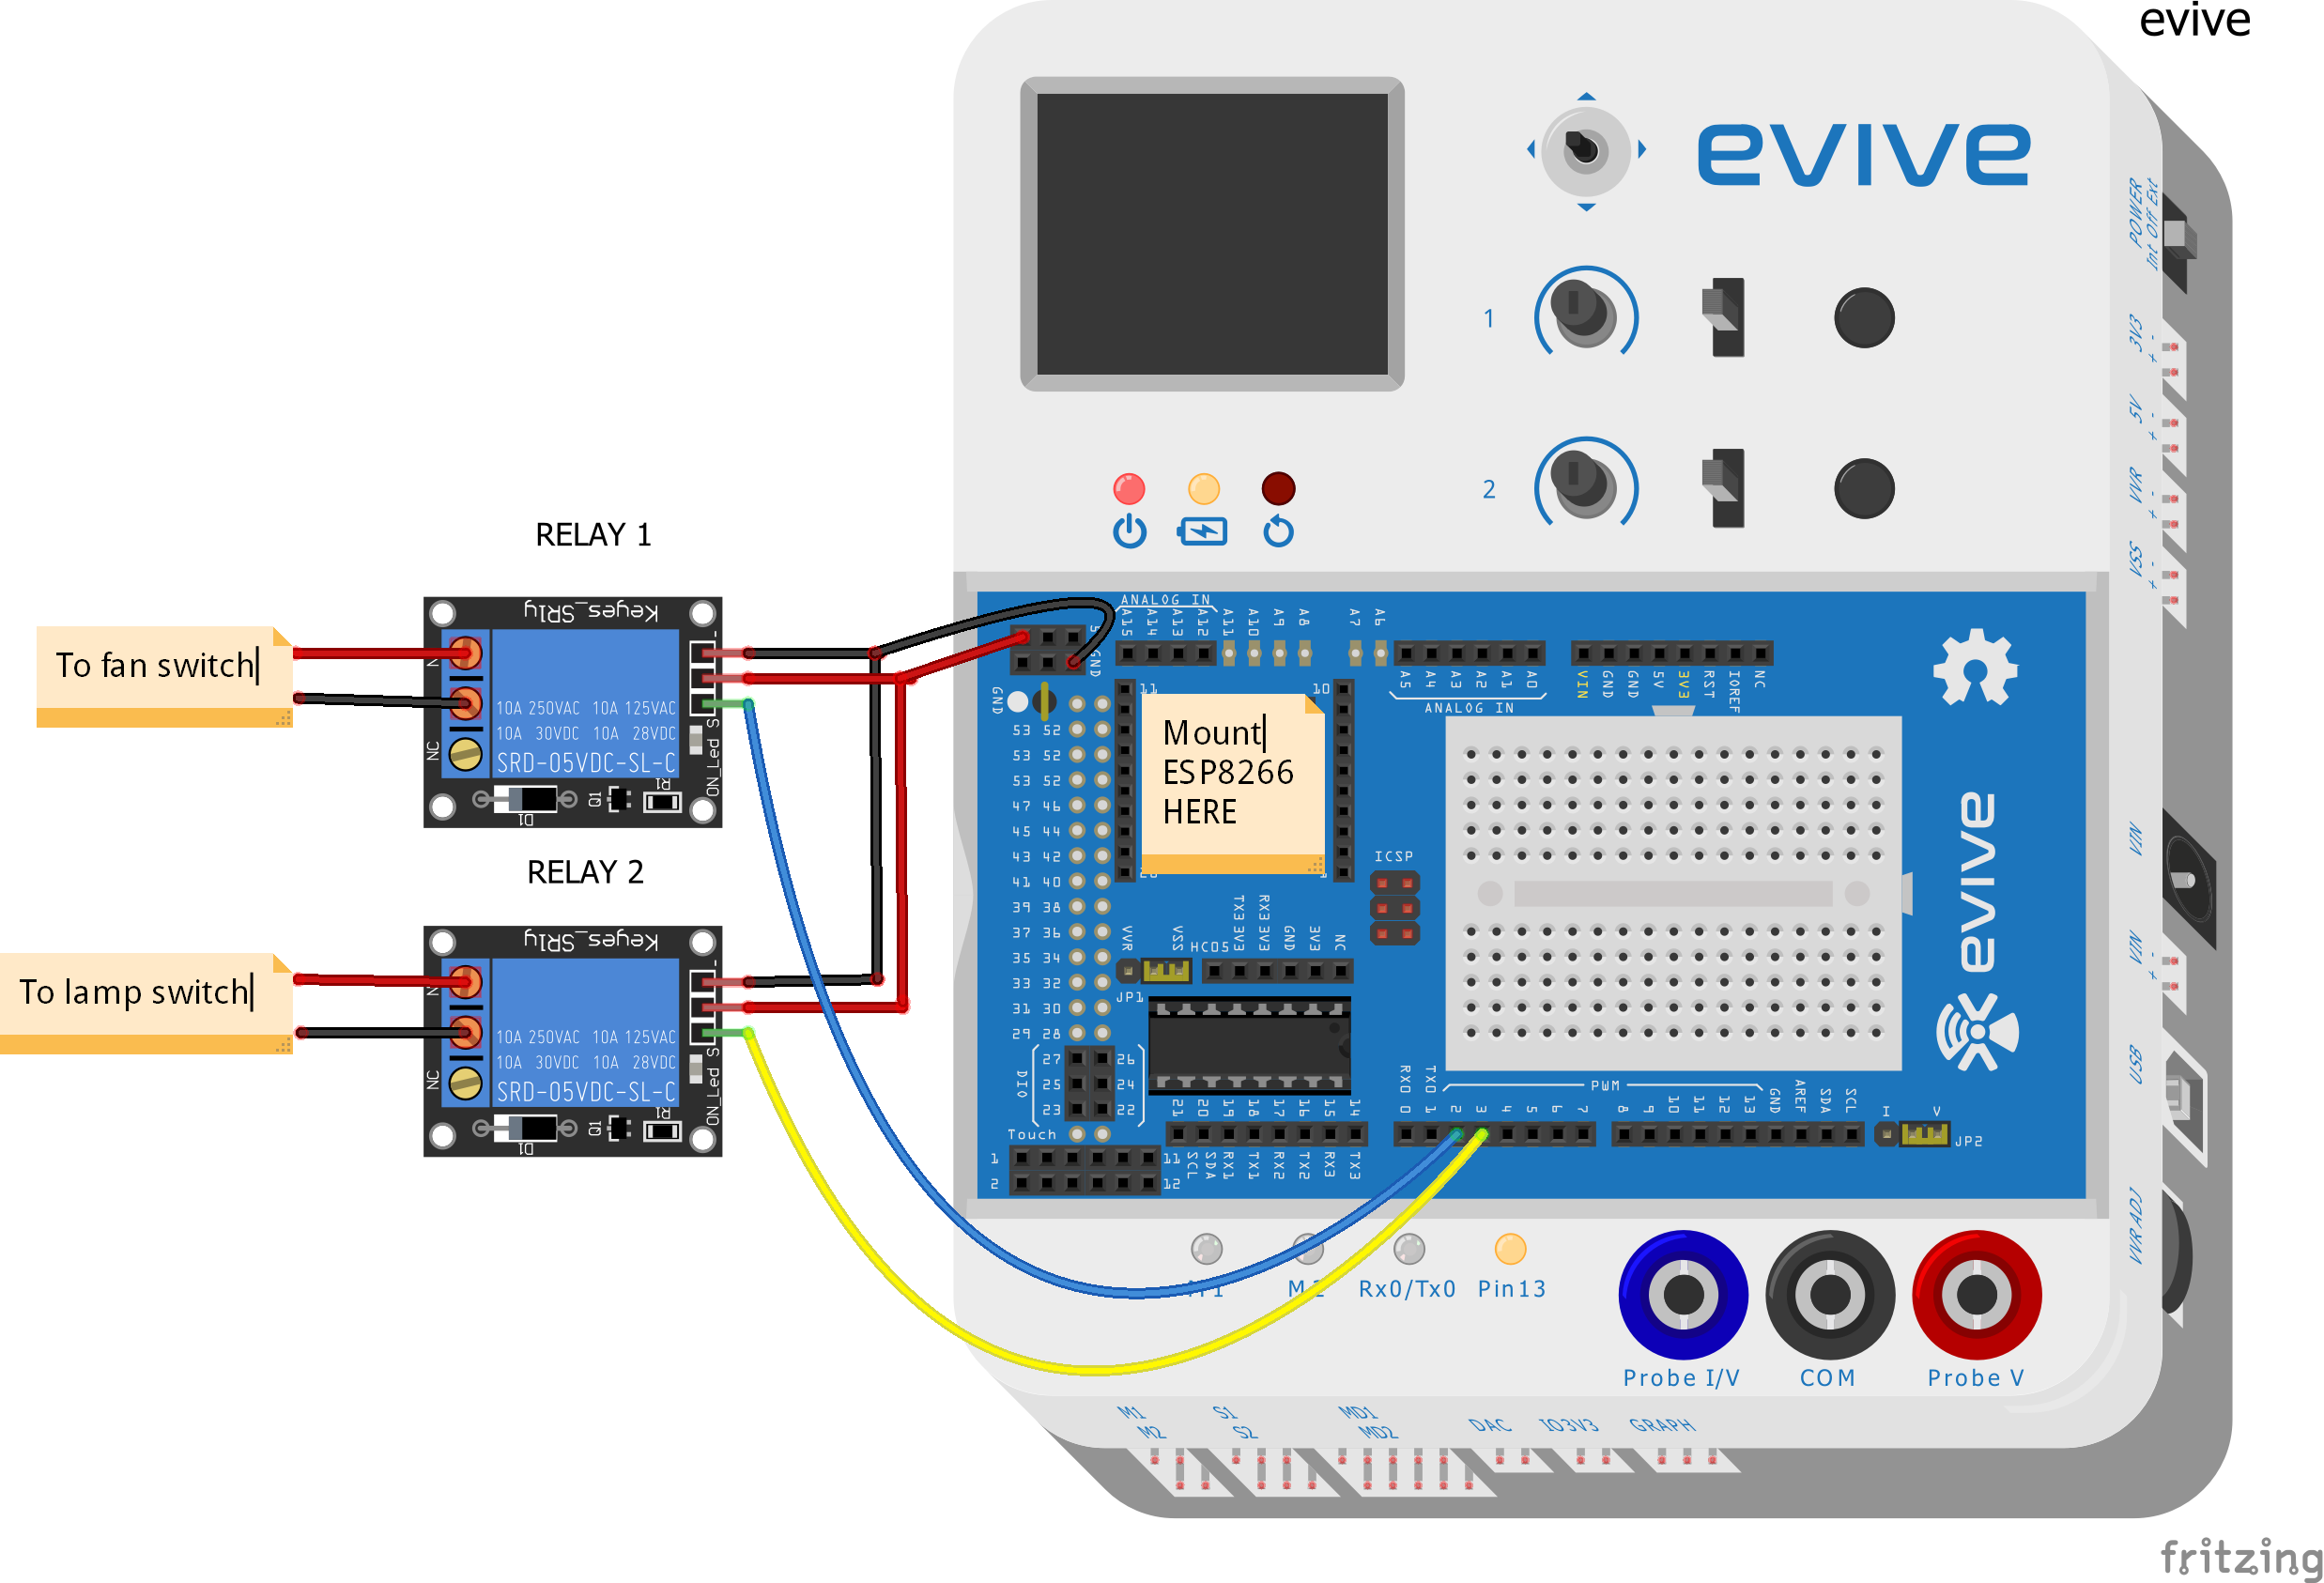
Fritzing Diagram

Code

Arduino Code for Home Automation

Arduino
#include "WiFiEsp.h"
#include <EEPROM.h>
#include<evive.h>

char ssid[] = "AR3";            // your network SSID (name)
char pass[] = "STEM@101";        // your network password
int status = WL_IDLE_STATUS;

unsigned char add1 = 10;
unsigned char add2 = 11;

unsigned int relay1 = 2;
unsigned int relay2 = 3;

boolean relay1_state = true;
boolean relay2_state = true;

WiFiEspServer server(80);

RingBuffer buf(8);


void setup()
     {
         // put your setup code here, to run once:

         Serial.begin(9600);   // initialize serial for debugging
         Serial3.begin(115200);    // initialize serial for ESP module
         WiFi.init(&Serial3);    // initialize ESP module

         start_screen();

         for(unsigned int i =2;i<4;i++)
              {
                 pinMode(i,OUTPUT);
              }

         relay1_state = EEPROM.read(add1);
         relay2_state = EEPROM.read(add2);

         digitalWrite(relay1,relay1_state);
         digitalWrite(relay2,relay2_state);

         // attempt to connect to WiFi network
         while (status != WL_CONNECTED)
             {
                Serial.print("Attempting to connect to WPA SSID: ");
                Serial.println(ssid);
                // Connect to WPA/WPA2 network
                status = WiFi.begin(ssid, pass);
             }
             
          digitalWrite(13,HIGH);
          Serial.println("You're connected to the network");
          printWifiStatus();
  
          // start the web server on port 80
          server.begin();


}
void loop() 
     {
        // put your main code here, to run repeatedly:

        WiFiEspClient client = server.available();  // listen for incoming clients

        if (client)
           {                                              // if you get a client,
              Serial.println("New client");              // print a message out the serial port
              buf.init();                               // initialize the circular buffer
              while (client.connected())
                   {                                              // loop while the client's connected
                         if (client.available()) 
                               {                                            // if there's bytes to read from the client,
                                    char c = client.read();                // read a byte, then
                                    buf.push(c);                          // push it to the ring buffer

                                    // printing the stream to the serial monitor will slow down
                                    // the receiving of data from the ESP filling the serial buffer
                                    //Serial.write(c);
                                    
                                    // you got two newline characters in a row
                                    // that's the end of the HTTP request, so send a response
                                    if (buf.endsWith("\r\n\r\n"))
                                        {
                                           sendHttpResponse(client);
                                           break;
                                        }
                                    // Check to see if the client request was "GET /H" or "GET /L":
                                    
                                    if (buf.endsWith("GET /A"))
                                          {
                                              relay1_state = false;
                                              EEPROM.write(add1,relay1_state);
                                              digitalWrite(relay1, relay1_state);   
                                          }
                                   else if (buf.endsWith("GET /B"))
                                          {
                                              relay1_state = true;
                                              EEPROM.write(add1,relay1_state);
                                              digitalWrite(relay1, relay1_state);    
                                          }
                                   else if (buf.endsWith("GET /C"))
                                          {
                                              
                                              relay2_state = false;
                                              EEPROM.write(add2,relay2_state);
                                              digitalWrite(relay2, relay2_state);  
                                          }
                                  else if (buf.endsWith("GET /D"))
                                          {
                                             
                                              relay2_state = true;
                                              EEPROM.write(add2,relay2_state);
                                              digitalWrite(relay2, relay2_state);  
                                             
                                          }
                               
        
                                 }
                }
                  // close the connection
                  client.stop();
                  Serial.println("Client disconnected");
          }

}

void sendHttpResponse(WiFiEspClient client)
{
  // HTTP headers always start with a response code (e.g. HTTP/1.1 200 OK)
  // and a content-type so the client knows what's coming, then a blank line:
  client.println("HTTP/1.1 200 OK");
  client.println("Content-type:text/html");
  client.println();
  
  // the content of the HTTP response follows the header:
  client.print("The light is ");
  if(relay1_state==HIGH)
  {
    client.print("OFF");
  }
  else
  {
    client.print("ON");
  }
  
  client.println("<br>");
  client.println("<br>");
  
  client.println("Click <a href=\"/A\">here</a> to turn the light on<br>");
  client.println("Click <a href=\"/B\">here</a> to turn the light off<br>");

  client.println("<br>");
  client.println("<br>");
  client.println("<br>");

   // the content of the HTTP response follows the header:
  client.print("The fan is ");
   if(relay2_state==HIGH)
  {
    client.print("OFF");
  }
  else
  {
    client.print("ON");
  }
  client.println("<br>");
  client.println("<br>");
  
  client.println("Click <a href=\"/C\">here</a> to turn the fan on<br>");
  client.println("Click <a href=\"/D\">here</a> to turn the fan off<br>");

   client.println("<br>");
  client.println("<br>");
  client.println("<br>");
  
  // The HTTP response ends with another blank line:
  client.println();
}

void printWifiStatus()
{
  // print the SSID of the network you're attached to
  Serial.print("SSID: ");
  Serial.println(WiFi.SSID());

  // print your WiFi shield's IP address
  IPAddress ip = WiFi.localIP();
  Serial.print("IP Address: ");
  Serial.println(ip);

  // print where to go in the browser
  Serial.println();
  Serial.print("To see this page in action, open a browser to http://");
  Serial.println(ip);
  Serial.println();
}

void start_screen()
{
   tft_init(INITR_GREENTAB);
 tft.setRotation(1);
 tft.fillScreen(ST7735_BLACK);

 tft.setCursor(25,10);
  tft.setTextSize(2);
  tft.setTextColor(ST7735_WHITE,ST7735_BLACK);
  tft.print("STEMpedia");

   tft.setCursor(5,50);
  tft.setTextSize(1);
  tft.setTextColor(ST7735_GREEN,ST7735_BLACK);
  tft.print("IOT BASED HOME AUTOMATION");
  tft.setCursor(55,60);
  tft.print("SYSTEM");

   tft.setTextColor(ST7735_GREEN,ST7735_BLACK);
  tft.setCursor(0,95);
  tft.setTextSize(1.8);
  tft.print("FOR MORE INFORMATION VISIT");
  tft.setCursor(30,110);
  tft.setTextColor(ST7735_WHITE,ST7735_BLACK);
  tft.print("thestempedia.com");
 
}

evive Library

C/C++
No preview (download only).

Credits

STEMpedia

STEMpedia

42 projects • 169 followers
STEMpedia blends theory with experiential learning by offering state-of-the-art technology, projects, tutorials, courses, and much more.

Comments