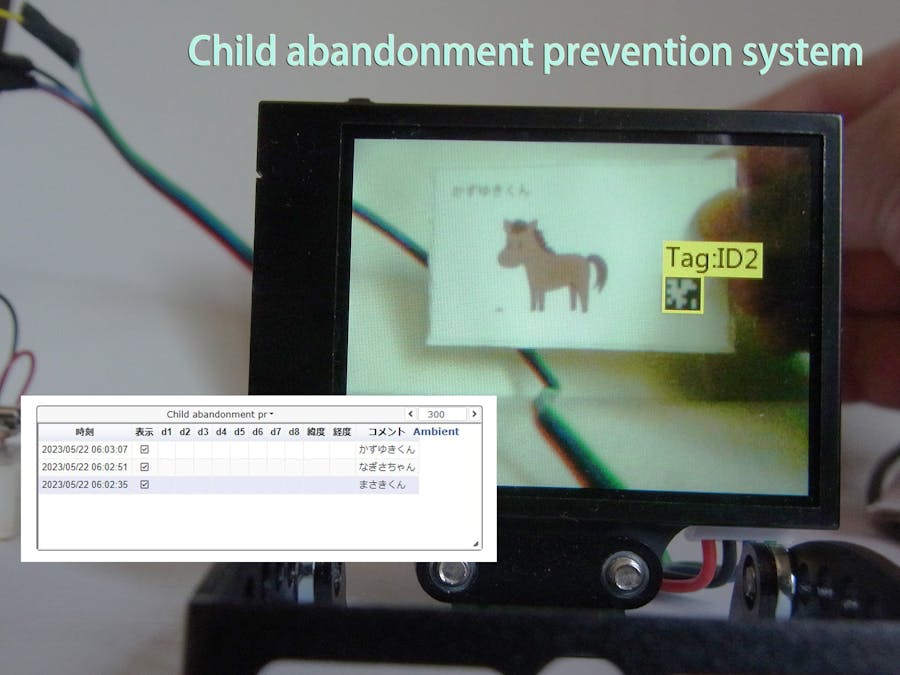
The accident which left a kindergarten child in a kindergarten bus occurred in the summer in Japan. The child died of heatstroke. We need to prevent accidents such as abandoning leaving children behind on the bus.
My solution is to use to confirm nobody on the bus the processing AI / Machine Learning (ML) solutions. And my solution records the kindergarten children who go to kindergarten on the cloud, and the kindergarten staff confirms to attend kindergarten children using the cloud.
2. How I am Trying to Solve It?In the Child abandonment prevention system, FireBeetle 2 inputs AI result data using Huskylen. FireBeetle 2 checks the child identification using the AI result data. FireBeetle 2 sends the result data to DFPlayer Pro for voice messages. FireBeetle 2 sends the result data to also “Ambient” Cloud, and the kindergarten staff monitors the result data.
Huskylens are installed on the bus exit and scan the ID card that the child has. The ID card is drawn tag and animal. Huskylens generate AI result data having tag recognition from the ID card of each child.
DFPlayer Pro generates a voice message including the child's name according to AI result data and plays the voice message from Stereo Enclosed Speaker installed bus exit.
Dashboards in the “Ambient” Cloud display child name processed AI result data for the kindergarten staff to check. It is easy for the kindergarten staff to know the absent child using that information.
3. Constructing HardwareThe hardware of the Child abandonment prevention system sets up as follows.
Here is Circuit Schematic made with KiCad. Getting Started with AI connects, using the I2C interface, Huskylens wired to FireBeetle 2. Getting Started with AI also connects DFPlayer Pro wired to FireBeetle 2 using the Uart interface.
The program code of the Child abandonment prevention system for FireBeetle 2 is developed by Arduino IDE. Those source codes show in "https://github.com/tomosoft-jp/Gesture-Recognition."
The ”ambientloop” Function sends the child's name to the “Ambient” Cloud using the “Ambient” API. This function parameter “id” is the child's name of a string data type.
‘preventionsystem.ino’
・・・

void ambientloop(char* id) {
//data1 = "1";
//data2 = "2";
//data3 = "3";
//ambient.set(1, data1);
//ambient.set(2, data2);
// ret = ambient.set(1, *id);
//ret = ambient.set(1, "かずゆきくん");
ret = ambient.setcmnt(id);
Serial.println(ret);
ret = ambient.send(); // データをAmbientに送信
Serial.println(ret);
ret = Serial.println(ret);
Serial.println(ret);
Serial.println("***");
delay(PERIOD * 1000);
}

・・・
The ” playloop” Function sends a voice message number to DFPlayer Pro using DFPlayer Pro API. This function parameter “id” is the voice message number of int data type.
‘preventionsystem.ino’
・・・
void playloop(int id) {
Serial.println("Start playing");
/*Start playing*/
DF1201S.playFileNum(id); // 1.wav の再生
}
・・・
The ”loop” Function checks ID card recognition using the Huskylens API. “huskylens.available()” API indicates the end of preparing the recognized result. When this API returns true, the program code reads the Tag ID using “huskylens.read()” API.
‘preventionsystem.ino’
・・・
void loop() {
// if (!huskylens.request()) stub();
if (!huskylens.request()) Serial.println(F("Fail to request data from HUSKYLENS, recheck the connection!"));
else if (!huskylens.isLearned()) Serial.println(F("Nothing learned, press learn button on HUSKYLENS to learn one!"));
else if (!huskylens.available()) Serial.println(F("No block or arrow appears on the screen!"));
else
{
Serial.println(F("###########"));
while (huskylens.available())
{
HUSKYLENSResult result = huskylens.read();
printResult(result);
if (objectcheck(result, &objectID )) {
ambientloop(ambient_name[objectID]);
playloop(play_nameid[objectID]);
}
Serial.println(String() + F("result.ID: ") + result.ID + F(" objectID: ") +
objectID + F(" inID: ") + inID + F(" inRun: ") + inRun );
}
}
}
The ”objectcheck” Function checks Huskylen's result. Huskylens get the same Tag ID a few times. That recognition data is the correct answer data. After recognition, the same Tag ID discard for not issuing the same voice message.
‘preventionsystem.ino’
・・・
bool objectcheck(HUSKYLENSResult result, short int *ID) {
if (inID == result.ID) {
inRun ++;
if ((inRun >= 3) && (*ID != result.ID)) {
*ID = result.ID;
inID = 0;
inRun = 0;
return true;
}
else {
return false;
}
}
else {
inID = result.ID;
inRun = 0;
return false;
}
}
・・・I dial and turn on the "Learn Multiple" switch, and short press the “function button“.
I point the “+” symbol at a tag, and long press the "learning button" to learn it. The Tag ID of the pointed tag is displayed after learning.
6 Setting up AmbientAmbient is a Visualization service for IoT data. Ambient receives sensor data from the FireBeetle 2 using the internet, accumulates those data, and graphs those data.
I create a table for displaying names from FireBeetle 2 as follows. This name is generated by Huskylens checking an ID card.
I create a voice message using a cloud “Ondoku.” Ondoku is TEXT-TO-SPEECH software.
When enter a hello text for a child in the text box, I can hear it in voice and download it as a Voice Message audio file. Produced Voice Message example as follows.
<audio src="https://tomosoft.jp/hackstervideo/2023/05/kazuyuki.mp3" controls></audio>I made three different ID cards for the child as follows. The ID card has the child’s name, animal, and tag symbol.
Program code flash by Arduino ID and executes automatically.
Here is a video of the Child abandonment prevention system on Getting Started with AI. When I show the ID card to Huskylens, Huskylens recognizes the Tag of the ID card and sends Tag ID to FireBeetle 2. FireBeetle 2 processes that Tag ID sends result data to “Ambient” Cloud and DFPlayer Pro as the child’s name. I can hear the child’s name from Stereo Enclosed Speaker. I can also confirm the child’s name using “Ambient” Cloud.
The serial monitor in Arduino IDE outputs the message as follows.


Comments
Please log in or sign up to comment.