In this challenging times of pandemic, this solution can help lessen the spread of the virus in a premises by eliminating a common touch points such as switches of appliances or equipment.
Transform your regular appliances such as lamp shades, electric fan and others into a phone and voice controlled devices. This cost effective solution can make your dwelling into a smart home and requires less coding experience to implement.
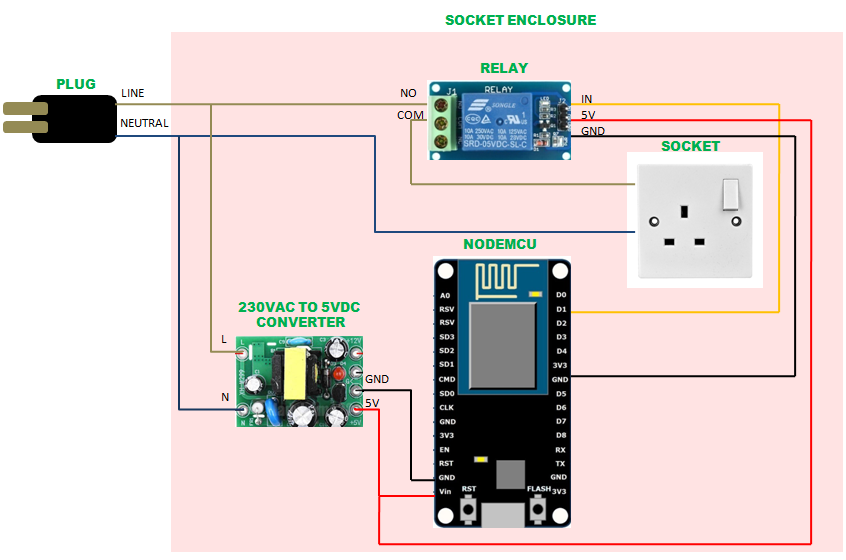
2. Wiring and assembling the componentUsing the schematics provided, wire up your component and assemble it firmly inside the outlet. Ensure to have a proper insulation when you seat any of the PCB component on metal part. You can use a double adhesive tape to secure the component and insulate at the same time or you can also use a glue gun.
3. Setting up your Blynk AppStep 1: Download the Blynk App to your phone and create a New Blynk account.
Step 2: Login to your account and start by creating a new project.
Step 3: Select ESP8266 from the hardware drop down and name your project.
Step 4: Every new project you create will have its own Auth Token. You’ll get Auth Token automatically on your email after project creation. You can also copy it manually. Click on devices section and selected required device :
Step 5: Your project canvas is empty, to add a button to control our relay tap anywhere on the canvas to open the widget box. All the available widgets are located here. Now pick a button.
Step 6:Drag-n-Drop - Tap and hold the Widget to drag it to the new position. Each Widget has it’s own settings. Tap on the widget to get to them.
Step 7: The list of pins reflects physical pins defined by your hardware. On our case we connect it to pin 5.
Step 8: When you are done with the Settings - press the PLAY button. This will switch you from EDIT mode to PLAY mode where you can interact with the hardware. You will get a message saying “Arduino UNO is offline”. Its normal because code has not been uploaded to the module yet.
Step 1: Start your Arduino IDE and open the Preferences window
Step 2: Enter the following into the Additional Board Manager URLs field. https://arduino.esp8266.com/stable/package_esp8266com_index.json
Step 3: Open Boards Manager from Tools > Board menu and install esp8266 platform (and don't forget to select your ESP8266 board from Tools > Board menu after installation).
Step 4: To install a new library into your Arduino IDE you can use the Library Manager. Open the IDE and click to the "Sketch" menu and then Include Library > Manage Libraries
Step 5: Then the Library Manager will open and you will find a list of libraries that are already installed or ready for installation. Search for Blynk library and in the version selection choose the latest version to date
Step 6: Finally click on Install and wait for the IDE to install the new library. Downloading may take time depending on your connection speed. Once it has finished, an Installed tag should appear next to the Bridge library. You can close the library manager. You can now find the new library available in the Sketch > Include Library menu.
Step 1: Open the sketch 'ESP8266_Standalone' as shown below or create a new file and paste the code provided here.
Step 2: Scroll the sketch and find the following line.
char auth[] = "YourAuthToken";Step 3: This is the Auth Token that you emailed yourself. Please check your email and copy it, then paste it inside the quotation marks.
Step 4: Look for the following line again to put in your wifi network name and password.
char ssid[] = "YourNetworkName";
char pass[] = "YourPassword";
Step 6: Connect the ESP module to your computer and upload the program.
6. Setting up your IFTT Applet for Voice ControlStep 1: Create a google account if you dont have one and use it to login for IFTT account. https://ifttt.com/
Step 2: Sign in your account and on the top right corner click the drop down icon and click 'Create'.
Step 3: On the search bar, type google and click 'google assistant'.
Step 4: Click 'Connect'
Step 5: On the choose trigger page, select 'say a simple phrase'.
Step 6: Type the phrase you want to say to turn on the device.
Step 7: Click the '+' button on the following page
Step 8: On the search bar, type webhook and click the icon.
Step 9: Click 'connect'.
Step 10: Click 'Make a web request'
Step 11: Fill in the following as shown below. Take note that the authentication code of the URL part must be taken from your blynk account when you add a device. The io pin number refers to the ESP module pin number that you have connected your relay, in our case at D5.
URL: https://188.166.206.43/blynk authentication code/update/io pin number
Step 12: Click 'Finish'
Step 13: Follow the same procedure to create an applet that will turn off the device but take note to put ["1"] on the following settings.
1. https://docs.blynk.cc/#getting-started-getting-started-with-the-blynk-app-2-create-a-new-project


Comments
Please log in or sign up to comment.