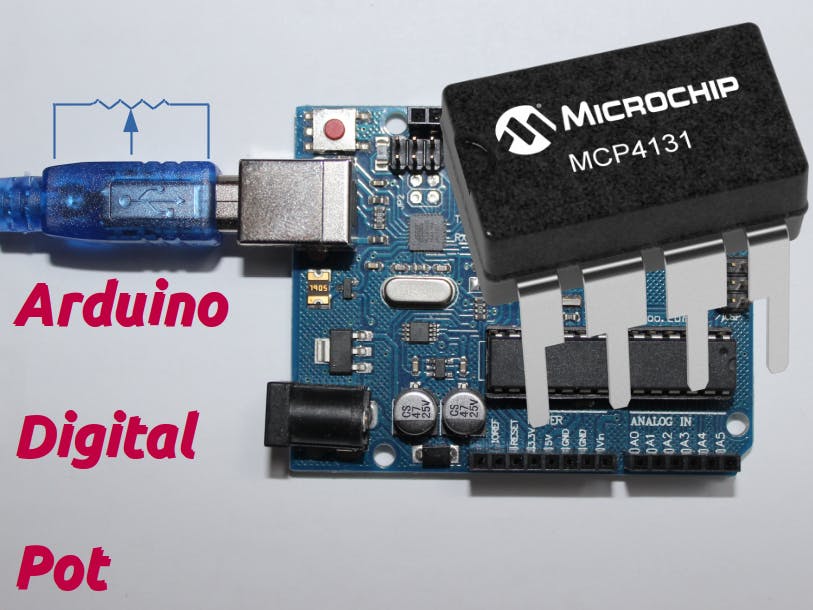
This project shows how a MCP4131 IC is controlled by an Arduino to implement a variable resistance. It uses the Arduino library of the same name. Why use a DCP? - variable resistors are widely used in circuits and having the capability to control this from an Arduino opens up many applications.
Three demos are included:
- Step resistance up through its entire range and then step down via the entire range
- Based on user input via the serial interface, set the wiper value to a given value
- Read in wiper value and output result to the Serial Interface
Here is a picture of the setup:
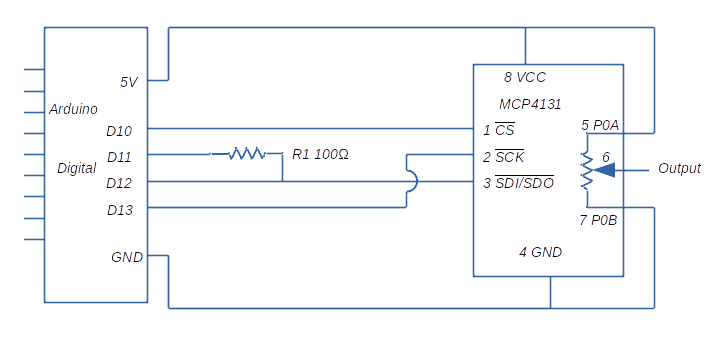
Here is the schematic:
Brief description of the circuit:
- The Arduino communicates with the MCP 4131 via the SPI bus
- D11 to D13 on the Arduino are configured as the SPI communication bus
- D10 is used as a Chip Select signal. This is configurable by the user
- Because of pin limitations on the MCP 4131, incoming and outgoing SPI communication is multiplexed via a single pin 3
- Resistor R1 is required in case of volt difference between the Arduino and MCP 4131. Because the Arduino and MCP are both working on 5V, 100 Ω is sufficient.
- Output is set up as a voltage divider and will nominally vary from 0 to 5V
The MCP family of integrated circuits are manufactured by Microchip and represent a range of digitally controlled potentiometers. The family of devices support 7-bit and 8-bit resistor networks using an SPI interface to control resistance.
A block diagram from the MCP data sheet:
The device can be used as two terminal variable resistor or a three terminal potentiomenter.
Control of the wiper position and hence the resistance is determined by the three digital inputs:
- Device is selected by taking CS low.
- Using a SPI serial interface (10 MHz, modes 0, 0 & 1, 1), high-speed Read/Writes are written to potentiometer registers. SCK synchronizes the clock between devices
- The wiper moves to the position determined by the value written to the register.
- The wiper has 128 (in the case of MCP4131) possible positions (0 – 128), allowing for incremental steps of about 0.8% of the total resistance.
- The current wiper position can be read from the MCP4131 via the SPI interface
Complete specifications for the MCP4131 can be found at the Microchip website.
https://www.microchip.com/en-us/product/MCP4131
https://ww1.microchip.com/downloads/en/DeviceDoc/22060b.pdf
SPI InterfaceThere are multiple articles on the internet regarding the SPI interface. There is a standard library available for the Arduino to communicate via the SPI protocol.
The Arduino pin assignments for this project shown below:
here is a standard library available for the Arduino that allows control of the MCP4131. Use the Tools→Manage Libraries… command to bring up the library manager window.
Search for MCP4131 and install the library to your IDE environment.
The library contains the following commands:
MCP4131 name( intchip_select_pin); – command used to instantiate an object from the class. User can nominate which digital pin is used for chip select.
name.readWiper( ); - returns a byte giving current position of the wiper (0-128)
name.writeWiper(unsigned int wiperValue); - write a value to the MCP4131 to set wiper position
name.decrementWiper( ); - decrement the wiper by one position
name.incrementWiper( ); - increment the wiper by one position
The library needs the inclusion of the SPI library available for the Arduino.
This project contains three demonstrations; all use the same circuit.
Step Up and Down RangeThe code for this demonstration given below. The Arduino initializes the MCP4131 to 0 and then executes a loop that increments the MCP4131 wiper position from 0 to 128. After a pause, another loop decrements the wiper position from 128 to 0.
A voltmeter connected to the output will indicate a rising voltage fro 0 to 5V, pause and then show a falling voltage from 5 V to 0.
/*
 * This sketch shows an Arduino controlling a MCP4131 digital potentiometer
 * Sketch utilizes the MCP4131 library
 * https://www.arduino.cc/reference/en/libraries/mcp4131-library/
 * After initialization, two loops in program increment and decrement
 * potentiometer from 0 to full value and then back again
 *
 * February 2022
*/


#include <MCP4131.h>

const int chipSelect = 10;
unsigned int wiperValue;
int i;

// Create MCP4131 object nominating digital pin used for Chip Select
MCP4131 Potentiometer(chipSelect);

void setup() {
  // Reset wiper position to 0 Ohms
  wiperValue = 0;
  Potentiometer.writeWiper(wiperValue);

  // Begin Serial port and print out welcome message
  Serial.begin(9600);
  Serial.println("MCP4131 Digital Potentiometer Test");

}

void loop() {
  // Starting at 0 Ohms increment MCP4131 up to max resistance
  for ( i = 0 ; i <= 128; i++){
    Potentiometer.incrementWiper();
    delay(100);
  }

  // Print out message showing voltage is turning
  Serial.println("5V turning point");

  // Starting at max resistance decrement MCP4131 to 0 Ohms
  for ( i = 128 ; i >= 0; i-- ){
    Potentiometer.decrementWiper();
    delay(100);
  }

  // Print out message showing voltage is turning
  Serial.println("0V turning point");
}The code for this demonstration given below. After initialization, the Arduino awaits input from the user via the serial monitor. The user inputs a number between 0 and 128 and the wiper is set to that position.
A voltmeter connected to the output will measure a voltage between 0 and 5V depending on the user input. For example, an input of 64 (50% of range) will give a reading of approx 2.5V
/*
 * This sketch shows an Arduino controlling a MCP4131 digital potentiometer
 * Sketch utilizes the MCP4131 library
 * https://www.arduino.cc/reference/en/libraries/mcp4131-library/
 * After initialization, serial monitor waits for input
 * User inputs a value between 0 and 128
 * (Note - no error checking in case of invalid input)
 * Program sets potentiometer value to match input
 * and prints out nominal voltage
 *
 * February 2022
*/


#include <MCP4131.h>

const int chipSelect = 10;
unsigned int wiperValue;
String incomingString;

// Create MCP4131 object nominating digital pin used for Chip Select
MCP4131 Potentiometer(chipSelect);

void setup() {
  // Reset wiper position to 0 Ohms
  wiperValue = 0;
  Potentiometer.writeWiper(wiperValue);

  // Begin Serial port and print out welcome message
  Serial.begin(9600);
  Serial.println("MCP413451 Digital Potentiometer Test");
}

void loop() {
  // Wait for user input via serial monitor
  if (Serial.available() > 0){
     //Read the incoming string
     incomingString = Serial.readString();
     //Convert to a integer
     wiperValue = incomingString.toInt();
     //Set Potentiomter to step value
     Potentiometer.writeWiper(wiperValue);

     // Print out user input and nominal voltage
     Serial.print(wiperValue);
     Serial.print('\t');
     Serial.print("Nominal Voltage: ");
     Serial.print((5.0 * wiperValue / 128.0) ,DEC);
     Serial.println();
  }

  delay(200);
}The code for this demonstration given below. After initialization, the Arduino awaits input from the user via the serial monitor. The user inputs a number between 0 and 128 and the wiper is set to that position. The program then increments the wiper position by 2 steps. The wiper value is read back from the MCP4131 and printed out to the Serial Monitor.
/*
 * This sketch shows an Arduino controlling a MCP4131 digital potentiometer
 * Sketch utilizes the MCP4131 library
 * https://www.arduino.cc/reference/en/libraries/mcp4131-library/
 * After initialization, serial monitor waits for input
 * User inputs a value between 0 and 128
 * (Note - no error checking in case of invalid input)
 * Program sets potentiometer value to match input
 * Program increments MCP4131 two steps and then reads potentiometer value
 * Prints out user input and potentiometer value after increment
 *
 * February 2022
*/


#include <MCP4131.h>

const int chipSelect = 10;
unsigned int wiperValue;
byte readWiperValue;
int i;
String incomingString;

// Create MCP4131 object nominating digital pin used for Chip Select
MCP4131 Potentiometer(chipSelect);

void setup() {
  // Reset wiper position to 0 Ohms
  wiperValue = 0;
  Potentiometer.writeWiper(wiperValue);

  // Begin Serial port and print out welcome message
  Serial.begin(9600);
  Serial.println("MCP4131 Digital Potentiometer Test");
}

void loop() {
  // Wait for user input via serial monitor
  if (Serial.available() > 0){
     //Read the incoming string
     incomingString = Serial.readString();
     //Convert to a integer
     wiperValue = incomingString.toInt();
     //Set Potentiomter to step value
     Potentiometer.writeWiper(wiperValue);

     //Print out input value
     Serial.print("Input Wiper Value  ");
     Serial.println(wiperValue);

     //Increment wiper two steps
     Potentiometer.incrementWiper();
     Potentiometer.incrementWiper();

     //Read in Wiper value and print
     readWiperValue = Potentiometer.readWiper();
     Serial.println(readWiperValue);
     delay(250);
  }
}Resistance and voltage values for various wiper positions were taken across the range.
Of course, there are inherent limitations to this circuit. The major limitation is the step nature of the potentiometer. The best resolution 0.8% of the total resistance. In this case, the 10KΩtotal resistance gives a best case resolution of approximately 80 Ω
Potential applications of a MCP4131 include a variable cutoff frequency filter, variable gain amplifier and variable power supply. Microchip website contains several application notes that cover design of these circuits.


_ztBMuBhMHo.jpg?auto=compress%2Cformat&w=48&h=48&fit=fill&bg=ffffff)


Comments
Please log in or sign up to comment.