#include <ESP8266WiFi.h>
#include <ESP8266mDNS.h>
#include <ESP8266WebServer.h>
#include <WiFiClient.h>
#include <WiFiUdp.h>
#include <ArduinoOTA.h>

const char* ssid = "your wifi ssid";
const char* password ="your wifi password";

const char* host = "the ip of the raspberry pie";
const int httpPort = 8080;
int registerTimer = 0;

// Use WiFiClient class to create TCP connections
WiFiClient client;

ESP8266WebServer server(80);

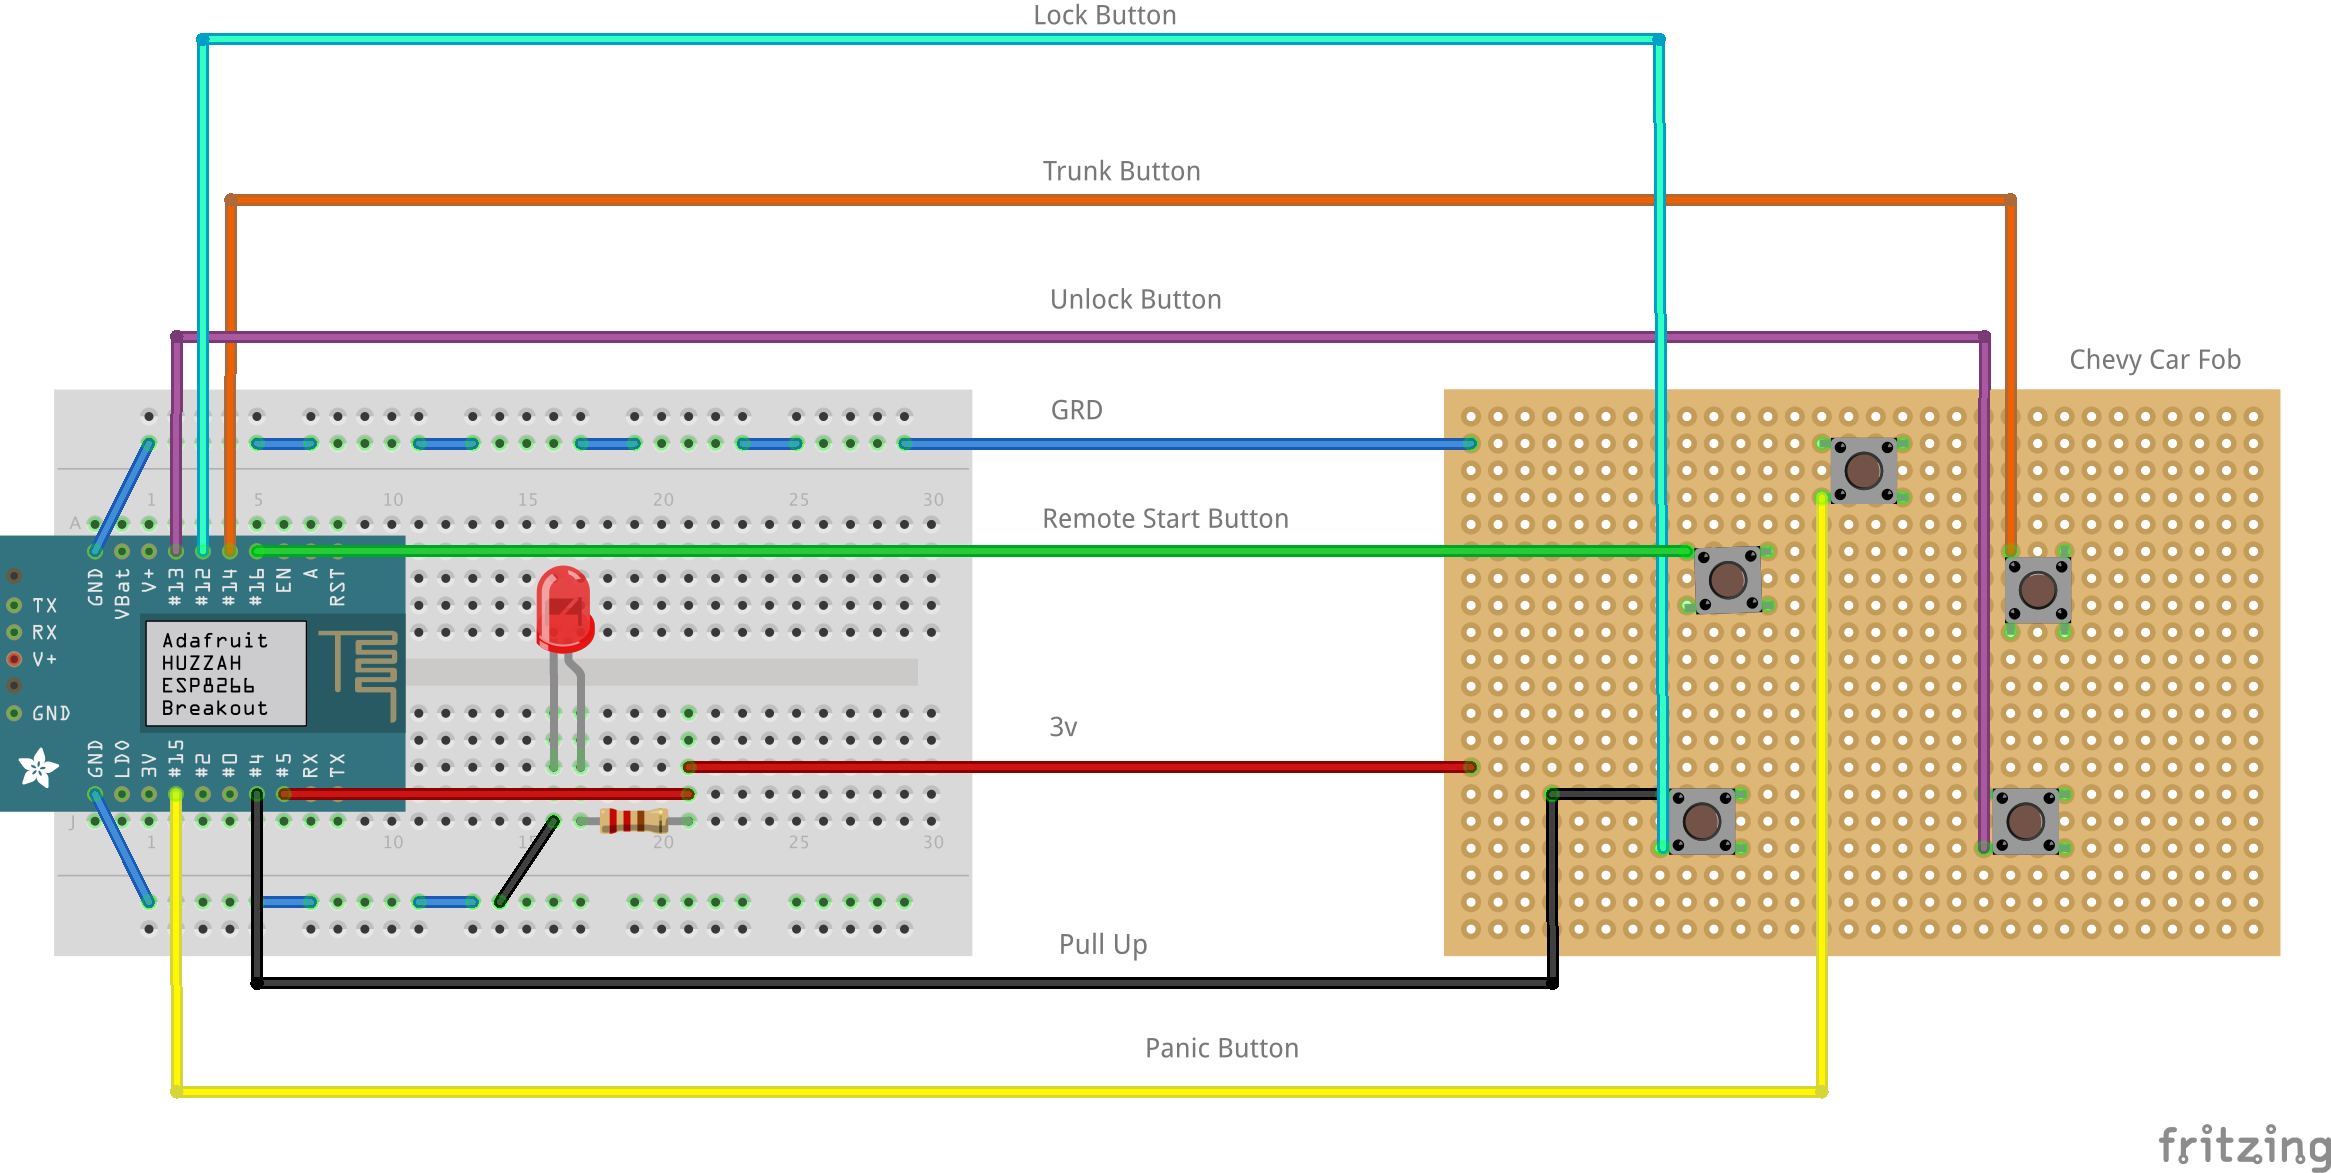
const int onboardLedRed = 0;
const int onboardLedBlue = 2;

const int pullUpPin = 4;
const int auxPowerPin = 5;

const int lockPin = 12;
const int unlockPin = 13;
const int trunkPin = 14;
const int panicPin = 15;
const int startPin = 16;

char auth[] = "some authentication token";

void setup(void) {

  pinMode(pullUpPin, INPUT);
  digitalWrite(pullUpPin, HIGH);

  pinMode(onboardLedRed, OUTPUT);
  pinMode(onboardLedBlue, OUTPUT);

  pinMode(lockPin, OUTPUT);
  pinMode(unlockPin, OUTPUT);
  pinMode(trunkPin, OUTPUT);
  pinMode(panicPin, OUTPUT);
  pinMode(startPin, OUTPUT);

  digitalWrite(lockPin, 1);
  digitalWrite(unlockPin, 1);
  digitalWrite(trunkPin, 1);
  digitalWrite(panicPin, 1);
  digitalWrite(startPin, 1);

  digitalWrite(onboardLedRed, LOW);
  digitalWrite(onboardLedBlue, HIGH);

  // power on aux
  pinMode(auxPowerPin, OUTPUT);
  digitalWrite(auxPowerPin, 0);

  //Serial.begin(74880);
  Serial.begin(115200);
  WiFi.begin(ssid, password);
  Serial.println("");

  // Wait for connection
  while (WiFi.status() != WL_CONNECTED) {
    blinkBlueLed();
    Serial.print(".");
  }

  // Port defaults to 8266
  // ArduinoOTA.setPort(8266);

  // Hostname defaults to esp8266-[ChipID]
  ArduinoOTA.setHostname("CarServer");

  // No authentication by default
  ArduinoOTA.setPassword((const char *)"123");

  ArduinoOTA.onStart([]() {
    Serial.println("Start");
  });

  ArduinoOTA.onEnd([]() {
    Serial.println("\nEnd");
  });

  ArduinoOTA.onProgress([](unsigned int progress, unsigned int total) {
    Serial.printf("Progress: %u%%\r", (progress / (total / 100)));
  });

  ArduinoOTA.onError([](ota_error_t error) {
    Serial.printf("Error[%u]: ", error);
    if (error == OTA_AUTH_ERROR) Serial.println("Auth Failed");
    else if (error == OTA_BEGIN_ERROR) Serial.println("Begin Failed");
    else if (error == OTA_CONNECT_ERROR) Serial.println("Connect Failed");
    else if (error == OTA_RECEIVE_ERROR) Serial.println("Receive Failed");
    else if (error == OTA_END_ERROR) Serial.println("End Failed");
  });

  ArduinoOTA.begin();

  Serial.println("");
  Serial.print("Connected to ");
  Serial.println(ssid);
  Serial.print("IP address: ");
  Serial.println(WiFi.localIP());

  while (!client.connect(host, httpPort)) {
    Serial.println("Connection failed!");
    delay(50000);
  }

  // We now create a URI for the request
  String ip = WiFi.localIP().toString();
  String url = "/RegisterCar/token=" + ip;
  Serial.print("Requesting URL: ");
  Serial.println(url);

  // This will send the request to the server
  client.print(String("GET ") + url + " HTTP/1.1\r\n" +
               "Host: " + host + "\r\n" +
               "Connection: close\r\n\r\n");
  Serial.println();
  delay(500);

  // Read all the lines of the reply from server and print them to Serial
  while (client.available()) {
    String line = client.readStringUntil('\r');
    Serial.print(line);
  }

  Serial.println();
  Serial.println("closing connection");


  if (MDNS.begin("esp8266")) {
    Serial.println("MDNS responder started");
  }

  server.on("/", handleRoot);

  server.on("/inline", []() {
    server.send(200, "text/plain", "this works as well");
  });

  server.on("/LockCar", []() {

    server.send(200, "text/plain", "Car Locked");

    blinkBlueLed();

    digitalWrite(auxPowerPin, 1);
    delay(500);

    digitalWrite(lockPin, 0);
    delay(500);
    digitalWrite(lockPin, 1);

    delay(500);
    digitalWrite(auxPowerPin, 0);

  });

  server.on("/UnlockCar", []() {

    server.send(200, "text/plain", "Car Unlocked");

    blinkBlueLed();

    digitalWrite(auxPowerPin, 1);
    delay(500);

    digitalWrite(unlockPin, 0);
    delay(500);
    digitalWrite(unlockPin, 1);

    delay(500);
    digitalWrite(auxPowerPin, 0);

  });

  server.on("/PanicCar", []() {

    server.send(200, "text/plain", "Car Panic");

    blinkBlueLed();

    digitalWrite(auxPowerPin, 1);
    delay(500);

    digitalWrite(panicPin, 0);
    delay(500);
    digitalWrite(panicPin, 1);

    delay(500);
    digitalWrite(auxPowerPin, 0);

  });

  server.on("/CarTrunk", []() {

    server.send(200, "text/plain", "Trunk Opened");

    blinkBlueLed();

    digitalWrite(auxPowerPin, 1);
    delay(500);

    digitalWrite(trunkPin, 0);
    delay(2000);
    digitalWrite(trunkPin, 1);

    delay(500);
    digitalWrite(auxPowerPin, 0);

  });

  server.on("/StartCar", []() {

    server.send(200, "text/plain", "Car Started");

    blinkBlueLed();

    digitalWrite(auxPowerPin, 1);
    delay(500);

    digitalWrite(panicPin, 0);
    delay(500);
    digitalWrite(panicPin, 1);
    delay(3000);

    digitalWrite(lockPin, 0);
    delay(500);
    digitalWrite(lockPin, 1);
    delay(500);

    digitalWrite(startPin, 0);
    delay(2000);
    digitalWrite(startPin, 1);
    delay(5000);

    digitalWrite(unlockPin, 0);
    delay(500);
    digitalWrite(unlockPin, 1);

    delay(500);
    digitalWrite(auxPowerPin, 0);

  });

  server.onNotFound(handleNotFound);

  server.begin();

  Serial.println("HTTP server started");

  digitalWrite(onboardLedRed, HIGH);
}

void loop(void) {

  ArduinoOTA.handle();

  server.handleClient();

  registerTimer++;

  if (registerTimer == 6000000) {

    registerTimer = 0;

    while (!client.connect(host, httpPort)) {
      Serial.println("Connection failed!");
      delay(50000);
    }

    // We now create a URI for the request
    String ip = WiFi.localIP().toString();
    String url = "/RegisterCar/token=" + ip;
    Serial.print("Requesting URL: ");
    Serial.println(url);

    // This will send the request to the server
    client.print(String("GET ") + url + " HTTP/1.1\r\n" +
                 "Host: " + host + "\r\n" +
                 "Connection: close\r\n\r\n");
    Serial.println();
    delay(500);

    // Read all the lines of the reply from server and print them to Serial
    while (client.available()) {
      String line = client.readStringUntil('\r');
      Serial.print(line);
    }

    Serial.println();

    Serial.println("closing connection");

  }

  blinkRedLed();

}

void handleRoot() {
  server.send(200, "text/plain", "Hello From CarServer!");
}

void handleNotFound() {
  String message = "File Not Found\n\n";
  message += "URI: ";
  message += server.uri();
  message += "\nMethod: ";
  message += (server.method() == HTTP_GET) ? "GET" : "POST";
  message += "\nArguments: ";
  message += server.args();
  message += "\n";
  for (uint8_t i = 0; i < server.args(); i++) {
    message += " " + server.argName(i) + ": " + server.arg(i) + "\n";
  }
  server.send(404, "text/plain", message);
}

void blinkBlueLed() {
  digitalWrite(onboardLedBlue, LOW);
  delay(500);
  digitalWrite(onboardLedBlue, HIGH);
}

void blinkRedLed() {
  digitalWrite(onboardLedRed, LOW);
  delay(500);
  digitalWrite(onboardLedRed, HIGH);
}


Comments
Please log in or sign up to comment.