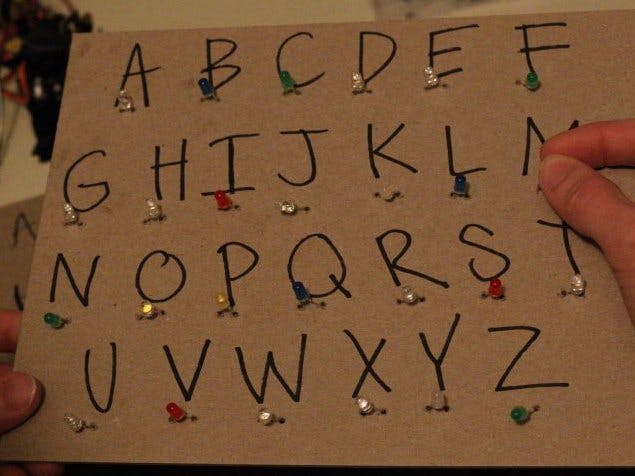
Happy Halloween! Today we are in the Halloween spirit and will be going over a tutorial to make a Stranger Things “HELP ME” Board.
Parts you will need:
- Arduino or equivalent
- LEDs
- Cardboard or chipboard
- 9V Battery
- Sharpie
The Elegoo Uno R3 Complete Starter kit turned out great for this as it includes 4 different LED colors. Luckily I also had some other color LEDs lying around so I could add more variety to the project.
Schematic
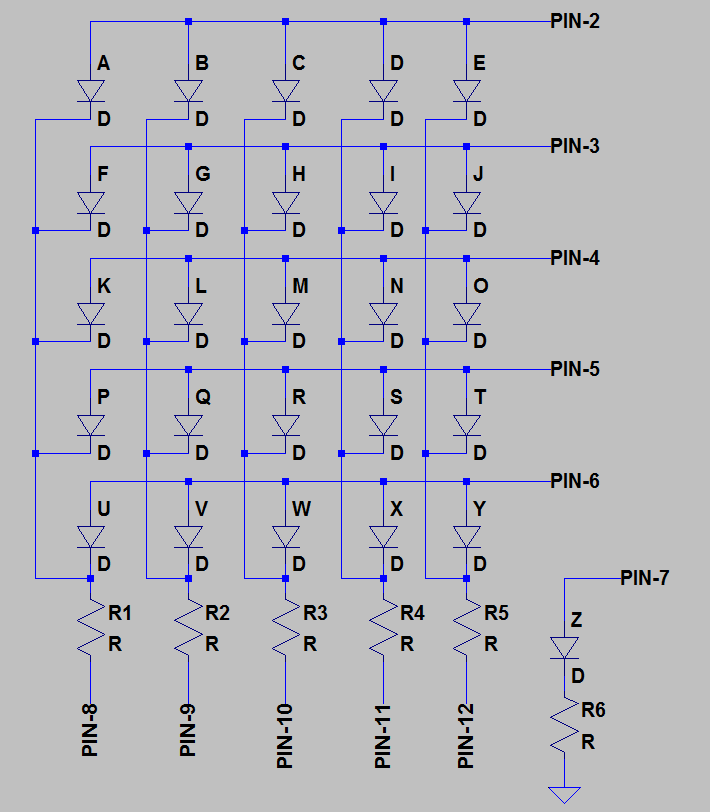
In order to use less I/O pins we will be using a 5×5 matrix. This will cover letters A-Y. For Z it will have its own pin. From looking at the schematic above, you can see that in order to turn on one LED the row will turn high and the source will be set low. For example. To turn on A, PIN 2 will be set High and Pin 8 will be set low. This will only turn on A. Each combination of having one ROW set as a high with the other ROWS being set to LOW and one column set as a low with the other columns set to HIGH will only tun on one LED at a time. This uses 10 pins + 1 to do all 26 letters. This utilizes a lot less I/O pins than having to have one I/O for each LED.
The next thing to decide is the Source Resistors(R1-R6). Since there are varying LEDs there will be varying voltage drops. Anywhere from 1.5V to 3.5V across the LED. Since this is supposed to look spooky, we don’t really care that some LEDs might seem brighter and others might seem dimmer. The only concern we have is to make sure we don’t exceed the 20mA that is the most the Arduino Pins can source. I ended up picking 250 Ohm resistors for this project. This gives us a range of (5V-1.5V)/250 Ohm to (5V-3.5V)/250Ohms, or 14mA – 6mA. This is OK because we will not exceed the 20mA max requirement for the I/O pins.
Step 1Now that we have the circuit we will be using, the first step is to grab your chipboard or cardboard and layout the alphabet. Make sure to try this out on a piece of paper beforehand so you can get the correct spacing and size of the letters
Next we will drill holes beneath the letters. Try to make these spaced so that the LED leads can easily be inserted into the holes.
Once you have drilled all the holes, it is time to insert all the LEDs. I chose to try and make the LEDs random. Insert them all the same polar direction so it’s easier to wire up. I inserted each LED with the LONG lead on the LEFT. This made wiring the LEDs very easy when looking at the schematic.
Now it is time to begin soldering. You will need to flip the board over onto its back. Make sure the LEDs don’t fall out when you do this. I did this by putting another piece of chip board on top of the LEDs when I flipping it to its back.
Now go ahead and add in your Arduino, 9V battery and wire everything to the appropriate pins. Also use the electrical tape to make sure nothing shorts out. I placed mine on the leads of the LED and the back of the Arduino. I then used the electrical tape to secure the 9V battery and Arduino to the back of the board.
Now we will begin to code. You can test out your circuit and wiring by setting using digitalWrite() and setting all ROWs low except for one ROW and then set all columns high except for one column and make sure the corresponding LED turns on for the combination.
Instead of using digitalWrite() we will go directly into the ATMEGA micro library to turn on and off the pins by setting PORTD and PORTB to the Digital I/O we want on and off. This will make the programming easier. PORTD controls Digital I/O pins 0-7 while PORTB controls pins 8-13. For example:if you want to turn pin 7 on and all other pins off you just set PORTD = 10000000.
To start we will create a structure that will define each letters PORT configuration.
typedef struct // Create a structure to convert Binary of the PORTs for the corresponding Letter
{
  byte portd;
  byte portb;
}letter_data_t;
The structure we will name letter_data_t. Next we will layout the table defining each letter as a port based on the 5×5 matrix we have wired up. This will be the letter[] array.
const letter_data_t letter[] =
{
  {B00000100,B11111110}, //A
  {B00000100,B11111101}, //B
  {B00000100,B11111011}, //C
  {B00000100,B11110111}, //D
  {B00000100,B11101111}, //E
  {B00001000,B11111110}, //F
  {B00001000,B11111101}, //G
  {B00001000,B11111011}, //H
  {B00001000,B11110111}, //I
  {B00001000,B11101111}, //J
  {B00010000,B11111110}, //K
  {B00010000,B11111101}, //L
  {B00010000,B11111011}, //M
  {B00010000,B11110111}, //N
  {B00010000,B11101111}, //O
  {B00100000,B11111110}, //P
  {B00100000,B11111101}, //Q
  {B00100000,B11111011}, //R
  {B00100000,B11110111}, //S
  {B00100000,B11101111}, //T
  {B01000000,B11111110}, //U
  {B01000000,B11111101}, //V
  {B01000000,B11111011}, //W
  {B01000000,B11110111}, //X
  {B01000000,B11101111}, //Y
  {B10000000,B11111111}, //Z
  {B00000000,B00000000}  //26 = 0ff
};
Now the table has been established referencing the PIN output for each letter using the structure we created above.
Next we will go to the setup part of the code. Each pin needs to be set as an output
void setup() {
  // Setup each pin used as an output
  pinMode(2,OUTPUT);
  pinMode(3,OUTPUT);
  pinMode(4,OUTPUT);
  pinMode(5,OUTPUT);
  pinMode(6,OUTPUT);
  pinMode(7,OUTPUT);
  pinMode(8,OUTPUT);
  pinMode(9,OUTPUT);
  pinMode(10,OUTPUT);
  pinMode(11,OUTPUT);
  pinMode(12,OUTPUT);
}
Now that the code has been setup and our table created, we will setup some functions. The main function for this program is the runHelpme() function. This will have the board spell H-E-L-P M-E. Which is our attempt to show that someone in the “UPSIDE DOWN” might be trying to contact us.
void runHelpme()
{
  PORTD = letter['h'-'a'].portd;
  PORTB = letter['h'-'a'].portb;
  delay(1000);
  PORTD = letter['e'-'a'].portd;
  PORTB = letter['e'-'a'].portb;
  delay(1000);
  PORTD = letter['l'-'a'].portd;
  PORTB = letter['l'-'a'].portb;
  delay(1000);
  PORTD = letter['p'-'a'].portd;
  PORTB = letter['p'-'a'].portb;
  delay(1000);
  PORTD = letter[26].portd;
  PORTB = letter[26].portb;
  delay(1000);
  PORTD = letter['m'-'a'].portd;
  PORTB = letter['m'-'a'].portb;
  delay(1000);
  PORTD = letter['e'-'a'].portd;
  PORTB = letter['e'-'a'].portb;
  delay(1000);
  PORTD = letter[26].portd; //Turn off the LEDs
  PORTB = letter[26].portb; //Turn off the LEDs
  delay(1000);
  }
This uses our structure we created and will subtract the letter we want minus ‘a’ , which is the first letter in the table. This will result by giving us our wanted “letter” number of the table we created. After setting the letter on, we delay for one second then turn on the next letter.
The next function we will write are some flair functions to make the board seem a little weird. The first flair function will be a runRandom() function which will pick random letters and turn them on for random amount of times.
void runRandom()
{
  for(int i = 0; i<=15; i++)
  {
    int x = random(0,25);
    PORTD = letter[x].portd;
    PORTB = letter[x].portb;
    delay(random(40,200));
    delay(random(40,200));
    delay(random(40,200));
  }
}
This will run for 15 random letters. We set x to a random number between 0-25 which chooses one of the 26 letters and then wait three random times between 40mS and 200 mS.
The last function we will write is a flickerRandom() function. This will flicker a random function. I think this definitely adds a nice touch that the board has something strange going on with it.
void flickerRandom()
{
  int x = random(0,25);
  for(int i = 0; i<=5; i++)
  {
    PORTD = letter[x].portd;
    PORTB = letter[x].portb;
    delay(random(40,500));
    PORTD = letter[26].portd;
    PORTB = letter[26].portb;
    delay(random(40,500));
  }
}
This will flicker 5 random letters anywhere between 40mS – 500mS of time for the flicker.
Now that all the functions are written, it’s time to put all the main loop code together.
void loop() {
  flickerRandom();
  delay(2000);
  runHelpme();
  delay(2000);
  flickerRandom();
  flickerRandom();
  runRandom();
}
This will first start with the flickering routine, delay for 2 seconds, display our “H-E-L-P M-E” routine , wait for 2 seconds, flicker again 2 times in a row then run the random routine. This all come together to show that the stranger things board definitely has some strange things going on with it and if you watch close enough someone can see that it is saying “HELP ME”. Obviously someone from the UPSIDE DOWN, is trying to contact us!
You can get the full BreakoutBros Stranger Things code here.
Make sure you subscribe to see more update on projects, tutorials, and reviews!


_ztBMuBhMHo.jpg?auto=compress%2Cformat&w=48&h=48&fit=fill&bg=ffffff)


Comments
Please log in or sign up to comment.