The Sony Spresense is a microcontroller device. It combines a small size with a huge performance, and a remarkable energy efficiency. The device and its ecosystem can be used for professional research and development. It is also very well suited to be employed in the fields of education, teaching and making.
Compared to other boards in the market, the Sony Spresense® is has a high degree of feature completeness, and it also includes very unique features for such a tiny-sized board. To be mentioned are for example its advanced audio capabilities or the ability to support GPS-based applications.
A typical development setup includes the board itself, and the extension board. The extension board exposes the interfaces of the board to the outside world. Many use cases require a camera. Sony offers a corresponding solution that can be interfaced with the board.
2. Focusrail - ProjectThis project demonstrate a narrow application, that uses by far not the complete power and feature-richness of this board. However in its particular field of photography my prototype addresses and solves the common problem to create focus stacks.
2.1. Macrophotography: The requirementBoth photography and videography cover a wide wide range of artistic genres. As a specialization, the macrophotography aims at tiny objects, such as insects, small parts or material surfaces. Some macro-photographers might even employ lenses that are usually found in microscopes.
Macro photography comes with its own set of photographic and technical requirements. One common problem has to do with the limited depth of field of given lenses and cameras that are used for capturing macro photos.
2.1.1 Technical process for macro photographyModern photo- and videocameras or cameras on smartphones consist of an optical system and a sensor that captures the light that passes the optical system. These cameras also include the software that manages the capturing process, and all steps needed to pre- or post process the photograph („computational photography“).
The optical system has the task to collect the light-rays that are emitted by the scene to be captured, and it focusses these light rays towards a common focus-point. The focussed light rays pass the lens and the aperture before they hit a film (analog), or a camera sensor (digital). Either film or sensor records these light rays, and the result of this recording can then be seen as a photograph.
The optical system basically consists of these elements
- One or many lenses, that alter the direction of the incoming light rays.
- An aperture that defines how many light rays can enter the camera body at the same time.
- A shutter that sits between lens and sensor and that defines the duration during which light reaches the sensor. The sensor has a defined light sensitivity (ISO-setting)
Depending on its sensitivity, the sensor makes sure that the photography is exposed correctly given aperture and shutter speed. At a given ISO setting, the aperture setting and the shutter speed correlate. Thereby a small aperture requires a large shutter speed, and vice versa. On the other hand the aperture also correlate to the depth of field (DOF), and therefore the distance range in which the object is in focus. Here small apertures correspond to a small DOF, and large apertures correspond to a large DOF.
Due to technical limitations, macro photos are characterized by a shallow depth of field. Therefore given the light conditions only parts of the object of interest are sharp, while areas in front or behind the focus point are blurred. In order to create photos that are completely in focus, the photographer typically employs a technology that is called focus stacking.
2.1.2 Focus stackingAt a given setting for aperture, ISO, and shutter speed only a slice of the object is in focus. In order to extend the focus area, the photographer can capture multiple photographs of the same scene, while he makes sure that each time a different plane of the photo is in focus. In the post processing step these multiple photographs, and manly the in-focus areas of each of them are then stacked onto each other using a proper algorithm. At the end the in-focus areas of all images are combined in one image.
In an earlier project, I have tested stacking algorithms, and have programmed corresponding prototypes. See https://github.com/produkt-manager/focusstacking for more information.
Task of the actual project is to create the mentioned stack of photos. The options are (all other parameters remain unchanged):
- Alter the object-lens-distance in steps, while you take a photograph after each step.
- Alter the lens-sensor-distance in steps, while you take a photograph after each step.
The second option requires a fundamental change in the camera itself, while the first method only requires that you move the complete camera in steps, while you leave all settings unchanged. Therefore most devices mechanically effect the object-lens-distance. To achieve this, the camera and the lens is typically mounted to a focus rail, while a motor takes care that the camera is moved in steps towards the object.
Such a device typically consist of mechanical parts (focus rail), electronics (motor control), and software that is capable to interface and affect the motor and the shutter of the camera.
2.2 FischertechnikFischertechnik® is prototyping system that aims both kids, and educated engineers the like. It supports a large area of technical applications, such as mechanics, pneumatics, dynamics, electronic, or robotics, to name just a few. The normed parts allow the user to construct a wide variety of machines and devices, and also supports motor control.
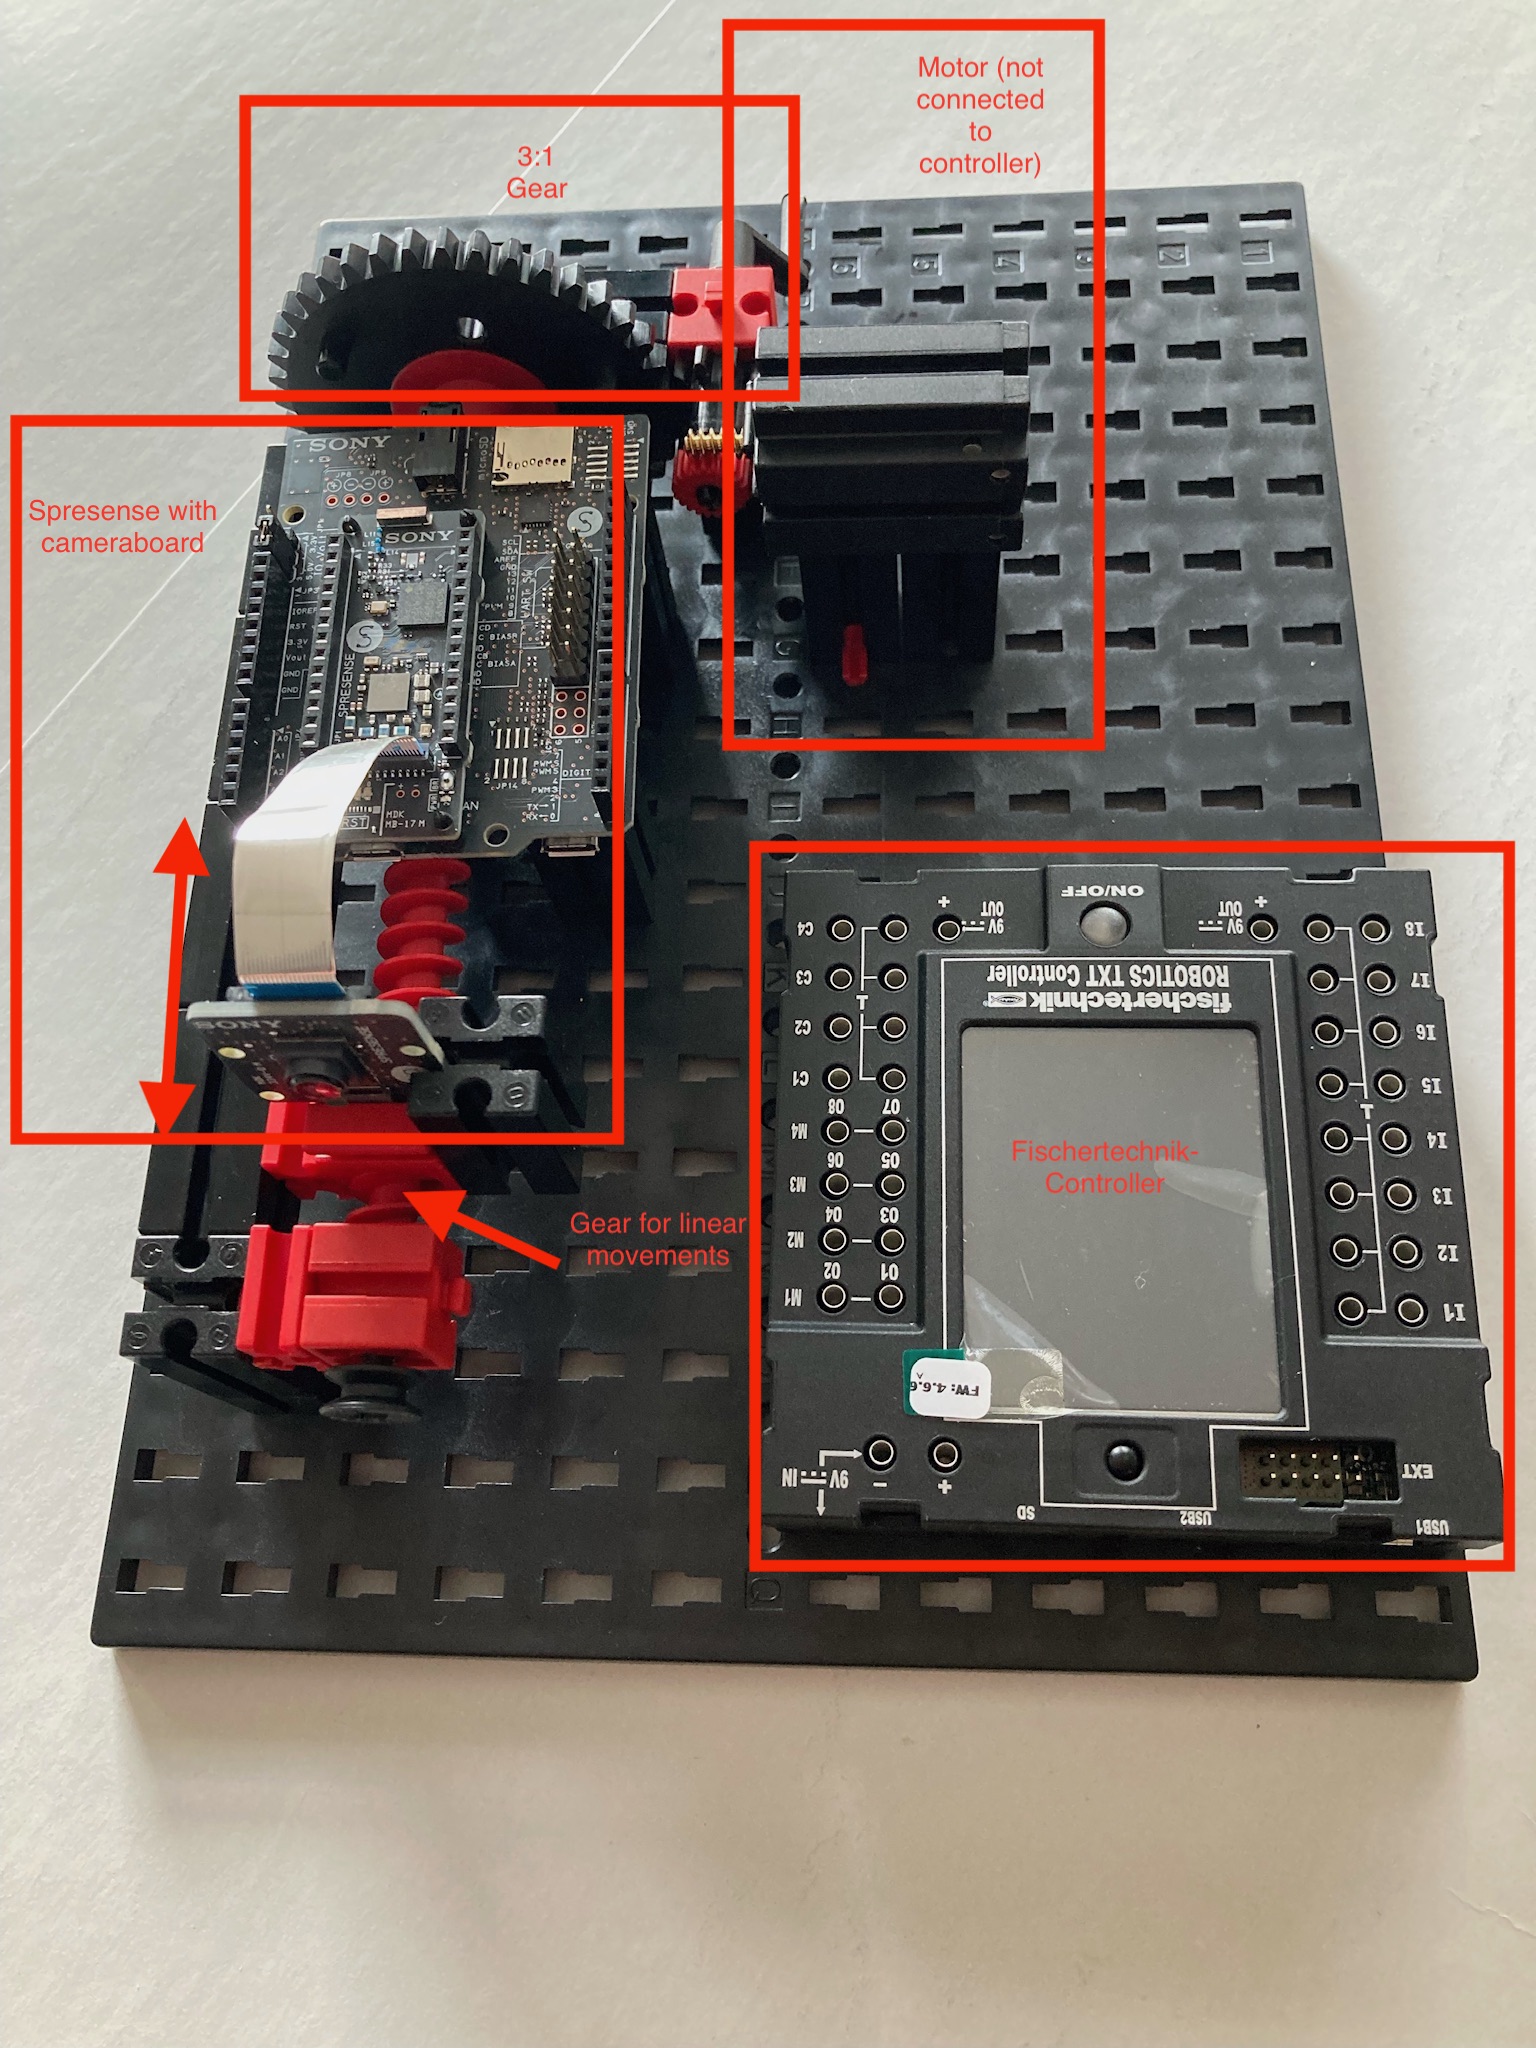
In this project I will use Fischertechnik® in order to build the prototype of a motorized focus rail. In this setup the Sony Spresense is equipped with a camera board, and is mounted to this focus rail. The board interfaces to the Fischertechnik® motorcontroller, or an alternative, which is in charge of the motor movement control. The Sony Spresense will control the motorcontroller, while it captures the photos. These stacks are lateron combined into one photo and stored on an SD card.
3. ImplementationSpresense offers different options to program and run code on your board. The following documentation serves as a central hub for everything you need to know: https://developer.sony.com/develop/spresense/docs/home_en.html. First, setup your board.
3.1 ConfigurationWith Spresense you can basically use one of these development environments (see https://developer.sony.com/develop/spresense/docs/introduction_en.html#_spresense_software)
- Spresense Arduino Library
- Spresense SDK, which is Sony’s original development environment and is based on NuttX and uses GNU Make.
- CircuitPython for Spresense
As the algorithms for stacking photos are written in Python, the current project will prefer the latter option. Install CircuitPython and use it as described here: https://developer.sony.com/develop/spresense/docs/circuitpython_set_up_en.html.
In order to program your board, you need a development and build environment. The current project uses Microsoft’s Visual Studio code. Install it and configure it as described here: https://developer.sony.com/develop/spresense/docs/circuitpython_tutorials_en.html#_build_and_deploy_circuitpython_on_spresense_from_sources.
3.2 Implementation of the Features - PrincipleWith the most simple design for a focus rail you constantly move the camera with the focus rail, constantly take photos or use video during this movement, and store the results on the SD card. After movement ends, the stacked photo is then created from these photos.
This solution does not require motor control. However, as the rail is constantly moving you need to meet specific lighting conditions, and the quality of the photos might be limited.
A more complex design includes motor control. Here you move the camera for one step, take a photo, and then move the camera for the next step and again take a photo - until you covered the entire object.
3.3 Implementation - Design of a Controlled VersionSpresense includes several building blocks for the current project. This section describes the design of the more complex solution and that consists of the following parts:
- Console
- Camera (capture photos and create stacks)
- Motorized focus rail/ motors
Focus stacking requires you to capture several photos from the same object, while you change the focus plane between each shot. This can be achieved by mounting the camera onto a motorized rail, which then moves the camera by a defined distance between each shot.
A UI that extends/ interfaces the camera example is required that allows the user to define parameters, such as how many shots, distances, etc.
3.3.2 CameraIn this project, Spresense works as a camera. The example section of the documentation (see here https://developer.sony.com/develop/spresense/docs/circuitpython_tutorials_en.html#_circuitpython_camera_tutorial) includes a camera example, which is a good starting point for this part. You install it to your Spresense as described in the mentioned documentation.
The example code is able to capture photos, and it can be extended by the missing functions to create focus stacks. The stacked photo is then written to the SD card. The corresponding section of the standard is a good starting point in order to learn how this is done (see https://developer.sony.com/develop/spresense/docs/circuitpython_tutorials_en.html#_circuitpython_sdcard_tutorial).
3.3.3 Motorized focus railThe current project employs a standard construction kit in order to create a prototype of the mentioned motorized focus rail. This prototype includes the required mechanical structure, and it employs motors in order to move the mounted camera. After each shot, the modified/ extended camera example needs to move the motors correspondingly.
Different options exist to establish the interface between the modified camera example on the Spresense and these motors.
- Separate motor controller
- Spresense as the motor controller
- RoboRISC and ftRoboRemote on the fischertechnik® controller
As described in the book „Fischertechnik-Roboter mit Arduino“ (see https://fischertechnik-roboter-mit-arduino.de), you can use an Arduino that is equipped with a motor shield to connect the motors of the fischertechnik® construction system. This described setup in particular uses the Adafruit Motor shield and the communication between Arduino and motors employs the I2C protocol.
In such a setup the Spresense will interface the Arduino-based Motor Controller and input commands, which describe the needed movements. The connection can either be established directly, or by means of a message broker such as MQTT that runs on a central server (i.e. located in the Spresense).
However, keep in mind that on the Spresense the CircuitPython does not support MQTT (see the FAQ section in the Spresense documentation). There you have the options to either install the stand-alone ArduinoMqttClient library in the Arduino IDE. Or, in the SDK environment you use the MQTT library (Eclipse Paho MQTT C/C++ client for Embedded platforms). As EdgeImpulse writes in their Deep Dive you can also install an Arduino WLAN shield that also supports MQTT.
For more information, see these links
- Arduino IDE: See the Arduino LTE example, LTE → LteGnssTracker: Spresense Arduino: LteGnssTracker sample sketch
- SDK environment : See the code example in the spresense/sdk/examples/lte_mqtt folder of Spresense SDK: LTE MQTT sample application
- EdgeImpulse: Deep Dive Sony Spresense with Edge Impulse https://www.edgeimpulse.com/blog/deep-dive-sony-spresense-with-edge-impulse-part-1
As described above, the motors of the mechanical construction will be connected to the Motor Shield as before. But instead of a separate Controller Board that interfaces this motor shield, the motor shield is connected to the Spresense. Here, the Spresense takes the pictures and also functions as a controller for the motor shield/ the motors.
3.3.3.3 RoboRISC and ftRoboRemote on the fischertechnik® controllerThe fischertechnik® system includes an own controller. Available to this project is the TXT 3.0 controller, which is normally programmed with a graphical language.
As by the book „Bauen, erleben, begreifen: fischertechnik®-Modelle für Maker“ (see https://dpunkt.de/produkt/bauen-erleben-begreifen-fischertechnik-modelle-fuer-maker/) to following options exist to extend the programmability of this board:
- Extend this controller with libraries that support modern program languages (see „TXT C Programming Expert Kit“ available on the fischertechnik® homepage).
- Use the program system ftrobopy (Python interface to the fischertechnik® TXT controller by Torsten Stuehn), which comes with much more features. In order to use this library an upgrade to the system is needed (see page 270ff).
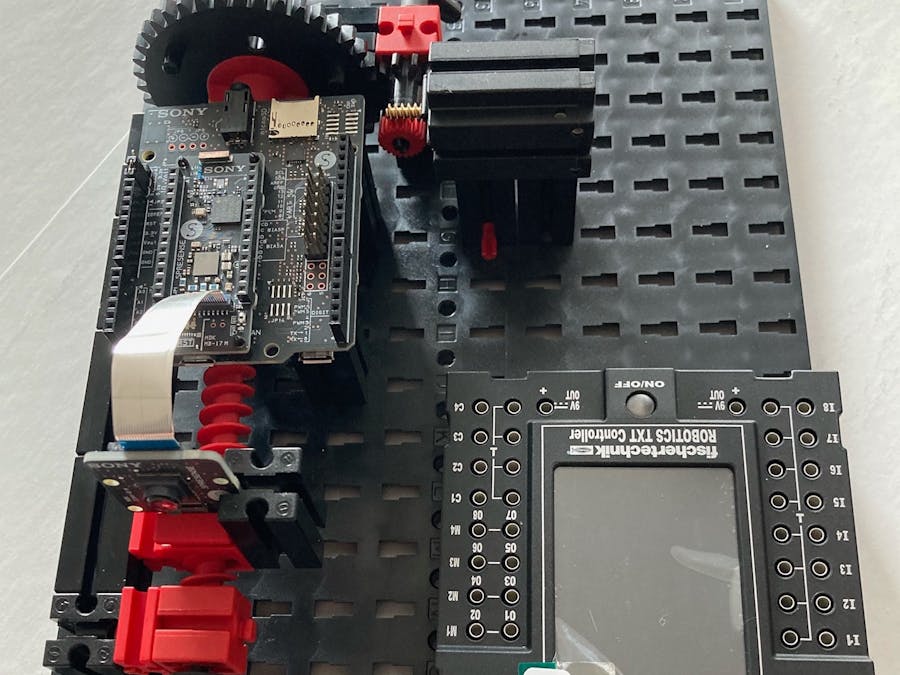
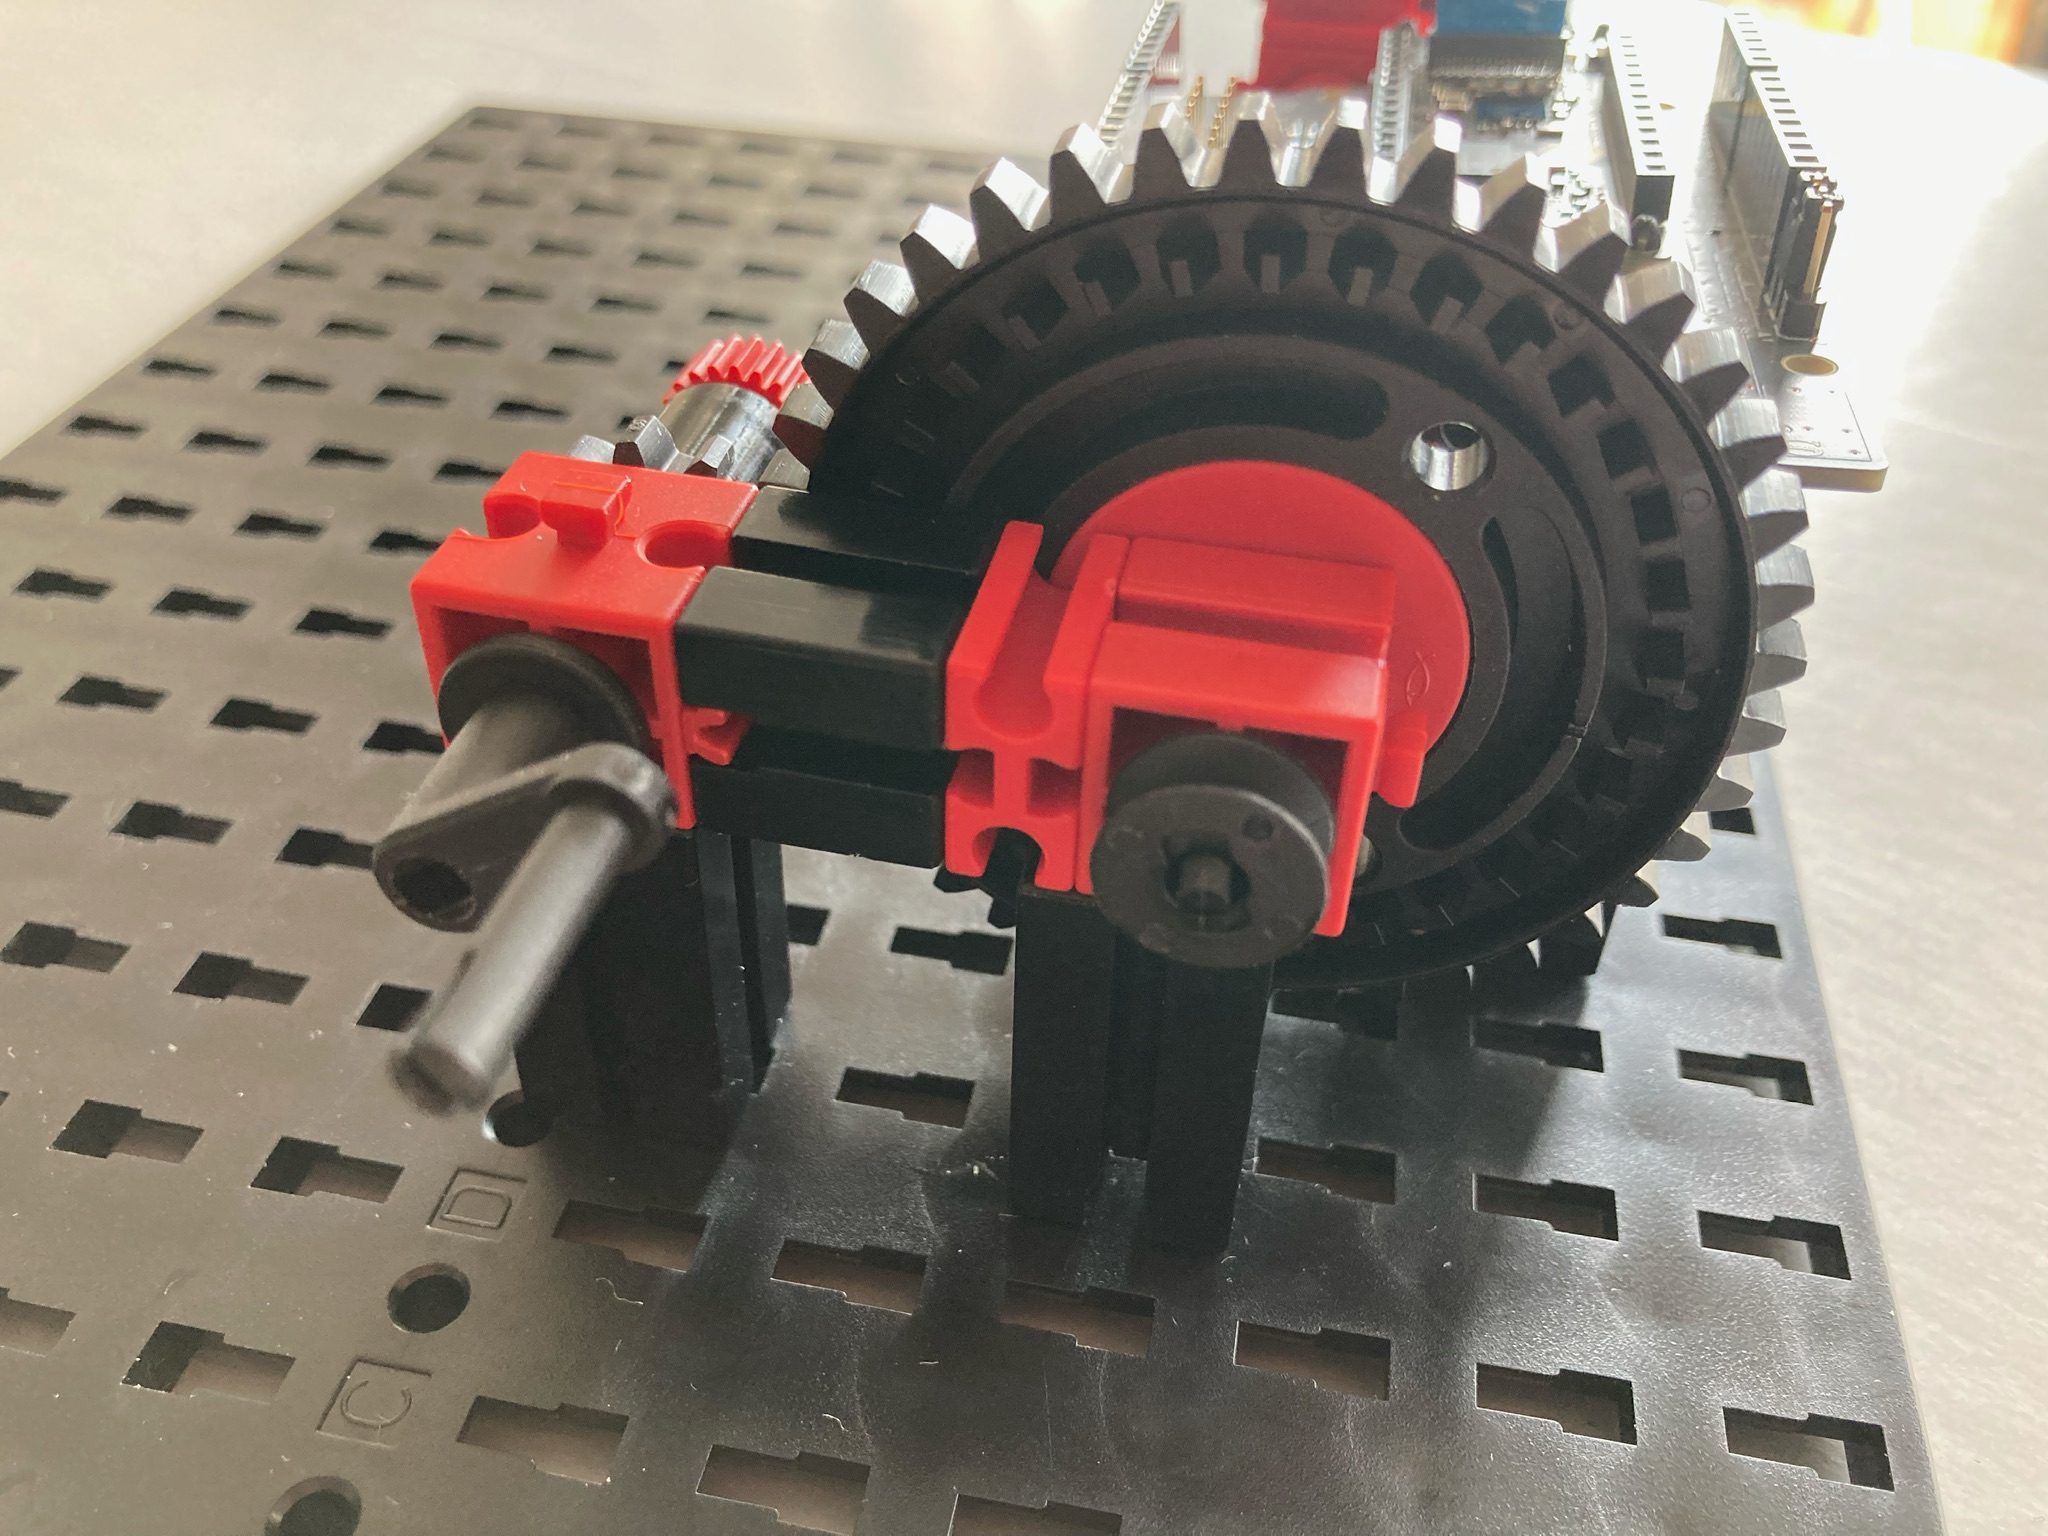
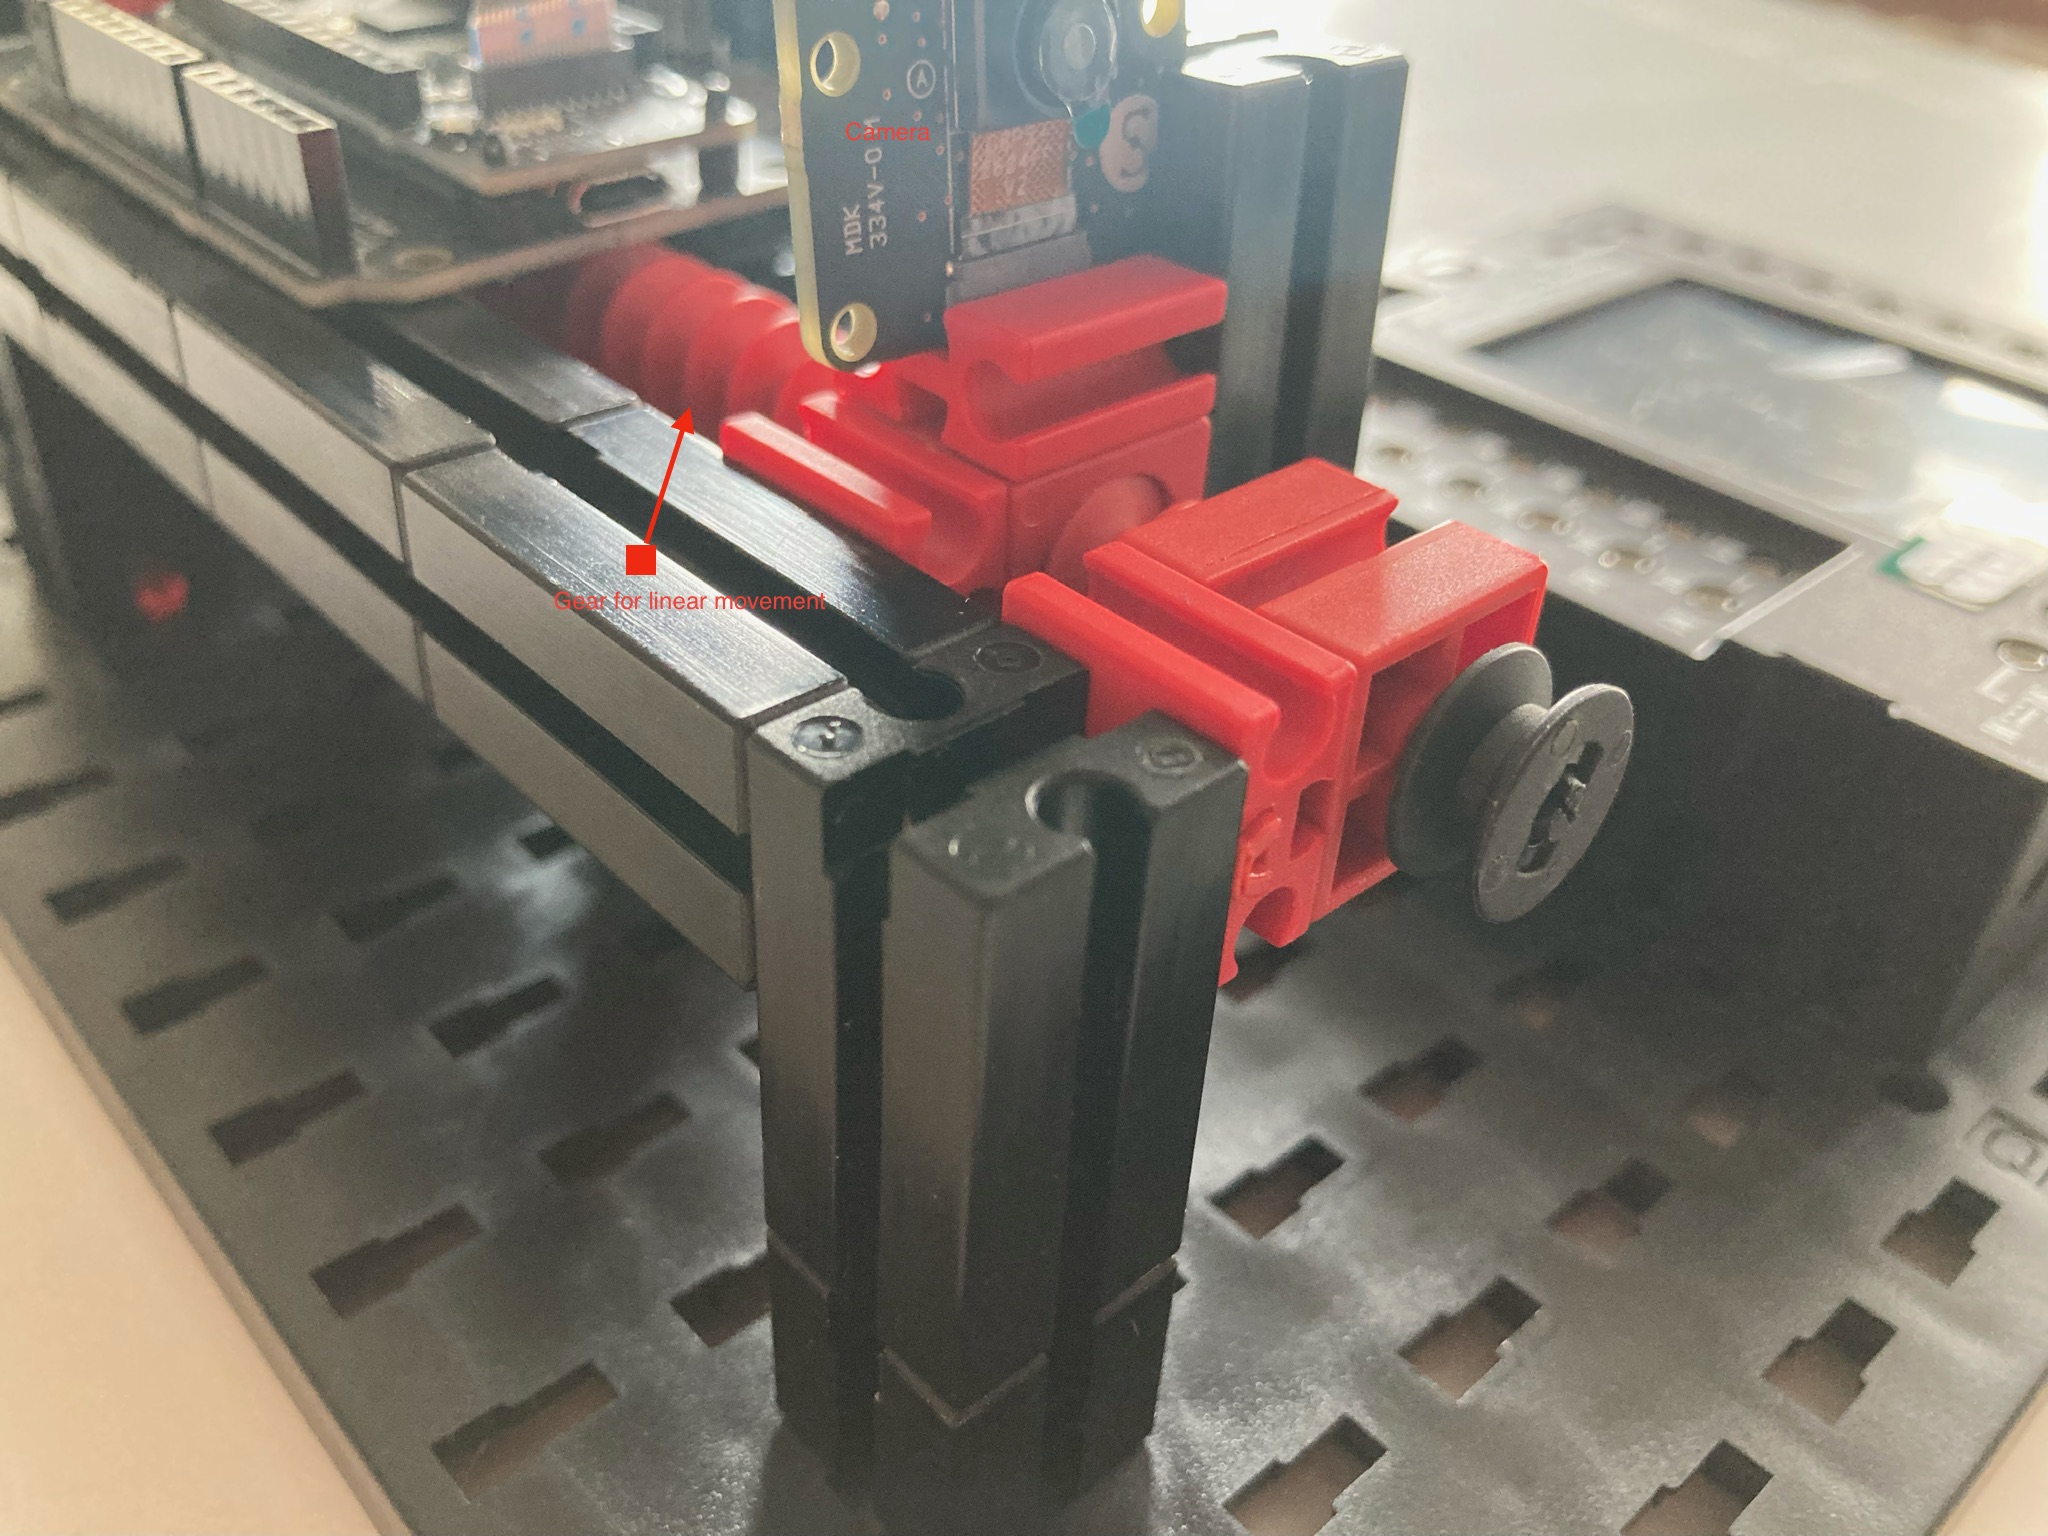
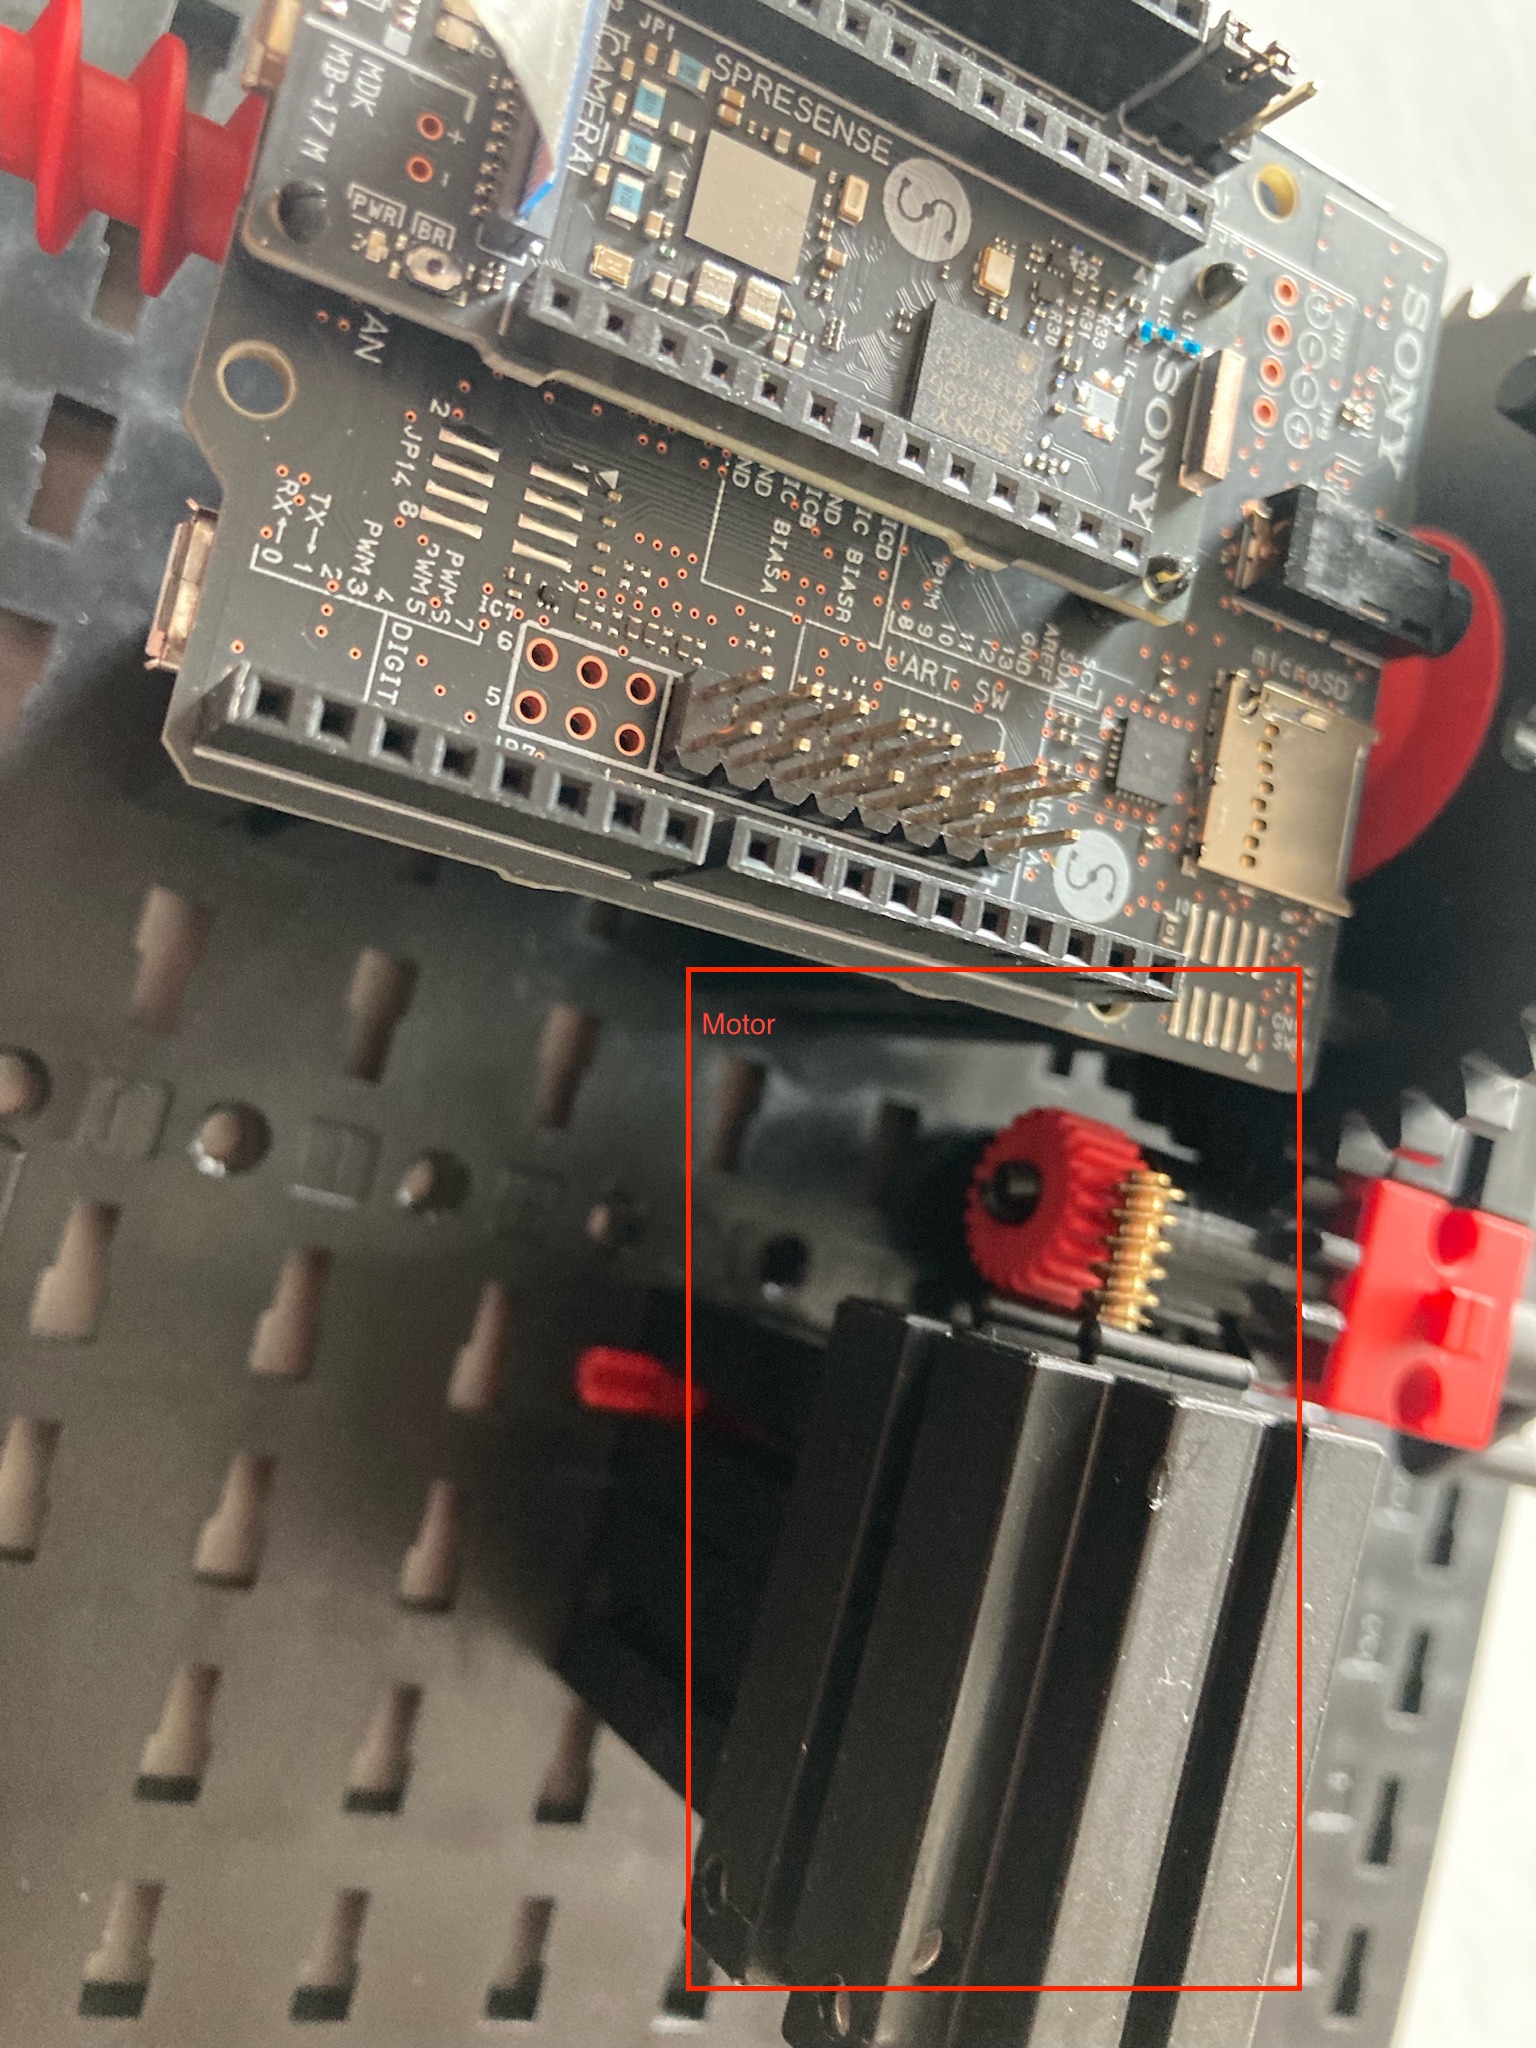
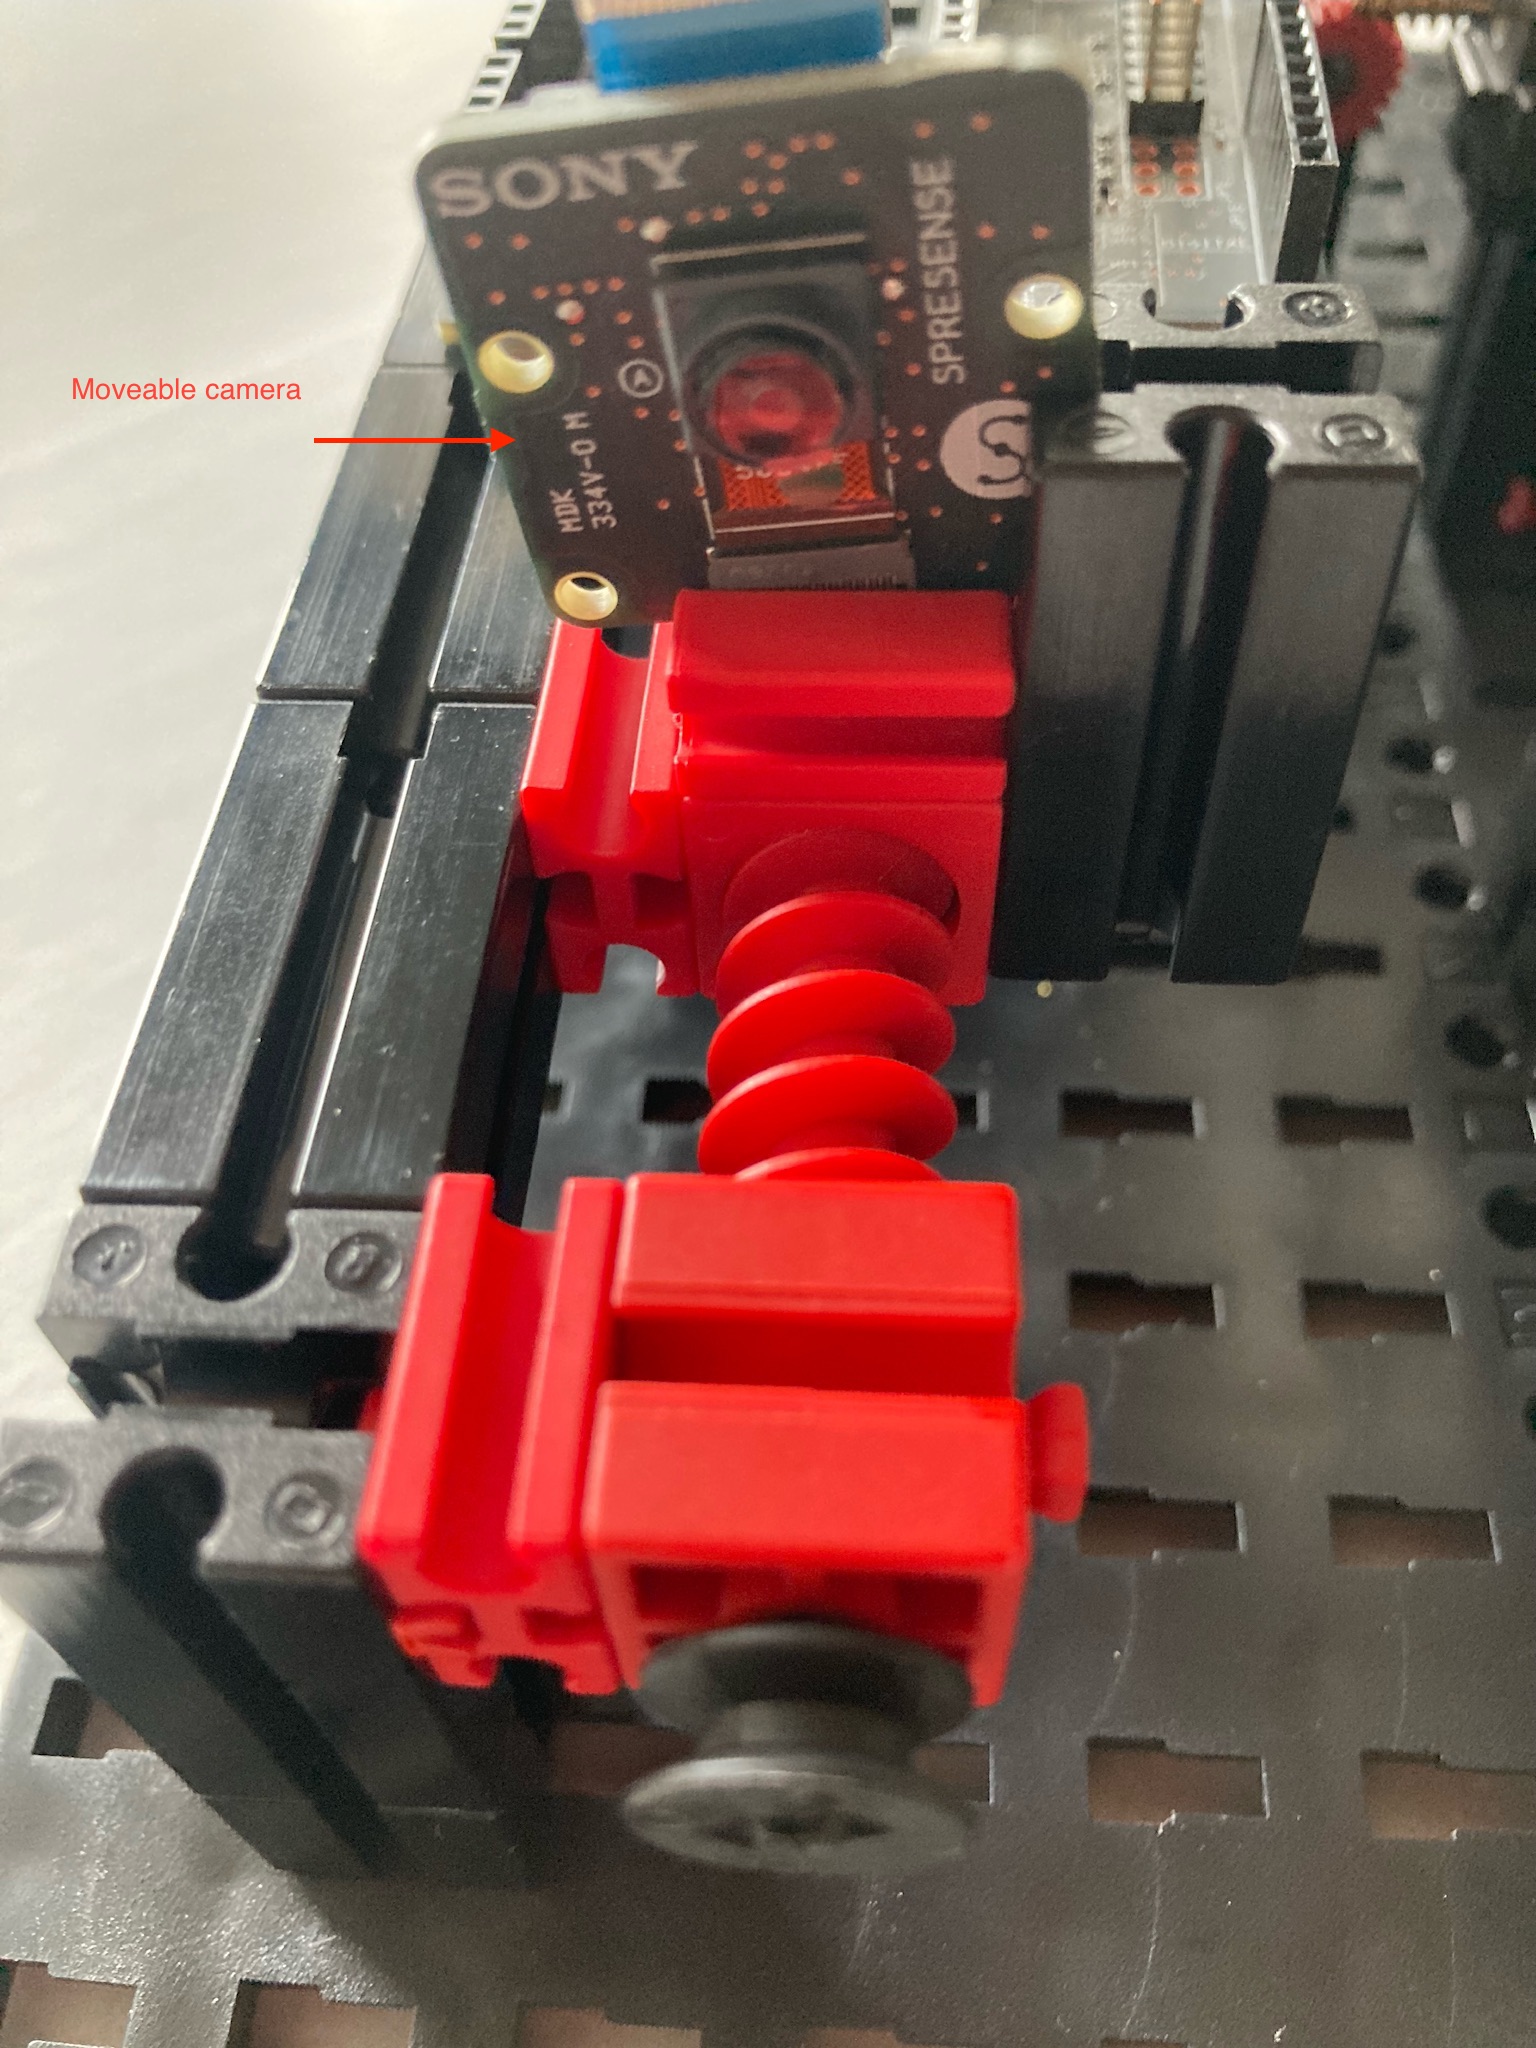
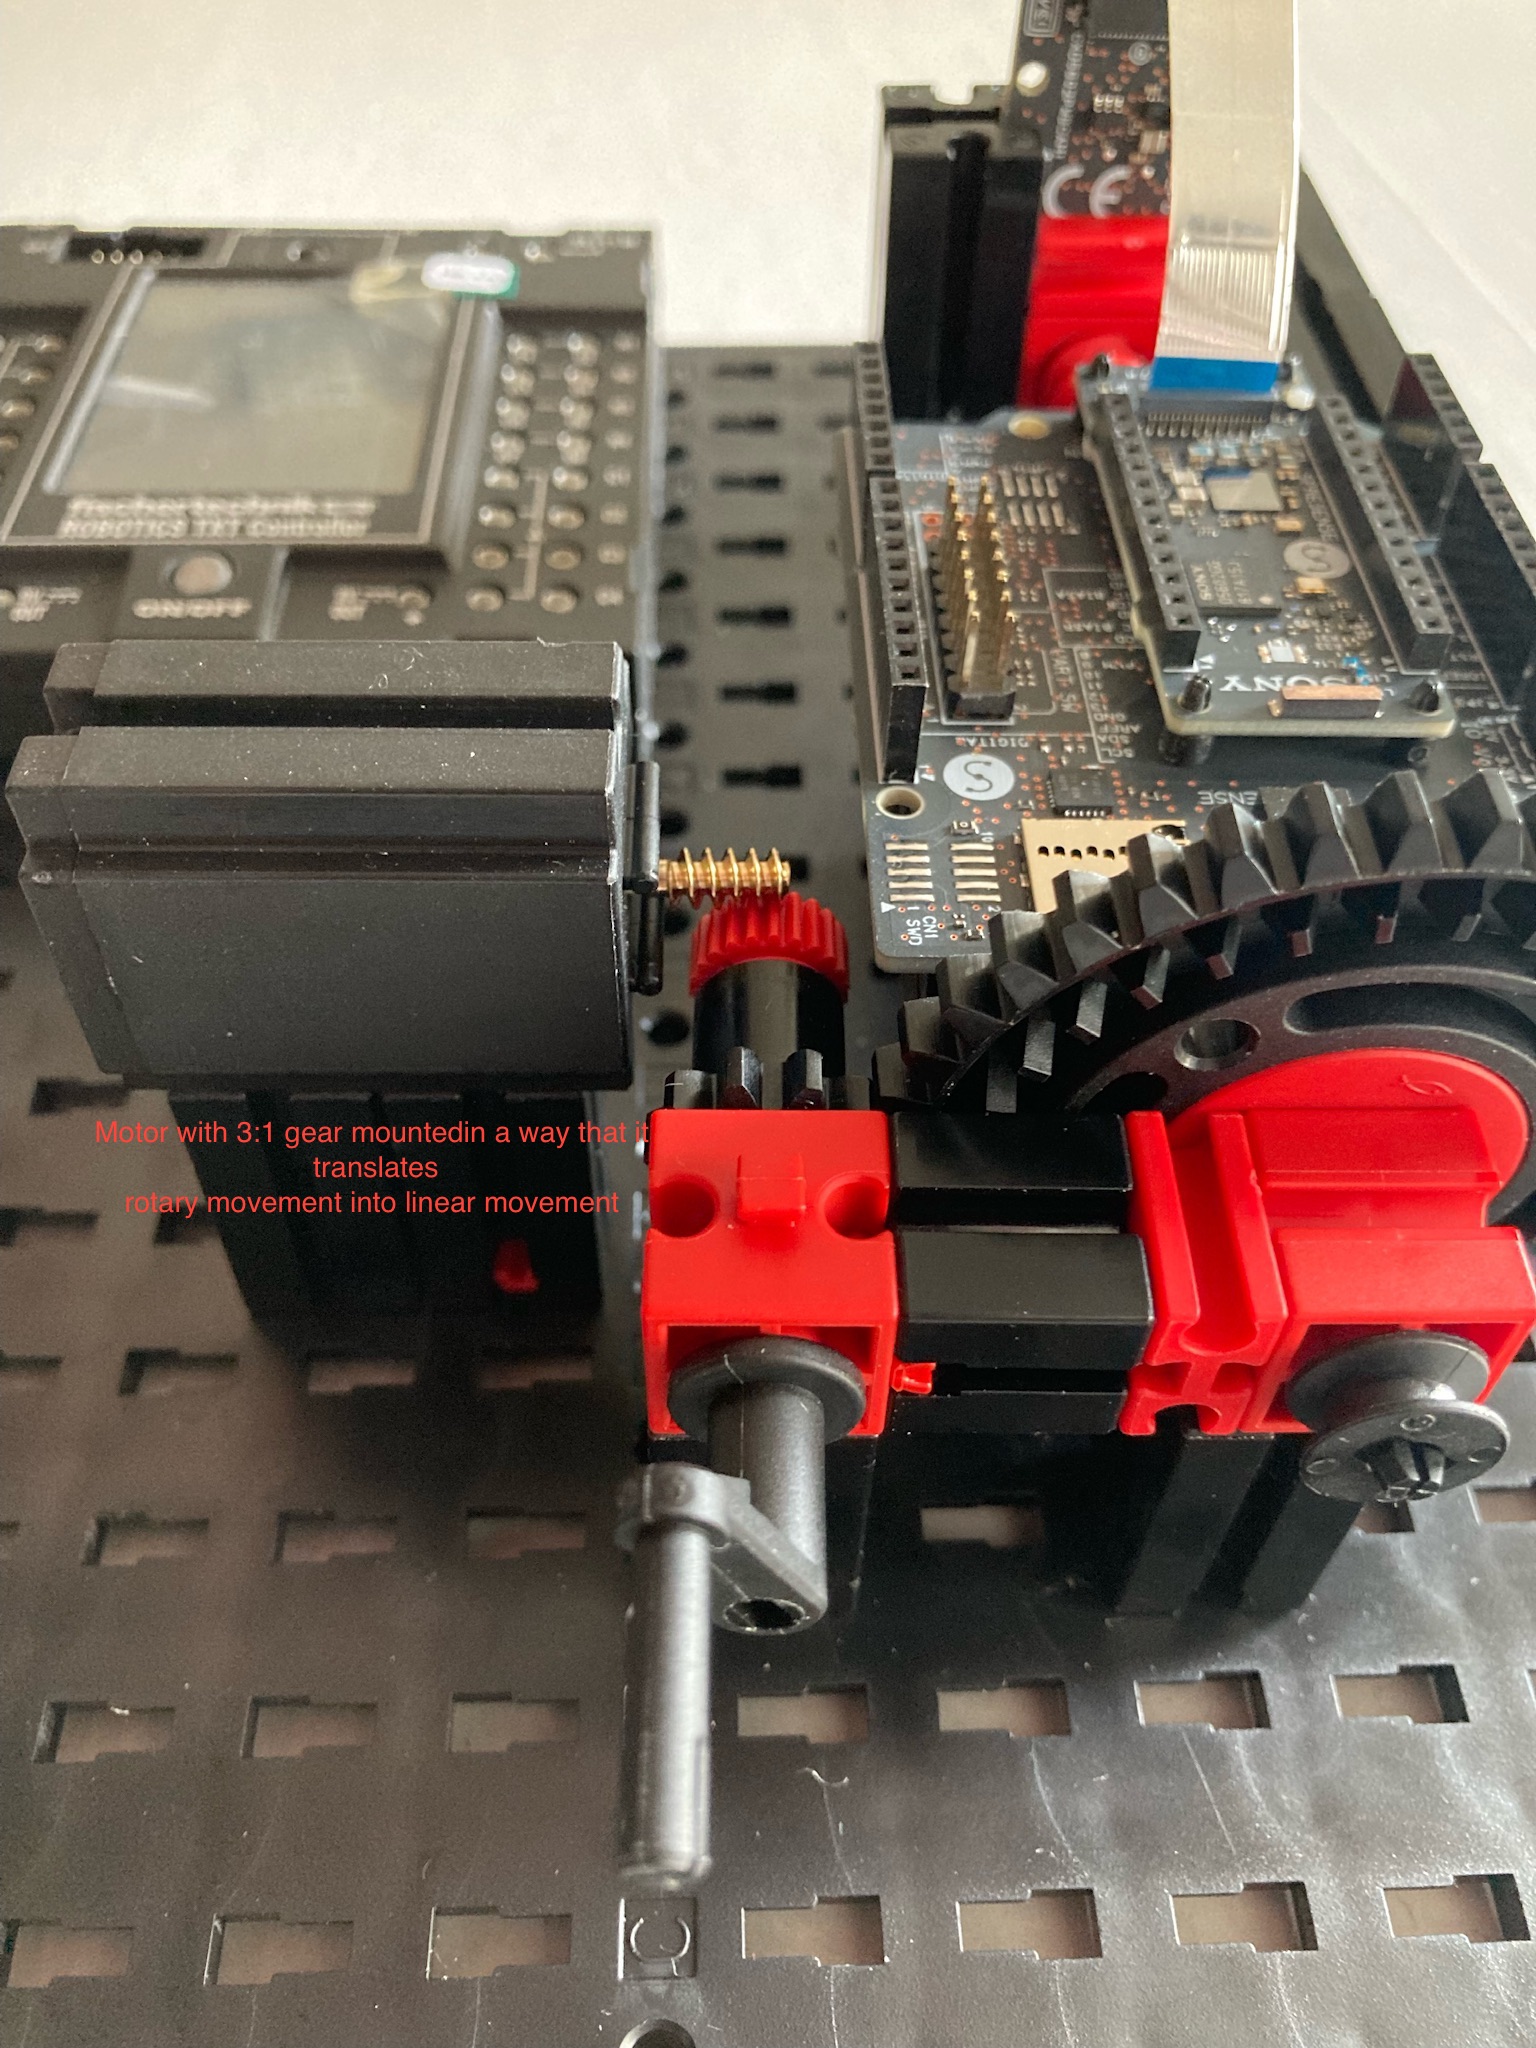
A focus rail is s piece of hardware that is capable of moving the Spresense camera board towards the object, as smoothly as possible. Attached photos document different aspects of the the construction details (for better view ability not all parts finally assembled).
First you create a gear, which is moved by the motor. The higher the translation of this gear, the smaller and smoother the movement. As you see on the photos, the prototype uses a 3 : 1 gear that is driven by the motor on one side, and that is connected to a shaft, which is then used to translate the rotation to a linear movement by means of a worm gear.
One complete revolution of the shaft requires 3 motor revolutions. As you see in the photos, the outbound shaft of the 3 : 1 gear is connected to a worm gear. The camera is mounted to a plate that is fixed on this worm gear. This construction translates the rotary movements from the 3 : 1 gear into a linear camera movement. The Spresense is mounted to a traversal behind this gear, as it does not need to be moved. A short video shows the camera movement.
3.5 CodeIn the codesection of the attached GitHub you find a codeidea based on the Spresense documentation. This might give you a first idea of the needed camera code.




Comments