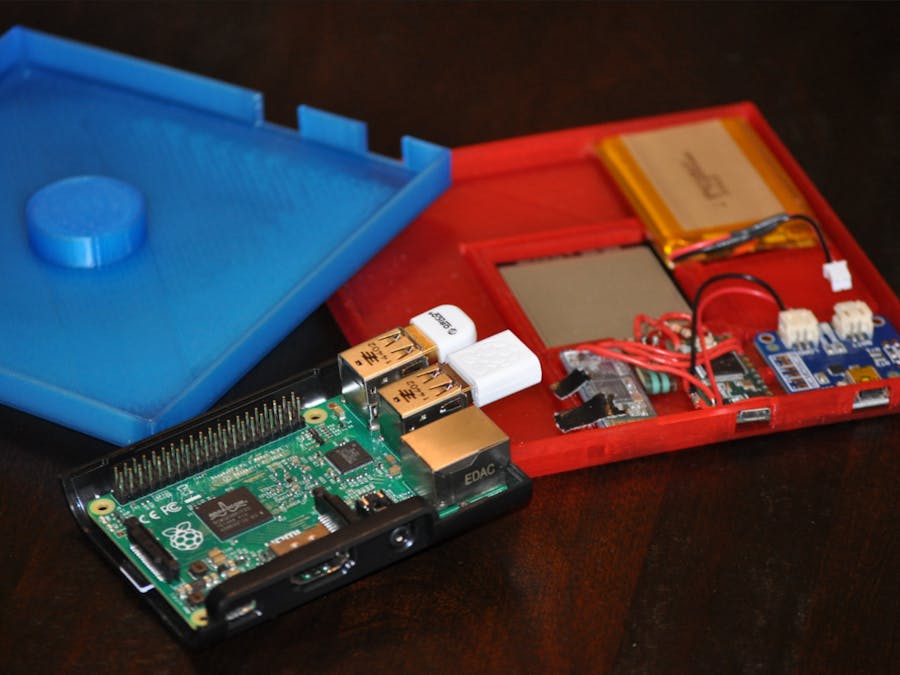
Foodie is meant to be a modular end to end weight sensor network that allows you to track food usage, provide statistics, recommend shopping lists and even more. Combining a Raspberry Pi 2 running the Windows 10 IoT Core, a Teensy, Spark, Cassandra, and Azure we get an end to end sensor consumption service that is capable of tracking food usage and tying it to individual barcodes.
What Does Foodie Do?
- Live tracking of weight sensors
- Web Interface to view sensor data and upload barcodes
- Upload barcode images and tie a product to the sensor
- Integrates a barcode API to get product information
Overview:
1 Fish - Getting Started
2 Fish - Hardware
Red Fish - Setting up the Backend
Blue Fish - Linking It All Together
1 Fish - Getting Started:
This project relies on various different pieces that range from running on the Raspberry Pi 2 to running in the Cloud. In the following sections you will learn everything from how the project interacts, to where and how to buy the pieces, as well as how to get everything up and running.
First off, some general notes about this project.
- I opted to use a Teensy instead of an Arduino to make sure I could make the form factor I wanted. However I have included code that will run on an Arduino Uno which takes advantage of the SoftwareSerial Library to emulate a UART connection on pins 10 and 11.
- The project was designed to be fairly modular in the sense that, the backend could be stripped to support a wide array of different sensors and modules that need streaming support. By all means break apart the code base and use it, the Event Hub and Spark streaming pieces are great for just about any sensor network.
Initial tools to get ready
- Visual Studio - You will need at least the Community edition to compile and deploy the C# Raspberry Pi Hub to the Raspberry Pi
- Arduino IDE - This will be needed to deploy the weight sensor firmware to the Arduino. OPTIONAL: If you opt to for the Teensy you will also need to download the Teensy plugin for the Arduino IDE.
- Azure Account - This project relies on an Event Hub hosted in Azure and my example takes advantage of an Azure VM as well as an additional Azure SQL Database.
- Soldering Iron - This is optional however if you want to package it all up inside the case you will want to solder the connections directly.
- Outpan API Key - You will need this a little later on, it is the Barcode API Key.
- 3D Printer or Something Similar - If you are interested in printing out the housing, you can find the STL files in Foodie/STL
2 Fish - Hardware:
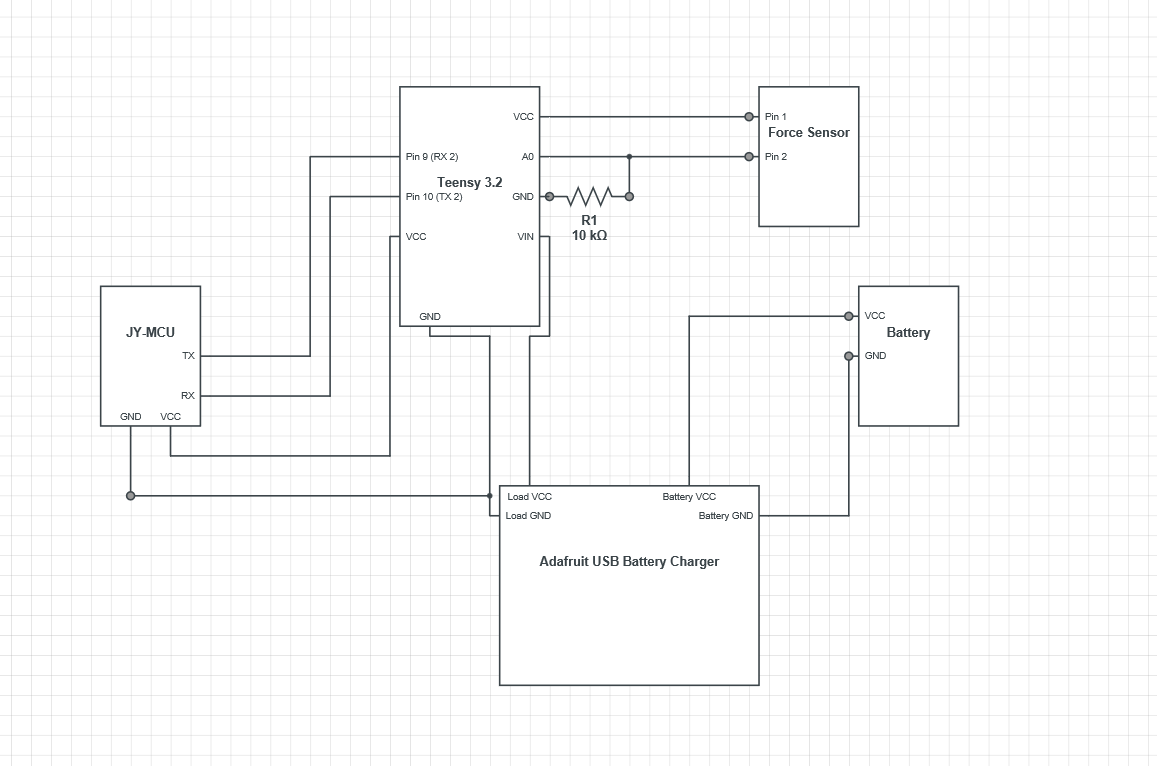
A few things worth noting about this circuit.
- When connecting the JY-MCU unit to the Arduino remember that the TX port on the Arduino connects to the RX port on the Bluetooth module and vice versa.
- Use one GND pin for the Force Sensor and the other GND pin for the Bluetooth Module and USB Battery Charger.
- On an Arduino Uno, simply connect the TX and RX pins to pins 10 and 11.
Red Fish - Setting up the Backend
The backend to this project relies on 4 major parts.
- Bluetooth Connected Arduino
- Raspberry Pi 2
- Azure Event Hub/Spark Streaming Job/Cassandra
- Website
Bluetooth Connected Arduino
- Navigate to the root of the project
- Open the "WeightSensorFirmware - Uno" or "WeightSensorFirmware - Teensy" folder and open up this file up in the Arduino IDE
- Side Note: If you are using a Teensy, ensure you have the following package installed. http://www.pjrc.com/teensy/loader.html
- Click on the sideways arrow in the upper left of the IDE to begin the upload process.
-
That's a wrap folks! That's all it takes to get the Arduino ready to talk to the Raspberry Pi 2.
Raspberry Pi 2
- Follow Microsoft's setup guide to get the Windows IoT Core image running on the Raspberry Pi 2 http://ms-iot.github.io/content/en-US/win10/SetupPCRPI.htm
- Open up the Windows IoT Core Watcher program and determine the IP Address of your RPi 2.
- Side Note: Normally we would be able to navigate to the onboard website and pair our Bluetooth devices there. However I have not had much luck getting a device with a passkey to correctly pair via the website.
- Download and Install Putty or your favorite SSH Program
- Open up Putty and enter your Raspberry Pi's IP Address into the following box, then hit enter.
- Once you reach the login screen via the SSH terminal enter your credentials. (Default User: Administrator, Pass: p@ssw0rd)
- Follow these steps next to pair your RPi to you Bluetooth module. http://ms-iot.github.io/content/en-US/win10/samples/BLEGatt1.htm
- Side Note: If you are using the JY-MCU Bluetooth module or any variant of the HC-06 chip, the default passkey is "1234"
- Navigate to Foodie/RaspPiHub and open up the solution in Visual Studio
- Fill in the information at /AppConfiguration/app.json
- Deploy the app to the Raspberry Pi 2!
Azure Event Hub/Spark Streaming Job
- Begin by creating an Azure Event Hub by following this guide up until it begins creating a C# app. https://azure.microsoft.com/en-us/documentation/articles/event-hubs-csharp-ephcs-getstarted/
- Create an Azure VM with the following specs and make sure to give it a unique name!
- Navigate to the Endpoints tab of your VM and add TCP rules for all of the following.
- Here is where the fun really begins! The setup commands are numerous and are too much to attach in the body here, so I have attached a text file with the commands to run via SSH on the VM. https://github.com/vadlak/Foodie/blob/master/SetupInstructions.txt
- There is a lot to setup and quite a bit of information to digest, so take your time and walk try to understand it all.
- CONGRATULATIONS! If you have made it this far you only have one piece left to setup.
Website
- Navigate to /Foodie/FoodieWeb and ensure that line 14 of "FoodieWeb.py" is listening on port 80
- In /Foodie/FoodieWeb make the "run" file executable via chmod +x ./run
- Execute "nohup ./run &" to start the website in the background
Blue Fish - Linking It All Together
If all went well you should now have the entire project up and running and ready to go. That means we get to start the fun part, playing with the system we just setup.
- Assuming the Raspberry Pi is paired with the HC-06 correctly, load up RaspPiHub on the Raspberry Pi and connect it to HDMI. This will give you a UI to begin tracking paired Bluetooth devices. Click on the HC-06 Entry and hit add.
- The Raspberry Pi will now begin polling that sensor for weight sensor data every minute, and sending it to the Azure Event Hub we have set up.
- The Spark Streaming job we set up will consume the Event Hub data in 5 second intervals and inserting the new readings into the Cassandra DB
- Navigate in your web browser to http://publicipaddressofyourvm.com and you can view a graph of the last 30 readings that refreshes every 5 seconds and upload an image of a Barcode to attach to the sensor.
×
Drag and drop images or click to select some from your file system


_ztBMuBhMHo.jpg?auto=compress%2Cformat&w=48&h=48&fit=fill&bg=ffffff)


Comments
Please log in or sign up to comment.