


Hardware components | ||||||
 |
| × | 1 | |||
 |
| × | 1 | |||
| × | 1 | ||||
 |
| × | 1 | |||
Software apps and online services | ||||||
 |
| |||||
 |
| |||||
Abstract:
Automation the process of monitoring the garden can transform garden irrigation process from being manual and static to smart and dynamic one. This leads to higher comfortability, water using efficiency and less human supervision effort. This project proposes a cloud based Internet of Things (IoT) smart garden monitoring and irrigation system using Bolt IOT. The watering requirement for a plant can be adjusted by monitoring the soil moisture. Measuring the soil moisture of the plant gives information if the plant is ideally watered, over watered or under watered. This is done using soil moisture sensor. The monitored data is sent continuously to Bolt cloud. In the cloud the data gathered from the system is analyzed and when a target threshold of soil moister is reached, an action is sent accordingly from the cloud to the garden automatic watering system to irrigate the garden. Bolt iot module is used to implement the system control unit. IoT is used to keep the garden owner updated about the status of the sprinklers. Information from the sensors is regularly updated through Twilio is a cloud communications platform as a service (CPaaS) allows software developers to programmatically make and receive phone calls, send and receive text messages, and perform other communication functions using its web service APIs.
All the required components:
All the components required for the project are mentioned below and are easily available in market at reasonable price.
1. Soil moisture Sensor:
Information of soil moisture Sensor:
https://en.wikipedia.org/wiki/Soil_moisture_sensor
2. Bolt Iot:
Information of Bolt iot : https://docs.boltiot.com/docs
3. Motar:
4. Pump: (self made)
Credits and reference: https://www.youtube.com/watch?v=pnx86V0xkmo
5. Jumper wires (Male/Male):
6. Mobile Charger:
BoltIOT Platform
Bolt IoT platform gives you the capability to control your devices and collect data from IoT devices safely and securely no matter where you are. Get actionable insights by deploying machine learning algorithms with just a few clicks to detect anomalies as well as predict sensor values. To know more visit boltiot.com.
In the previous lesson, we created our account on Bolt Cloud. Before we link our Bolt device to our account, let us understand the Bolt Cloud Architecture, how it works, and why it is important.
The Bolt Cloud is one of the major component in providing the IoT capabilities to the Bolt device. All the Bolt devices connect to the Bolt Cloud out of the box. The Bolt devices are shipped with a firmware that helps it understand how to connect to the Bolt Cloud over the Internet.
Communication of Bolt Devices with Bolt CloudThe communication of Bolt devices with Bolt Cloud happens over the MQTT communication protocol. MQTT stands for Message Queue Telemetry Transport. But why do we need to have a protocol such as MQTT for communication when HTTP & HTTPS protocols are so popular and widely used for communication? Although these protocols are popular, the amount of overhead data that is sent over the Internet for managing the communication is quite a lot. Overhead data is the data which is sent along with the actual message/data which conveys the extra information required to understand the message/data sent. The overhead data varies from protocol to protocol. This is fine in case of systems such as mobile phones, laptops, desktop computes that have the hardware capabilities and the network capabilities to send the extra overhead data.
Most IoT devices and sensors contain limited processing capabilities and constrained Internet bandwidth. Due to these limitations, they send data over the Internet only when required and the data sent is very low in terms of bandwidth usage. Hence using protocols such as HTTP, HTTPS does not become feasible where the overhead data is more than the actual data itself. MQTT contains very low overhead and hence becomes ideal for IoT communication.
MQTT is a pub-sub messaging protocol. Pub refers to publishing and sub refers to subscribing. There is a central entity, in our case it is the Bolt Cloud. All the Bolt devices connect to the Bolt Cloud and send the data to various channels by publishing the data on their unique channels. The Bolt devies also subscribe to channels so that they can receive commands coming from the Bolt users.
The Bolt Cloud users i.e. people like us communicate with the Bolt Cloud using the HTTPS communication protocol. We can use the Bolt Cloud dashboard to control and monitor our Bolt devices or use the Bolt Cloud APIs in case we want to by-pass the dashboard and access our Bolt devices via programs that we have written. We shall learn more about this in the next modules.
Bolt Cloud receives all the commands to control or request for sensor data from Bolt devices, and sends the commands to the Bolt device. The Bolt device executes the commands, and sends a response back to the Bolt Cloud which in turn forwards it to the user who initiated the command.
In this lesson, we understood the architecture of the Bolt Cloud, how the Bolt devices and users communicate with the Bolt Cloud. In the next lesson, we shall see how the Bolt Cloud works.
Twilio:
Twiliois a cloud communications platform as a service (CPaaS) allows software developers to programmatically make and receive phone calls, send and receive text messages, and perform other communication functions using its web service APIs.
Twilio uses Amazon Web Services to host telephony infrastructure and provide connectivity between HTTP and the public switched telephone network (PSTN) through its APIs.
Twilio follows a set of architectural design principles to protect against unexpected outages, and received praise for staying online during the widespread Amazon Web Services outage in April 2011.
Twilio supports the development of open-source software and regularly makes contributions to the open-source community. In June 2010 Twilio launched Open VBX, an open-source product that lets business users configure phone numbers to receive and route phone calls. One month later, Twilio engineer Kyle Conroy released Stash board, an open-source status dashboard written in the Python programming language that any API or software service can use to display whether their service is functioning properly. Twilio also sponsors Local tunnel, created by now ex-Twilio engineer Jeff Lindsay, which enables software developers to expose their local development environment to the public internet from behind a NAT
Creating and setup of twillo account:
Reference link: https://support.vision6.com.au/hc/en-us/articles/230673727-Text-Messaging-Account-Setup-with-Twilio
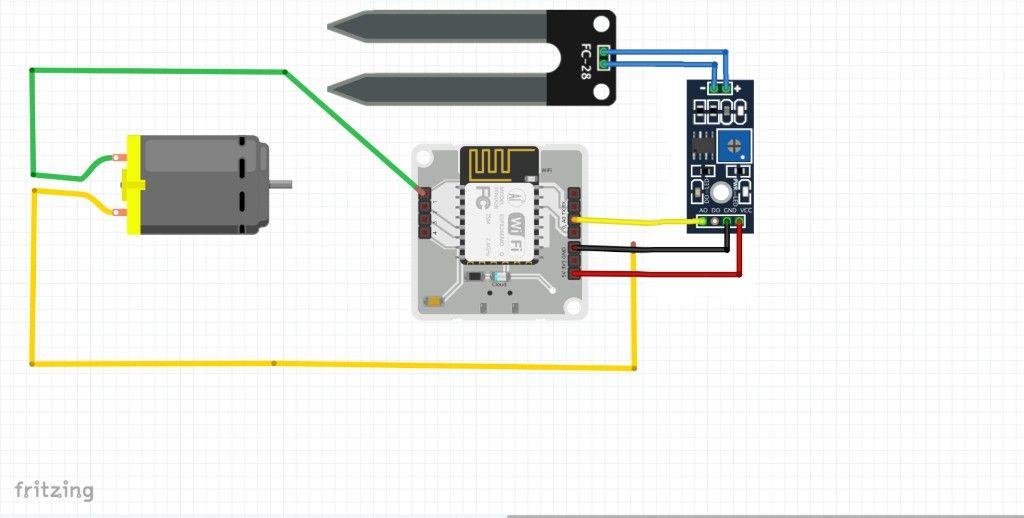
Assembling the hardware
1. Take soil moisture sensor and connect its analog pin to A0 pin in Bolt IOT module
2. Connect VCC of soil moisture sensor to 5V in Bolt IOT module
3. Connect motar to GPIO pin of Bolt IOT module
4. Use male and female jumper wires for connection
Some pictures of prototype
NOTE: motor dealing with water so should be carefully because some sort of sprinkled water on circuit and module may cause damage
We'll be using VMware Ubuntu device on our PC(Windows). You can Download the Virtual Box and Ubuntu Server.
To set up the server, follow the steps as shown in below video:
Step 1: Update the packages on Ubuntu
Execute the command below so that the packages on Ubuntu are updated to the latest version. If you skip this step, you may encounter an error while installing the Boltiot package.
sudo apt-get -y updateStep 2: Install python3 pip3
pip3 is a package manager for python3 used to install and manage packages and python libraries. It is system independent.
Install pip3 using the following command,
sudo apt install python3-pipStep 3: Installing Bolt IoT library using pip.
Now we will install the boltiot python library on your Ubuntu server.
Type the below command in terminal to install boltiot python library.
sudo pip3 install boltiotNow we are done with boltiot python library installation. In the next section, we will learn how to use the Bolt python library to check the device status and switch off the device.
Step 4: To get bolt API key and device ID, go to Bolt cloud and click in API section you will get API key.
Now go to device section you will get device ID
.
By creating account on Twilio
Take
SID, AUTH_TOKEN, FROM_NUMBER, TO_NUMBER
For this refer below link
Reference link: https://support.vision6.com.au/hc/en-us/articles/230673727-Text-Messaging-Account-Setup-with-Twilio
SENDING SMS WITH TWILIO
Step 1: Connect the temperature monitoring circuit REFER -Hardware connections for soil moisture sensor.
Step 2: Login into the putty by entering the IP address of your digital ocean droplet.
Step 3: After successful login, create a file named conf.py which will store all the credentials related to Twilio. To create a new file type sudo nano conf.py in the terminal. After that write below code to save all the credentials in a single file.
SID = 'You can find SID in your Twilio Dashboard'
AUTH_TOKEN = 'You can find  on your Twilio Dashboard'
FROM_NUMBER = 'This is the no. generated by Twilio. You can find this on your Twilio Dashboard'
TO_NUMBER = 'This is your number. Make sure you are adding +91 in beginning'
API_KEY = 'This is your Bolt Cloud account API key'
DEVICE_ID = 'This is the ID of your Bolt device'
Note: You have to replace all the above value with your credentials. You can find the first four value in Twilio dashboard and the last two in Bolt Cloud dashboard.
We store all the credentials in a separate file since it is sensitive data which should not be shared with anyone. Hence it is a good practice to avoid using credentials in code directly. After replacing all the values, save the file using CTRL+X.
Step 4: Now create one more file named soil_moisture.py. To do so you have to type sudo nano soil_moisture.py in the terminal. Now we will write main code to collect the data from the Bolt and send SMS if it crosses the threshold.
The algorithm for the code can be broken down into the following steps -
1. Fetch the latest sensor value from the Bolt device.
2. Check if the sensor value is in the range specified in our min and max values.
3. If it is not in range, send the SMS.
4. Wait for 10 seconds.
5. Repeat from step 1.
WORKING PRINCIPLE:
Automatic smart gardening and monitoring system using Bolt IOT is on the logic of whenever the plants are dried and the plants require some water the motor connected to near the plant it gives water at a certain period of time after that certain period motor turned off due to soil moisture sensor value.
1. Initially fix threshold values for drought condition up to max value which is nothing but fully dry land on the plant surface
2. Then the plant condition whether it may be wet or dry continuously monitored by soil moisture sensor and the data is send to the Bolt Cloud
3. Based on the API keys and all the details of conf.py file the details are displayed and run on Ubuntu server and also it requests SMS request to twilio cloud service
Results:
Compilation:
Response:

Comments
Please log in or sign up to comment.