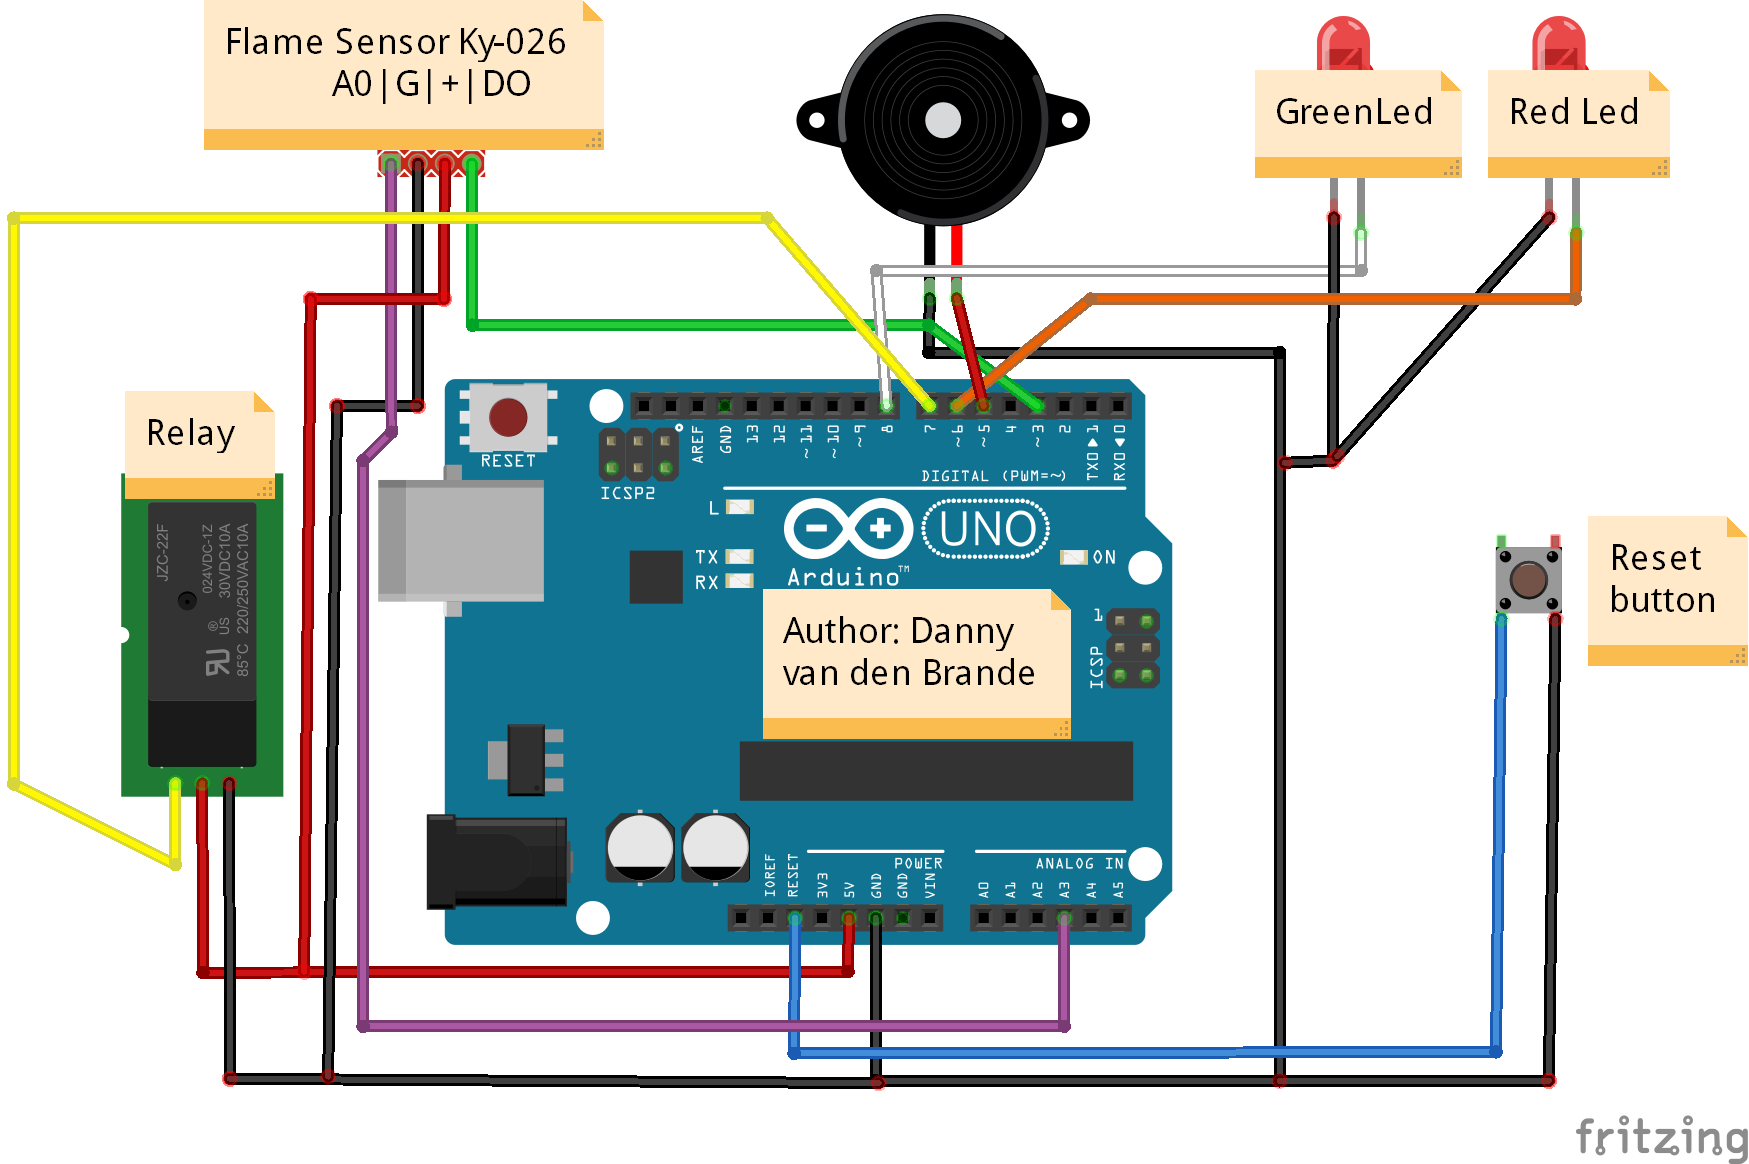
//Author Danny van den Brande. arduinosensors.nl, also check out my forum to find more info and example codes for most common sensors @ forum.arduinosensors.nl
//Do whatever you want with this.
// What can you do with this? you can turn on a sprinkler, or any other device, like a Siren with sound by using the relay.
// Or if you change the code to work the other way arround you can switch of something that works with gas, for example.
int Relay = 7 ; // Pin for relay
int Buzzer = 5; //Pin for buzzer
int RedLed = 6 ;// The pin for the RedLed
int GreenLed = 8 ;
int Digitalpin = 3;
int Analoogpin = A3; // define the flame sensor interface

int val ;// define numeric variables val
float sensor; //read analoog value

// here i set up the tones, you can change them @ void loop.
int tones[] = {261, 277, 293, 311, 329, 349, 369, 392, 415, 440, 466, 493, 523 ,554};
//              1    2    3    4    5    6    7    8    9    10   11   12   13   14
// You can add more tones but i added 14. Just fill in what tone you would like to use, @ void loop you see " tone(Buzzer, tones[12]); " below,  digitalWrite(Buzzer, HIGH);
// here you can change the tones by filling in a number between 1 and 14

void setup ()
{
  Serial.begin(9600);
  pinMode (Relay, OUTPUT) ;
  digitalWrite(Relay, LOW);
  pinMode (Buzzer, OUTPUT) ;
  digitalWrite(Buzzer, LOW);
  pinMode (RedLed, OUTPUT) ;// define RedLed as output interface
  pinMode (GreenLed, OUTPUT) ;
  pinMode (Digitalpin, INPUT) ;//
  pinMode (Analoogpin, INPUT) ;// output interface defines the flame sensor
  //+++++++++++++++++++++++++++++++++++++++++++
  //Part of buzzer tones
  for (int i = 0; i < Buzzer; i++)     {
}

}

void loop ()
{
  sensor = analogRead(Analoogpin);
  Serial.println(sensor);

  val = digitalRead (Digitalpin) ;// digital interface will be assigned a value of 3 to read val
    if (val == HIGH) // When the flame sensor detects a signal, RedLed flashes
  {
    digitalWrite (RedLed, HIGH);
    digitalWrite(Buzzer, HIGH);
    tone(Buzzer, tones[6]);
    delay (100);
    digitalWrite (RedLed, LOW);
    digitalWrite(Buzzer, LOW);
    noTone(Buzzer);
    delay (100);
    digitalWrite (RedLed, HIGH);
    digitalWrite(Buzzer, HIGH);
    tone(Buzzer, tones[1]);
    delay (100);
    digitalWrite (RedLed, LOW);
    digitalWrite(Buzzer, LOW);
    noTone(Buzzer);
    delay (100);
    digitalWrite(Relay, HIGH);
// Set relay to LOW if you want the alarm to switch off a device, setting the device to HIGH will turn on a device for example a sprinkler
// Then un-Comment //  digitalWrite(Relay, HIGH); at the else statement at the bodem of the code.
    delay (100);
    digitalWrite (RedLed, HIGH);
    digitalWrite (GreenLed, LOW);
    digitalWrite(Buzzer, HIGH);
    tone(Buzzer, tones[3]);
    delay (100);
  }
  else
  {
    digitalWrite (GreenLed, HIGH);
    digitalWrite (RedLed, HIGH);
    delay(10);
    digitalWrite (RedLed, LOW);
    digitalWrite(Buzzer, HIGH);
    noTone(Buzzer);
//  digitalWrite(Relay, HIGH); Uncomment if you want the alarm to switch off a device, when flames are detected.
//  for example something that works with gas.
  }
  delay(1000);
}


_ztBMuBhMHo.jpg?auto=compress%2Cformat&w=48&h=48&fit=fill&bg=ffffff)


_3u05Tpwasz.png?auto=compress%2Cformat&w=40&h=40&fit=fillmax&bg=fff&dpr=2)
Comments
Please log in or sign up to comment.