Municipalities all around the world are rushing to build roads made for bikes and e-bikes. The new concept of mobility and traffic management imposes the need of a sensing network that helps mantaining the world a safer, efficient and eco-friendly place. In my opinion, a system dedicated to sustainable mobility should provide the user with information about the environment such as weather conditions. My prototype in addition to this records the number of passes thanks to the KEMET pyroelectric sensor and works with solar energy, monitored by a KEMET current sensor. Everything is sent to cloud via GSM and is accessible to users via a custom APP.
SoftwareEvery 60 seconds arduino will detect the temperature, humidity, the presence of precipitation (rain or snow) and the current supplied by the photovoltaic panel. The passage of people is checked every 50ms and triggers a LED. The collected data are sent every sixty seconds to cloud (ThingSpeak IoT) via the GSM shield. Number of passes (transits) is stored in EEPROM.
To start, you need to create a channel on thingspeak.com and prepare the fields as shown in the picture. Write down "Write API Key", "Read API Key" and "Channel ID" available in the API Keys section.
Load BycicleLane.ino into Arduino IDE and change the APN and API_KEY variables. Then program Arduino by pressing "flash to board".
Visit ai2.appinventor.mit.edu/ and import the "BycicleLane.aia" file available in the GitHub repository. Go to blocks and change the variables according to your ChannelID and read api key. Click on Build and install the APK on your smartphone.
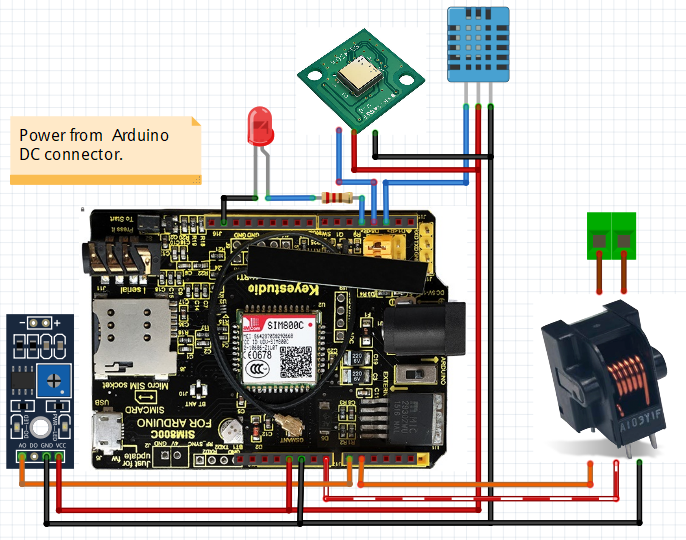
Connect the components together using Dupont cables and respecting the diagram provided at the bottom of the page. Note that LA12 current sensor must be powered by 12V so connect it to VIN pin of Arduino.
Arduino PIN2: DHT11 sensor
Arduino PIN3: KEMET Pyroelectric sensor
Arduino PIN4: signaling led
Arduino PINA0: rain sensor module
Arduino PINA1: KEMET LA12 current sensor
I decided to host the components inside an IP65 junction box in order to guarantee solidity to the system. To start, make ø5mm hole on one side and place a green LED inside. Once removed one of the plastic caps, position and glue the Pyroelectric sensor (behing a thin plastic film). Place all other components neatly inside the box.
Before closing the box, open another cap and pass the power and rain sensor cables through it. Check that short circuits cannot occur and eventually separate everything with cardboard.
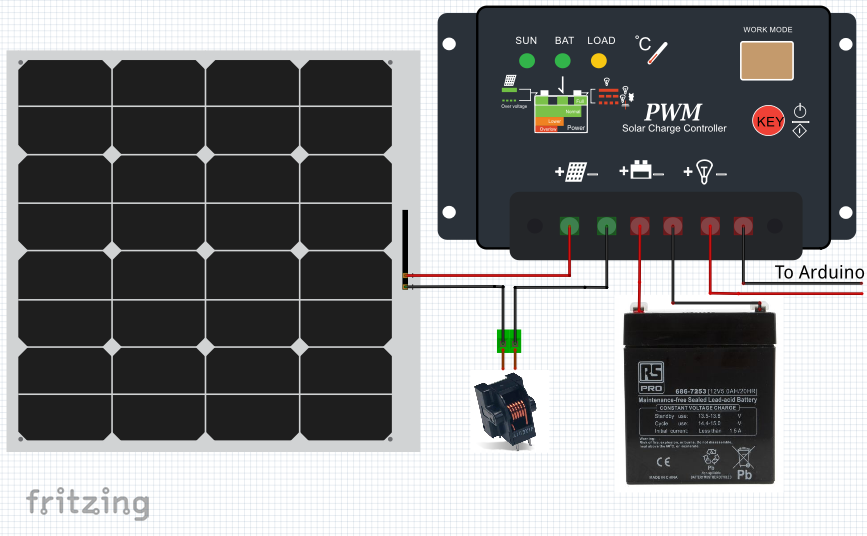
After the box has been placed in the required position, connect solar panel, regulator and battery.
After being powered, the device automatically starts searching for a mobile network. Every 30 minutes arduino will face a reset to ensure connection stability.
From my observations the device works better if positioned in areas not directly exposed to light, for example between two buildings or in underpassess. However, I believe that positioning the sensor at a height of at least two meters above the ground is already sufficient to not create reading errors. In an area with good GSM coverage, the equipment consumes about 100mA. In my case I used a 10W panel and a 2700mAh battery, that means that the device should stay powered all the day and probably all the night in a sunny day. However, a solar panel does not make sense in a context where sunlight is not recommended, so it would be better to provide power for example from public lighting.


_ztBMuBhMHo.jpg?auto=compress%2Cformat&w=48&h=48&fit=fill&bg=ffffff)


Comments
Please log in or sign up to comment.