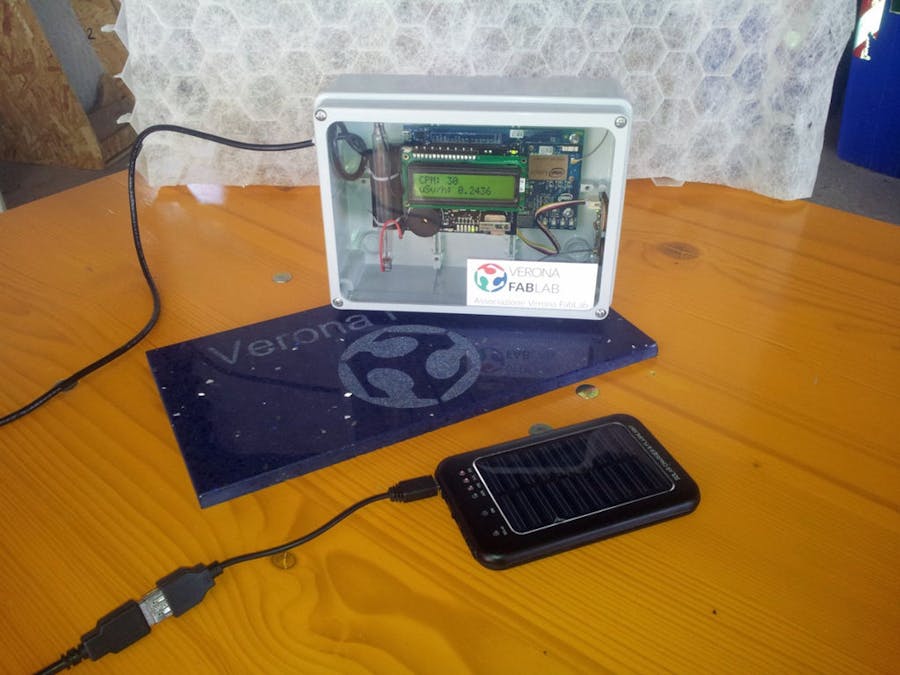
We are a group of makers who like to spend nights and weekends tinkering with tecnology here at Verona FabLab (Verona is a town in the North of Italy) and with this instructable we want to describe the project we've realized for Intel Maker contest.
Our project is a portable device powered by an Intel Edison and equipped with a GPS receiver and a Geiger Tube, a sensor able to detect radioactivity.
Our device continuosly measures ambient radioactivity and GPS position and saves them on a cloud database using your smartphone as a WiFi hotspot.
You can turn on your device, put it inside you backpack (here's the origin of the name), pick up you bike and ride all around you town. When you're back at home you can view a heatmap of radioactivity level you encountered during your ride.
Our project doesn't want to mimic governmental environment protection activities, we just want to involve citizenship and make people aware that taking care of our planet is everyone's duty.
Step 1: How it works
The Geiger tube is a glass tube fullfilled with a special gas and kept at high voltage (500V).
When a radioactive isotope decays, it generates a radiation which can be of 3 types: alpha, beta, gamma.
When the Geiger tube is hit by a radiation, it generates an electrical signal which is detected by the electronics circuits of the hosting Cooking Hacks Arduino shield.
We have the J305ß as the tube for the radiation sensor board as it is fairly sensible to Beta and Gamma radiation.
This shield, is stacked over a GROVE base shield which is stacked over an Intel Edison dev board.
A GROVE GPS is connected to the GROVE base shield.
The Intel Edison detects the interrupts generated by the Geiger shield and computes an average value called CPM (Counts Per Minute) and every 10 seconds it queries the GPS and sends a payload to the cloud server with the current CPM and GPS coords.
Step 2: The Hardware
No soldering is required for this project!
Just stack all the shields, from bottom to top: Intel Edison dev board, GROVE Base shield, Geiger shield.
The GPS must be connected to UART of the GROVE Base shield using the GROVE cable.
Step 3: The software
The software running on the Intel Edison is composed by:
- an application in nodejs installed into Intel Edison, It manages the measurement, capture position by GPS, save the data in the local database, set response on the LCD display and send them to the cloud.
On the cloud part we have:
- an Ubuntu server running Apache webserver and nodejs
- a node-red flow that receives the payloads from the Geiger Backpack and saves them on a database
- a MySQL database
- an HTML page with a Leaflet map with heatmap plugin for data visualization
- a php for database data extraction
Download the source code from github: https://github.com/VeronaFabLabRepo/intel_maker_geiger
In the folder "GeigerBackPack" you can find the project nodejs build with Intel XDK IoT Edition.
First you have to prepare the Intel Edison, please flash the latest firmware, then access via serial terminal and configure the system and the wifi network. You can do this by following the steps of the official documentation of Intel: Intel Edison on the arduino board
Update nodejs the 0.12 version and packages npm. In the Intel Edison Linux terminal type:
$ vi /etc/opkg/base-feeds.conf
Add these lines:
src/gz all http://repo.opkg.net/edison/repo/all
src/gz edison http://repo.opkg.net/edison/repo/edison
src/gz core2-32 http://repo.opkg.net/edison/repo/core2-32
$ vi /etc/opkg/intel-iotdk.conf
Add these lines:
src mraa-upm http://repo.opkg.net/edison/repo/all
$ opkg update
$ opkg upgrade nodejs
$ opkg upgrade libmraa0
$ opkg upgrade sqlite3
Update the services XDK-Daemon for compatibility with Indel XDK:
$ cd /opt/xdk-daemon
$ ./setup.sh
Update and install the following packages npm:
$ npm install -g mraa serialport nmea request qs local-ip http dateformat dblite q events util
Installed and run Intel XDK IoT Edition on your computer: getting-started-with-the-intel-xdk-iot-edition
Open the project GeigerBackPack and press the button "upload" in bottom tab. Launch the application. After 10 seconds you will see the measurement value displayed on the LCD, you can see the measurements directly from a browser if you want connect to IntelEdison: http://addressip:88/ or all measurements in json format: http://addressip:88/Date/
Each time you power on IntelEdison automatically starts nodejs sketch.
Step 4: Let's see it in action
Create a network hotspot with your smartphone, with ESSID GeigerIntelEdison and password inteledison.
Just once, connect to serial terminal to IntelEdison and add the hotspot network you just created.
The geiger backpack is ready.
Plug a power bank, turn your smartphone into a WiFi hotspot and go!
Step 5: Let's see the results
Go to http://104.40.139.35/Codiad/workspace/geigerBackPack/
choose time slot and see the heatmap of the radioactivity you encountered during your ride.
Watch the video here.


Comments
Please log in or sign up to comment.