This is a simple data logger. Using CavyIoT service.Temperature, Humidity log is saved in CSV format in the SPIFF of NodeMCU. Which we can retrieve for later analysis. As well as the we can control LED over the internet too.
Prerequisite:- Registered account at CavyIoT developers site.
- ESP8266 board installed in your Arduino IDE.
If not registered then register your account at https://www.developers.cavyiot.com with your valid email id, it is free.After successful registration, within five minute you will get email verification code at registered email address.Login with your registered username and password. and verify your email. Once the verification is done, you will get free Demo device with validity of one month.(You can seeDemodevice in your client area )
If ESP8266 board isnot installed in your Arduino IDE follow this step.The ESP8266 community created an add-on for the Arduino IDE that allows you to program the ESP8266 using the Arduino IDE and its programming language.Start Arduino and open Preferences window.Enterhttps://arduino.esp8266.com/stable/package_esp8266com_index.jsoninto Additional Board Manager URLs field. You can add multiple URLs, separating them with commas.Open Boards Manager from Tools > Board menu and find esp8266 platform. Select the version from a drop-down box. Click install button. Don’t forget to select your NodeMCU 1.0 (ESP-12E Module) board from Tools > Board menu after installation.
Step 1:Flashingfirmwareoverinternetusinghttp-update.
- Download libraryofficial site or from GitHub. Do not unzip the downloaded library, leave as it is.
- In the Arduino IDE, navigate to Sketch > Include Library > Add.ZIP Library. At the top of the drop down list, select the option to Add.ZIP Library.
- Then select downloaded ZIP file and click Open.
- Return to the Sketch > Include Library menu. menu. You should now see the library at the bottom of the drop-down menu. It is ready to be used in your sketch. The zip file will have been expanded in the libraries folder in your Arduino sketches directory. The Library will be available to use in sketches, but with older IDE versions examples for the library will not be exposed in the File > Examples until after the IDE has restarted.
- Upload ESP8266-httpupdate sketch In the Arduino IDE, navigate to File > Examples > CavyIoTdevelopmentBoard-master > ESP8266-httpupdate and open this example sketch.
- Then select board and COM port properly. NodeMCU is selected in this example.
Don’t forget to select your 'NodeMCU 1.0 (ESP-12E Module)' board
- Before uploading ESP8266-httpupdate.ino sketch you need to replace Wi-Fi SSID and Password with your own.
- After Done Uploading open serial monitor (Baudrate:9600, Both NL & CR) and Reset the NodeMCU and wait for 2 minutes to complete flashing. You will see output on serial monitor as shown below:
Flashing Done!
Step 2:
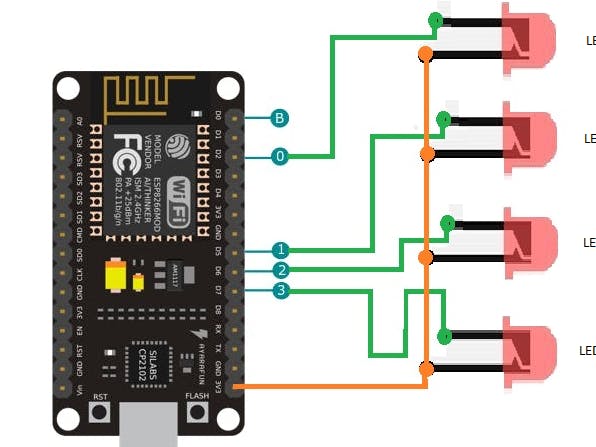
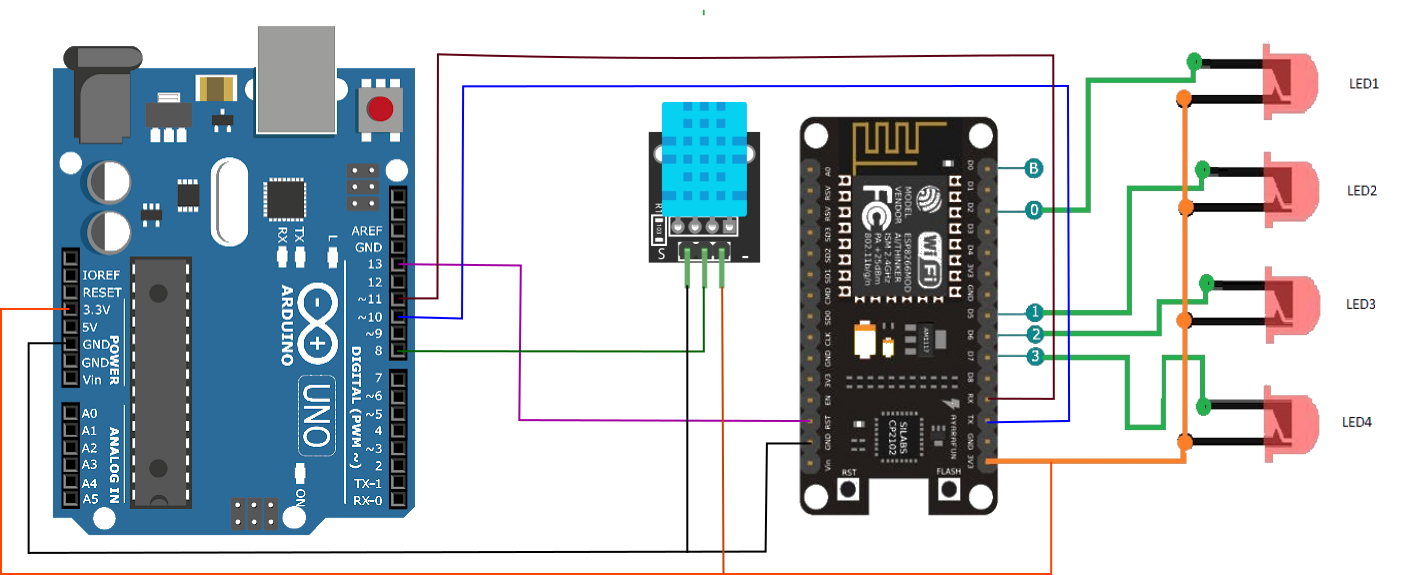
Make circuit arrangement as shown below.
And upload data-logger.ino sketch to Aruino UNO board. Don't forget to replace your Wi-Fi SSID and password along with CavyIoT credentials in the sketch.
Now open serial monitor and see the output.The device you made is working well if it is as below.(Reset Arduino UNO if needed).
Arduino Serial output
Now login to CavyIoT And control LED from control panel.
Step 3:
Run the circuit for a hour or two for testing. After that remove all connections of NodeMCU from Arduino. Unplug Arduino from USB.
Method to Download log file from NodeMCU.
- Connect D0 of NodeMCU to Ground. (Keep D0 LOW)
- Plug USB cable of NodeMCU to computer.
- And restart NodeMCU
- Open Serial monitor
Now connect to the Hot-Spot password admin@123, created by NodeMCU for serving Log File.
after connecting browse to url http://100.100.100.100
From the download link download log file and save it to your computer. This log file is in CSV format. You can print, can convert in JSON /PDF format for analysis and so on. Online tool CSV to PDF is available for this on your control panel.
Output of CSV to PDF converter looks like,


_ztBMuBhMHo.jpg?auto=compress%2Cformat&w=48&h=48&fit=fill&bg=ffffff)


Comments
Please log in or sign up to comment.