Introduction
HBus is started as a personal project (a cheap home automation system) but with aspiration to be enough flexible to support different hardware/software platforms ranging from simpler older technologies to newest powerful hardware that continues to enter in the market every day.
First version of the protocol was written in a plc basic to implement home automation commands directly on actuator hardware.
Some sofistication were already possible as shutter automations or dynamic configuration of inputs/outputs).
Next comes a “connected” version that uses an Arduino like board s a remote interface for HBus using a webservice through ethernet connection.
Using this system every day in a “transparent” way, like a traditional system, (push the button and turn on/off lights!) proved the stability of the protocol and pushed the desire to add a new level of features to the system.
From here the version 2.0 of the protocol was born with IoT functions to handle sensor data in a subscribe/unsubscribe way and revised commands to support these new features.
A first demo of this system was showed at maker faire rome 2014
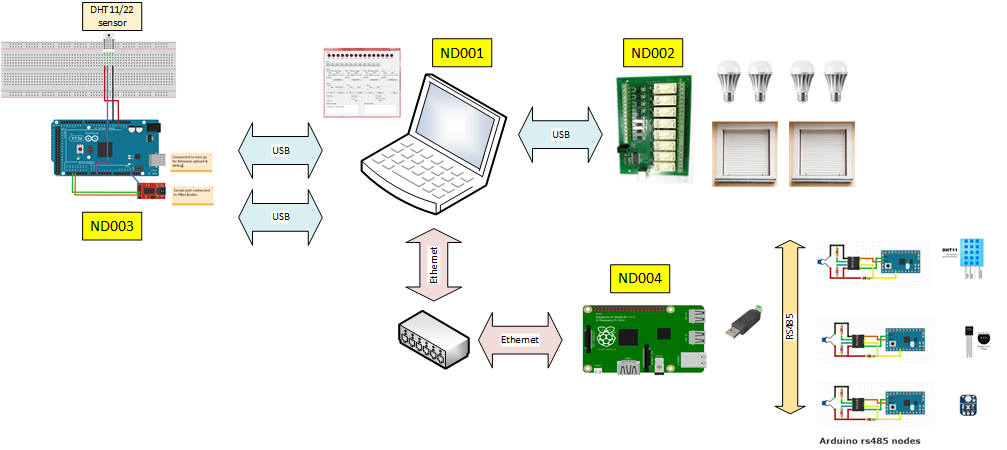
Current system is composed of several nodes connected with serial and/or ethernet
Both Arduino and Raspberry nodes can work in a standalone mode driving local outputs in response to local inputs, or work together exchange commands.
Current demo is composed of 4 nodes :
GETTING STARTED
PREREQUISITES
- Arduino Ide >= 1.6.3
- Visual studio 2015
- HBus sources from Github
ARDUINO NODE
- Copy HBus libraries into Arduino libraries folder
- Connect Arduino Mega as showed into scheme
- Take note of port name from Arduino ide into port settings
- Upload sensor_node.ino from HNode examples on Arduino mega with Arduino Ide
- Open serial terminal, if all gone well the terminal should send “node started” message.
RASPBERRY NODE
- Configure raspberry with Win10 IoT as showed in Microsoft tutorial
- Open Visual studio project with both Win10 and Windows projects and related libraries
- Configure node.config.xml into HBus.App with correct host ip address into PortTcp section:
<port type="HBus.Ports.PortTcp, HBus">
<parameters>
<parameter name="hostip" type="System.String" value="192.168.1.2" />
<parameter name="listenport" type="System.Int32" value="5000" />
<parameter name="sendport" type="System.Int32" value="5001" />
<parameter name="portnumber" type="System.Int32" value="1" />
<parameter name="asyncmessages" type="System.Boolean" value="false" />
</parameters>
</port>
“hostip” is the pc ip address
- Deploy HBus.App to raspberry node
HOST NODES
- Connect RLY816 if you want to drive real loads with configured demo otherwise disable start of console node ND002
- Configure node.config.xml into HBus.ConsoleNode and HBus.WinNode with correct ip address (same host node address) and serial port value (taken from Arduino settings)
<!-- Serial port -->
<port type="HBus.Ports.PortSerial, HBus">
<parameters>
<parameter name="portname" type="System.String" value="COM7" />
…
</parameters>
</port>
START DEMO
- Launch project execution from Visual Studio, if nodes configured correctly WinNode and ConsoleNode should start:
- You can send commands clicking on WinNode buttons or pressing from 0 to 7 into ConsoleNode window. Depending on button local or remote outputs should activate


_wzec989qrF.jpg?auto=compress%2Cformat&w=48&h=48&fit=fill&bg=ffffff)


_3u05Tpwasz.png?auto=compress%2Cformat&w=40&h=40&fit=fillmax&bg=fff&dpr=2)
Comments
Please log in or sign up to comment.