Since STM introduced the CubeMX for code generation, I looked for an interesting application to use this Tool and check its ease-of-use. Choice is to make an HID device, specific a joystick or gamepad that has X/Y analog input and some buttons, supported under Window10.
PART1: Setup USB device with simulated clicksUsing Cube project "USBTest4_joystick"
Nucleo32For hardware we use a STM43L432KC Nucleo-32 board, but you might use any other nucleo(32/64/144) board that supports a spare USB interface, but I like the small formfactor and the Arduino header style. It comes with a big 32-bit microcontroller, in this case a Cortex-M4 - Low power in QFN32 package
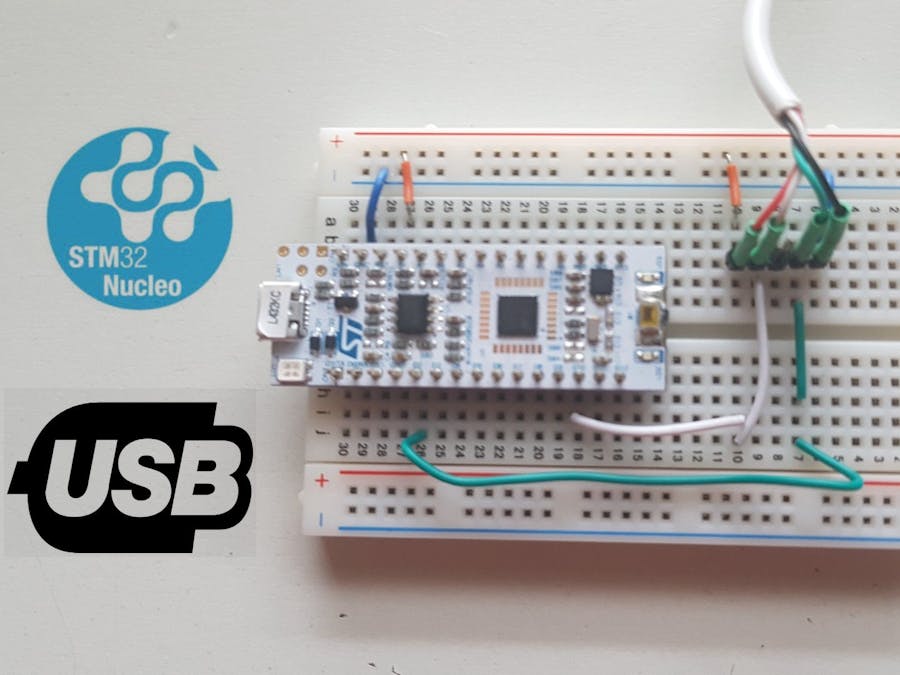
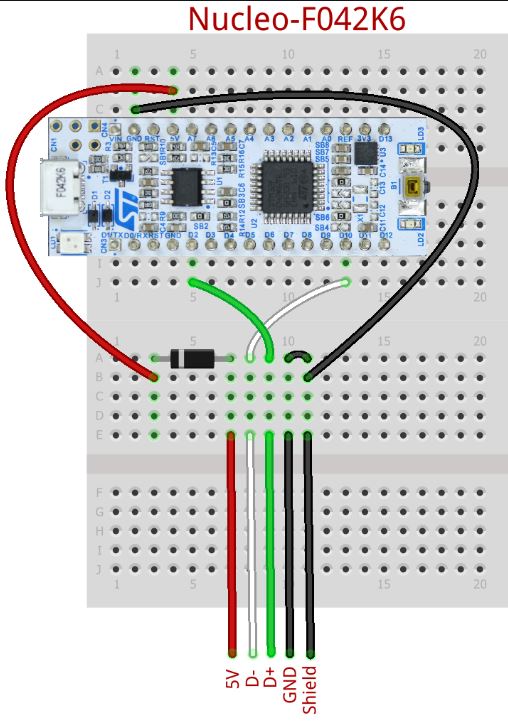
The board is pre-defined with a debug chip - ST-Link -, which uses the mico-usb on top to communicate via a virtual com-port and/or via a mass-storage interface. This ST-Link is your program and debug interface (and power supply), and is using the UArt2 RX/TX for interfacing, (and this is not the usb we will use!!) The spare usb device is ported to PA_12 (D2) and PA_11 (D10) on the board. For preparation you can take an old USB cable, cut off the peripheal connector (mini or micro usb) and strip the wires.:
Red = 5V, Black = GND, Green =D+, White =D-. This nice part is that you direct attach the USB to the nucleo board, no interfacing required, besides some protection if you prefer (ie clamping diodes, or in my case a Diode on the 5V supply line to avoid the nucleo souring power in case of a misconnect). Now you are ready to setup the tooling.
CubeMX
CubeMX is a free tool that supports STM32 devices to be setup with an basic driver or Bsp (Board Support Package) easily for a new development project. It generates a standard set of libary and drivers so you are quickly ready to build your own application. CubeMX is downloadable here, CubeIDE here, Install both on your system and start CubeMX up.
- An Intensive read on a CubeMX project-setup : : ahackaday
Now select new project, and use the board-selector tool to find your nucleo board. Generate the default values and you will end up with a pin-out of the choosen device.
As you choose a board, the layout is already pre-defined with the IO routed on the board, like the OSC, UArt2 RX/TX and the Green led on PB3. On the left side you can select the chip layout details per functions block. To add USB, select connecivity, select USB and select FS device, the pins PA11 and PA12 are now equiped. For middleware (drivers), select the Middleware section, USB_Device and select the drop down box for Human interface Device (HID) (dont use the custom one)USB Requires a 48Mhz clock, so select clock configuration on the top, and you can use the automatic clock resolver to set the USB clock to 48Mhz. You are almost set to code your application!
CubeIDE
Some more steps to get there ready : Select the Project Manager tab, give the project a name, use Basic Application Structure ( for the main.c structure), and select CubeIDE in the Toolchain section. Save your project.... and press the Generate Code on the top-right ! Once ready, you can open the project, and CubeIDE will start:
Im not going to explain the CubeIDE interface, assuming you have worked with IDE's like Gnu or Keil before. Here is the nice thing that CubeMX has done:
- It generated your complete project, incl drivers, libraries, and a main() function where the initialisation is setup and you can code you program, it compiles error-less wow!
- There is some disadvantage: it only generates one type USB HID : Mouse, so its upto you to change the USB descriptors in Middelwares>...> Class>HID>Inc and >Src.
- There is one major draw-back: once you re-run the CubeMX generator, ie after you have added some GPIO or DMA, it overwrites your Middelware changes.. so make backups!
- In general, my impression is it overwrites all code, except in main(), between the remarks of "/* USER CODE BEGIN.... */" and /* USER CODE END... */." sections. BE AWARE !!!
USB Desciptors
This is a story on itselves. Please get yourself informed how USB is working, and how the descriptors are working. Interesting links are :
- Wikipedia USBUSB.ORG HID
- MicroSoft USB Desciptors
- CubeMX examples
- Intersting Tool : HID Descriptor Generator
So what to change? - Check the CubeMX project-file in this post , open the CubeIDE with the project: USBTest4_joystick. This example build the USB interface and generates 'fake' X-Y movements and button presses as an example.
Middleware-section : Class>HID>SRC>usbd_hid.c - Here we have to change the desciptors. First adapt the "USB HID device Configuration Descriptor":, this has 3 sections: FS/ HS and OtherSpeed, all are the same setup. Change the interface subclass to no boot (0x00) and Interface protocol to 0x04 = Joystick. Do this for all 3 sections(!)
0x00,             /* bInterfaceSubClass : 1=BOOT, 0=no boot */
0x04,             /* nInterfaceProtocol : 0=none, 1=keyboard, 2=mouse  4=joystick  */
Second we have to change the HID device desciptor. This describes the report we send to the USB host to tell what data our device is spitting out: find static uint8_t HID_MOUSE_ReportDesc (we keep the same MOUSE-naming, but you might change it in the whole file if you like). arrray content will be:
0x05, 0x01, // Usage Page ( Generic Desktop controls)
    0x09, 0x04, // Usage (Joystick)
    0xA1, 0x01, // Collection (Application)

	0xA1, 0x02, // Collection (Logical)
	 0x05, 0x01, // Usage Page (Generic Ctrls)
	 0x09, 0x30, // Usage X
	 0x09, 0x31, // Usage Y
	 0x15, 0x81, // Logical Minimum (-127)
	 0x25, 0x7F, // Logical Maximum (127)
	 0x75, 0x08, // Report Size (8) -> 8 bits (1 byte value)
	 0x95, 0x02, // Report Count (2) -> 2x = 2 bytes -> no bit stuffing
	 0x81, 0x02, // Input (Data,Var,Abs,...)
	 0x05, 0x09, // Usage Page (Button)
	 0x09, 0x01, // Usage Button1
	 0x15, 0x00, // Logical Minimum (0)
	 0x25, 0x01, // Logical Maximum (1)
	 0x75, 0x01, // Report Size (1) -> 1 bit
	 0x95, 0x01, // Report Count (1) -> 1 value : need to stuff 7 more bits
	 0x81, 0x02, // Input (Data,Var,Abs...)
	 0x75, 0x07, // Report Size (7) -> 7 bit
         0x95, 0x01, // Report Count (1) -> 1 value  7 bits for byte alignment
	 0x81, 0x03, // Input (Const,Var,Abs,,,,,)
	0xC0, // end collection Logical

   0xC0, // End Collection =>  46 bytes
         //  Report 2 bytes signed for XY and 1byte  unsigned for button info bit-0
Now change the include file to change the size of this array in Class>HID>SRC>usbd_hid.h to 46:
#define HID_EPIN_ADDR                              0x81U
#define HID_EPIN_SIZE                              0x04U // kept the same

#define USB_HID_CONFIG_DESC_SIZ                    34U
#define USB_HID_DESC_SIZ                           9U
#define HID_MOUSE_REPORT_DESC_SIZE                 46U // CHANGED
Now, make a backup of these 2 files, as cubeMX overwrites these when you run another Code-Generator! This is all we change, the USB part will use the STM USB-ID and the devcie will be recognized as an STM-product. For Testing this is fine, for your own product, you should get your own ID via USB.ORG.
Src > Main() : First add the Hid include file to the user Include section:
/* USER CODE BEGIN Includes */
#include <stdio.h>
#include "usbd_hid.h"
/* USER CODE END Includes */
Second I had to had to declare the USB-handle explicit, otherwise the compiler gives an error (could be an issue with my paths ?) :
/* USER CODE BEGIN PV */
extern USBD_HandleTypeDef hUsbDeviceFS;
/* USER CODE END PV */
Now setup a structure and variable that is conform the Report Descriptor in usbd_hid.c:
// HID Game
 struct gameHID_t {
      int8_t JoyX; 	// X 1 byte, signed value
      int8_t JoyY; 	// Y 1 byte, signed value
      uint8_t JoyB1; 	// Button, one byte, button is bit #0
	  };
	  struct gameHID_t gameHID;
	  gameHID.JoyX = 0;
	  gameHID.JoyY = 0;
	  gameHID.JoyB1 = 0;
	  int8_t counter1=0; // counter for makingthe fake values wrapping around
Last but not least, setup and send the report vales in the main while-loop:
while (1)
  {

    /* USER CODE END WHILE */
    /* USER CODE BEGIN 3 */
 // Send HID report
counter1=(counter1+1)%32-127; // faking X,Y and button values
gameHID.JoyX = counter1*2;
gameHID.JoyY = counter1*4;
gameHID.JoyB1 = ~gameHID.JoyB1; //
USBD_HID_SendReport(&hUsbDeviceFS, (uint8_t*) &gameHID, sizeof(struct gameHID_t));
HAL_Delay(100);

  }
  /* USER CODE END 3 */
Compile the project, and start the code (use debugger or use the Bin-file dump to the mass-storage drive of the nucleo on your PC. If you need help with the debugger setup in CubeIDE with the nucleo board, this is interesting read:
- Getting Starter with nucleo32
- Generate binary : See Postbuild settings of your project - link
Windows USB
Once running, and you plug in the USB to your system, it should recognize the USB device. Under Windows> ControlPanel > Devices & Printers, a new device pops up as a GameController STM32 !
Left-click on the new device, and select the settings, doubleclick on the STM controller to open the test window.- If your device dont show up at all, check your USB HID code.- If you device show up, but has an exclamation, click on the device and windows gives you an fault description, mostly there is something wrong in the Descriptor (wrong code, or array size mismatch)- If your device shows up ok, but the test results are not there (no movement or blinking button), there is something wrong with the report-send, check your report-data and structure in main().
For more debugging, you can use the by CubeMX instantiated ST-Link Debug Uart (uart2 in this case) and use the virtual com-port to send/receive text by using the HAL_UART_Transmit( ) function, see this read-link. (It's initiated on 115200baud, 8, n, 1)
Part2: Building HID device with real Buttons and SlidersWork in progress....


Comments
Please log in or sign up to comment.