


Hardware components | ||||||
 |
| × | 1 | |||
Software apps and online services | ||||||
| ||||||
This time we will display some sensor values (DHT11 in example) on the Smartphone using the Blynk App. You will need:
- Raspberry Pi with internet connection
- Temperature and humidity sensors: DHT11 or DHT22 or AM2302
- Jumper wires
Please check my tutorial about getting Blynk and Node.JS running on Raspberry Pi and other single-board computers (BeagleBone, Intel Edison, Galileo, VoCore, OpenWrt... ):
After you get Blynk JavaScript library running, we can move on to reading sensor values.
Step 1: Install sensor librariesFor DHT11/DHT22/AM2302 sensors, you need to download and install:
- node-dht-sensor npm package
Here are the commands I run on my Raspberry to do this (it may take some time to execute...):
wget http://www.airspayce.com/mikem/bcm2835/bcm2835-1.46.tar.gz
tar zxvf bcm2835-1.46.tar.gz
cd bcm2835-1.46
./configure
make
sudo make check
sudo make install
sudo npm install -g node-dht-sensor
Note: You may want to read the node-dht-sensor Readme, and run "First Example" ;)
Step 2: Scan/create Blynk ProjectAfter logging in to the Blynk App, you can scan the QR code and get the project I have prepared for you (only Android, for now...)
Alternatively, you can create it manually:
- Create a new dashboard of type Generic, and send yourself an Auth Token.
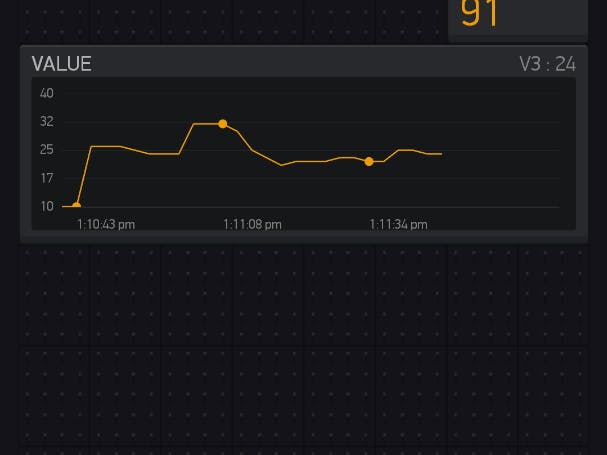
- Add a Graph widget and bind it to V3. Set range to 10..40,reading frequency to "PUSH"
- Add a Value Display widget and bind it to V4
- Press Run (triangle in the upper right corner)
Wire Raspberry Pi and DHT11:
- GND to GND
- sensor Signal to gpio4
- sensor VCC to 3.3v
On the board, create a new file (call it blynk-sensor-test.js):
var blynkLib = require('blynk-library');
var sensorLib = require('node-dht-sensor');
var AUTH = 'YOUR_AUTH_TOKEN';
// Setup Blynk
var blynk = new blynkLib.Blynk(AUTH);
// Setup sensor, exit if failed
var sensorType = 11; // 11 for DHT11, 22 for DHT22 and AM2302
var sensorPin  = 4;  // The GPIO pin number for sensor signal
if (!sensorLib.initialize(sensorType, sensorPin)) {
    console.warn('Failed to initialize sensor');
    process.exit(1);
}
// Automatically update sensor value every 2 seconds
setInterval(function() {
    var readout = sensorLib.read();
    blynk.virtualWrite(3, readout.temperature.toFixed(1));
    blynk.virtualWrite(4, readout.humidity.toFixed(1));

    console.log('Temperature:', readout.temperature.toFixed(1) + 'C');
    console.log('Humidity:   ', readout.humidity.toFixed(1)    + '%');
}, 2000);
Replace YOUR_AUTH_TOKEN with your token from the App.You may also want to change sensorType and sensorPin.
Now run it:
sudo NODE_PATH=/usr/local/lib/node_modules node ./blynk-sensor-test.js
The output should look like this:
OnOff mode
Connecting to TCP: blynk-cloud.com 8442
Connected
Temperature: 18.0C
Humidity:    26.0%
Temperature: 18.0C
Humidity:    26.0%
Note:
- You need to run our script with sudo as the sensor library requires privileged access to the hardware
- NODE_PATH=.. is set because Node.js may fail to locate global modules otherwise
Now, check the Blynk App on your smartphone, it should display a nice plot of temperature and current value of humidity. Congratulations! ;)


Comments
Please log in or sign up to comment.