I have Home Assistant platform at home, which I am using, among several other things, to control the home surveillance using cameras and sensors. First I tried to use the presence detection to turn on and off the surveillance system. But this caused several problems related to the presence detection.
Then I saw the nice project implemented by Lewis Barcley, which I planned to use to turn off the surveillance system. The device worked nicely in general, but the sensor (FPM10A) caused several communication errors making it unreliable and slow, which were also reported by others. Furthermore, the sensor has a very bright light.
After searching for alternatives, I ended up choosing SEN0348, a capacitive fingerprint sensor. This is much more reliable and faster than FPM10A and has a nice informative led light.
ChangesThis solution includes the following changes to Lewis's solution:
- The fingerprint sensor is SEN0348, a capacitive fingerprint sensor with ID809, see https://wiki.dfrobot.com/Capacitive_Fingerprint_Sensor_SKU_SEN0348
- The status and actions are shown in an OLED screen, in this example I have used https://www.az-delivery.de/collections/more-products-4/products/0-96zolldisplay Without changes any 128x64 IC2 OLED display should work and with small changes also other displays
- The display is controlled using u8g2, see https://github.com/olikraus/u8g2
- Names for fingerprints are stored into EEPROM
- I have also attached the 3d models for the case.
First, look at Lewis's very detailed instructions how the solution works with Home Assistant in general. After this
- Make changes to Home Assistant as described by Lewis
- In Home Assistant, add the name into the scripts as follows:
fingerprint_learning_mode:
 alias: Fingerprint learning mode
 sequence:
 - service: mqtt.publish
   data:
     payload_template: '{{states(''input_number.fingerprint_learning_id'') | int}},{{states(''input_text.fingerprint_name'')}}'
     topic: /fingerprint/mode/learning
 mode: single
fingerprint_delete_print:
 alias: Fingerprint Delete Print
 sequence:
 - service: mqtt.publish
   data:
     payload_template: '{{states(''input_number.fingerprint_learning_id'') | int}},{{states(''input_text.fingerprint_name'')}}'
     topic: /fingerprint/mode/delete
mode: single- Add helper for
input_text.fingerprint_name,set the maximum length to 9 - Add an entity to enter the name for
input_text.fingerprint_name
My Home Assistant display to control and follow fingerprint sensor looks as follows:
The above changes will send the given name to the device, which will be stored into EEPROM and when recognized, shown both on the OLED display and Home Assistant screen.
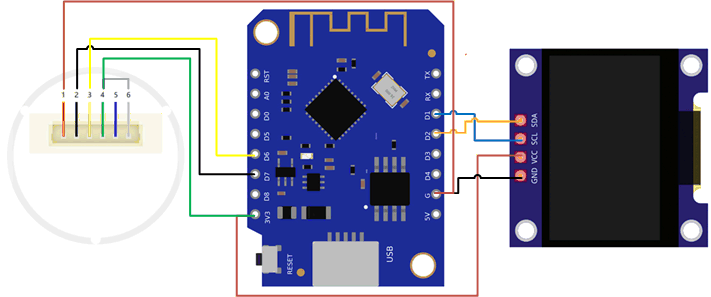
Instructions for Sensor- connect the parts following the wiring instructions first using a breadboard
- load the code into Arduino IDE
- update wifi and mqtt server information in the code
- load required libraries. I assume here that you know how to manage libraries. ID809 is not available in Arduino library manager (yet), you can find it from https://wiki.dfrobot.com/Capacitive_Fingerprint_Sensor_SKU_SEN0348
- Compile and upload the code
- The display should show "Init wifi", "Init mqtt" and finally "Ready" after connections have been established
Test the system as follows:
- in Home Assistant screen, provide ID and name and click <Fingerprint learning mode>
- The device should enter into the learning mode.
- Follow the instructions on the display (or Home Assistant screen)
- Repeat the teaching for other names and fingers
- When the status is Ready, test by reading both registered and non-registered fingers.
Below are some screen shots:
Although hardware serial is recommended for ID809, I chose to use the software serial since Wemos D1 mini Serial1 overlaps with the USB connection. ID809 wikipedia recommended to use 9600 baud software serial connection, but it did not work. Speed 115200 worked ok and I have not had any reliability problems.
CaseI also designed a 3D case holding Wemos D1, the fingerprint sensor and the display. The OLED holder is used to keep the OLED display in place. Unfortunately the cavities for the fingerprint sensor are not in the right place (wiki had a wrong image) and you have to carve two cavities yourself with a knife. I might make later required changes to the model


Comments
Please log in or sign up to comment.