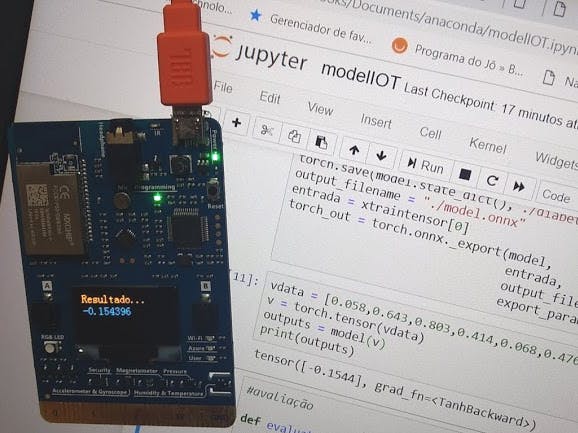
This tutorial show how to create a machine learning model using PyTorch, trained to predict diabetics disease, based on an dataset from UCI Machine Learning Repository. The construction of this model was show by Juliano Viana in they lecture on QCon conference in 2018. Than we use Microsoft Embedded Learning Library to compile this machine learning model into an assembly file. So we used the machine learning model file in assembly to be run by a program within the Microsoft Azure IoT Starter Kit.
We use Anaconda as our main development tool, we install PyTorch and other libraries like: pandas, sklearn, matplotlib, and torch.onnx that we will explain later.
I strong recommend to watch the Juliano's youtube video to understand the process of creating the model:
Using Anaconda we start an Jupyter notebook instance and create a new ipynb file. On the same folder we download your dataset in CSV file format.
We use this sequence of instruction to load your dataset.
import torch
import matplotlib.pyplot as plt
import pandas as pd
import torch.onnx
diabetes = pd.read_csv('diabetes.csv')
diabetes.head()
Than we your the sklearn library to transform the outcome column value to a new pattern from zero to number one negative.
from sklearn import preprocessing
diabetes['Outcome'].replace(to_replace=[0],value=-1,inplace=True)
diabetes.head()
The next step is to create a new dataset without the outcome column, this dataset will be use as feature dataset for the model.
diabetes_features_orig=diabetes.loc[:,diabetes.columns!='Outcome']
diabetes_features_orig.head()
Now we create a new dataset that will be our target for the model, with just the outcome column. This column respond if the pacient has or not diabetics deseases.
diabetes_target=diabetes.loc[:,diabetes.columns=='Outcome'].valuesNext we use the MinMaxScaler method from sklearn, to normalize the values of the feature dataset to values from zero and one.
minmax_scale=preprocessing.MinMaxScaler().fit(diabetes_features_orig)
diabetes_features = minmax_scale.transform(diabetes_features_orig)
print(diabetes_features)
Than we use the function MinMaxScaler from sklearn to adjust the values of the dataset to be between zero and one proportionally.
Now your dataset are ready to be use, we apply the sklearn function to split the dataset in two: one for training other for test.
from sklearn.model_selection import train_test_split
xtrain, xtest, ytrain, ytest = train_test_split(diabetes_features, diabetes_target)
xtraintensor = torch.from_numpy(xtrain).float()
ytraintensor = torch.from_numpy(ytrain).float()
print("Size of X feature set")
xtraintensor.size()
Next we create our object that will be the machine learning model from PyTorch. We use the linear projection process to compile the eight variables in one.
import torch.nn.functional as F
class DiabetesPredictionModel(torch.nn.Module):
   def __init__(self):
       super(DiabetesPredictionModel, self).__init__()
       self.linear_projection1=torch.nn.Linear(8,2)
       self.linear_projection2=torch.nn.Linear(2,1)
   def forward(self,x):
       output=F.tanh(self.linear_projection1(x))
       output=F.tanh(self.linear_projection2(output))
       return output
Than we run the process of training the model.
model = DiabetesPredictionModel()
minibatch_size = 32
learning_rate=1e-2
with torch.no_grad():
   for param in model.parameters():
       param.uniform_(0,0.01)
from sklearn.metrics import accuracy_score
import torch.optim as optim
optimizer = optim.Adam(model.parameters(),0.01)
#loop de treino
losses = {}
total_loss=0
for i in range(0,2000):
   minibatch_index=torch.randperm(xtraintensor.size(0))
   minibatch_index = minibatch_index[:minibatch_size]
   minibatchx = xtraintensor[minibatch_index]
   minibatchy = ytraintensor[minibatch_index]
   #forward pass
   output=model(minibatchx)
   loss=F.soft_margin_loss(output,minibatchy)
   #backward pass
   loss.backward()
   total_loss +=loss.item()
   #optimizer pass
   optimizer.step()
   optimizer.zero_grad()
   if i>0 and i%10==0:
       losses[i]=total_loss/i
plt.scatter(losses.keys(), losses.values())
To validate the model we use some values from our original dataset and run the trained model, then get the result of 19, 46%
vdata = [0.058,0.643,0.803,0.414,0.068,0.476,0.530,0.2]
v = torch.tensor(vdata)
outputs = model(v)
print(outputs)We now can prepare our model to be compiled and run on MXCHIP device. We use the function export to generate an ONNX file. ONNX (https://onnx.ai/) is an open neural network exchange format, that way we can export our trained model.
torch.save(model.state_dict(),"./diabetes_model.dat")
output_filename = "./model.onnx"
entrada = xtraintensor[0]
torch_out = torch.onnx._export(model,         # model being run
                              entrada,                   # model input
                              output_filename,     # where to save the model
                              export_params=True)  # store the trained weight
This is the result of our ONNX model file visualized on Netron (https://electronjs.org/apps/netron).
The next step is to install the ELL from Microsoft, to do that you must follow the instructions from this website (https://microsoft.github.io/ELL/).
Before you clone the repository from github, you have to compile the ELL project, to do that on windows you need to install the CMake extension on Microsoft Visual Studio. The easy way is to open your Visual Studio and type CMake on the quick search textbox. Before you need to insert the path to CMake compiler (c:\Program Files (x86)\Microsoft Visual Studio\2017\Enterprise\Common7\IDE\CommonExtensions\Microsoft\CMake\CMake\bin\) in your system variable PATH. Finally you can run the SETUP-Windows.cmd and way the compile process.
Now we use the terminal prompt from Anaconda to run the an python code on ELL to convert the ONNX format to ELL format.
From the folder \ELL\tools\importers\onnx run the onnx_import.py to convert the onnx file to ell file.
\ELL\tools\importers\onnx\python onnx_import.py C:\Users\walte\Documents\anaconda\model.onnxThis command will generate an file call model.ell in the same folder where are you model.onnx.
Next we need to compile your ELL file to bitcode format, to do that we use the ELL compiler. This very simple command will compile the model in a format that the MXCHIP can run. The result of this process are two files call: model.bc and model.h
\ELL\build\bin\Release\compile -imap C:\Users\walte\Documents\anaconda\model.ell -cfn Predict -cmn model --bitcode -od C:\Users\walte\Documents\anaconda\ --fuseLinearOps True --header --blas false --optimize true --target custom --numBits 32 --cpu cortex-m4 --triple armv6m-gnueabi --features +vfp4,+d16,+soft-floatThan we use another compiler call LLVM to generate our assembler code.
\ELL\external\LLVMNativeWindowsLibs.x64.6.0.1\llvm-6.0\bin>llc.exe C:\Users\walte\Documents\anaconda\model.bc -o C:\Users\walte\Documents\anaconda\model.S -O3 -filetype=asm -mtriple=armv6m-gnueabi -mcpu=cortex-m4 -relocation-model=pic -float-abi=soft -mattr=+vfp4,+d16Finally we get our assembly code, that will be like that.
To create your project to run in MXCHIP Microsoft Azure IoT Starter Kit we need to use the sample project call Keyword Spotting. Click on Open Sample in your Visual Studio Code.
We have to copy this two files to your project: model.S and model.h. Than we can modify the code to call your model like a C++ function, and passing as a parameter the same values we use in your notebook.
If we transfer this code to the Microsoft Azure IoT Starter Kit we will see that the model returns the same value.
This tutorial show how to create a machine learning model using PyTorch, compile this model using Microsoft ELL and run on a IoT device.


Comments
Please log in or sign up to comment.