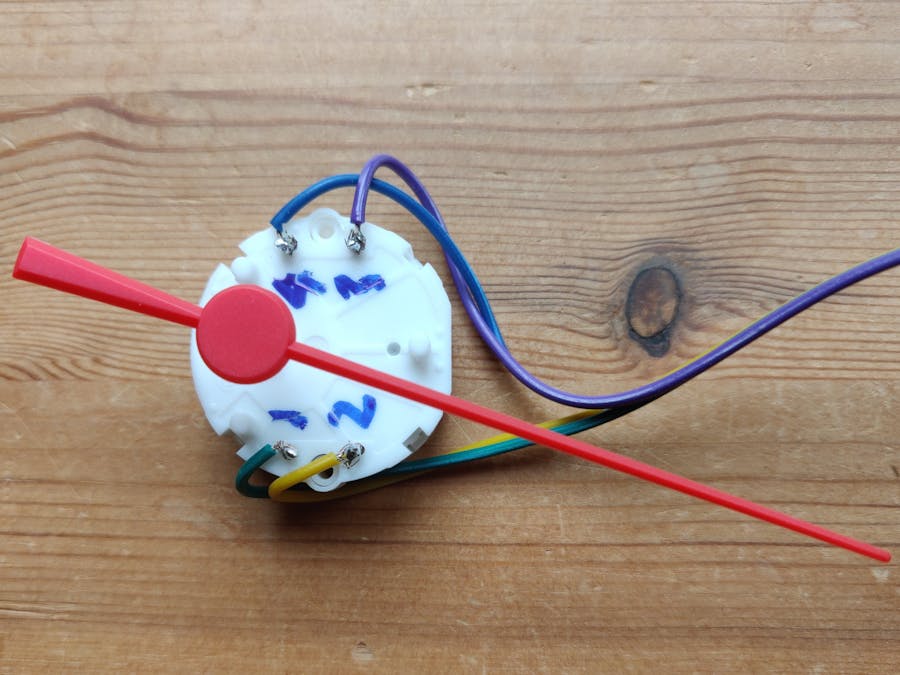
Switec X25/X27 stepper motors are designed for use in automotive gauges. In this project I will show you how to program an Arduino Uno to control one of these stepper motors using the XOD visual programming language.
HardwareThe X27-589 is a bipolar stepper motor with an angle of rotation of 315 degrees and a step count of 945. The four pins are on the front of the device and they are numbered counter-clockwise, starting from one at the top-left.
In this project the stepper motor is driven using a L293D quadruple half-H driver. For a comprehensive introduction to the L293D, see this tutorial from the Technology Robotix Society. The pins of the L293D are connected to the Arduino Uno and X27-293 as follows:
- 1 (enable driver channels 1 & 2):Arduino 5V
- 2 (IN1): Arduino pin 8
- 3 (OUT1): X27-293 pin 1
- 4 (GND): Arduino GND
- 5 (GND): Arduino GND
- 6 (OUT2): X27-293 pin 2
- 7 (IN2): Arduino pin 9
- 8 (power VCC for drivers): Arduino 5V
- 9 (enable driver channels 3 & 4): Arduino 5V
- 10 (IN3): Arduino pin 10
- 11 (OUT3): X27-293 pin 3
- 12 (GND): Arduino GND
- 13 (GND): Arduino GND
- 14 (OUT4): X27-293 pin 4
- 15 (IN4): Arduino pin 11
- 16 (5V supply for internal logic): Arduino 5V
A proto-shield with a breadboard is placed on top of the Arduino Uno and the L293D is mounted on the breadboard.
A slide potentiometer breakout board is connected to analog pin A0 on the Arduino Uno, so that we can demonstrate the gauge responding to user input.
XOD libraryGuy Carpenter wrote an excellent Arduino library for the Switec X25.168 stepper motor (and compatible steppers from other manufacturers): https://github.com/clearwater/SwitecX25. I've wrapped his code into a XOD library (https://xod.io/libs/wayland/x27-589-gauge/) for the X27-589 gauge.
To install the library in the XOD IDE, hit “File → Add Library” and enter the full library name:
wayland/x27-589-gauge
Following installation in the IDE workspace, the library will be visible in the project browser. To find out the function of a node, select the node and hit H to invoke help:
The library contains two example patches:
- example-blocking
- example-non-blocking
These examples demonstrate the two different modes by which the gauge can be updated and are described in detail below.
Example 1: synchronous/blocking operationThe example-blocking patch (above) demonstrates blocking updates of the gauge. On start-up the gauge will be set to zero. The needle of the gauge will then cycle through the following positions: middle (472 steps), maximum (945 steps), minimum (0 steps). The needle will pause for 2 seconds at each position. The update-blocking node moves the motor smoothly to the position specified by the set-position node. Please note that the Arduino cannot do anything else until the motor has reached its target position. The video below shows example-blocking patch in action:
Example 2: asynchronous/non-blocking operationThe example-non-blocking patch (above) demonstrates asynchronous/non-blocking updates. On start-up the gauge will be set to zero. The needle of the gauge can then be controlled using a potentiometer (analog-read node). The map node translates the output of the analog-read node (which has a range of zero to one) to a step position for the motor.
Each time the update node receives a pulse to its UPD input it advances the motor at most just one step toward the target position specified by the set-position node. A pulse should be sent to the UPD input of the update node as often as possible. The advantage of the update node over the update-blocking node is that it enables you to control many gauges simultaneously, and you won't have long periods of inactivity (and potentially missed I/O events) while a motor is moving. The video below shows the example-non-blocking patch in action:
Future workThis project is a work in progress. I have yet to test the XOD library with multiple X27-589 stepper motors. The XOD library may require modification to make it compatible with other models of stepper motors from the X25/X27 series.


_ztBMuBhMHo.jpg?auto=compress%2Cformat&w=48&h=48&fit=fill&bg=ffffff)


Comments
Please log in or sign up to comment.