openHAM 2 can run on multiple platforms. I am building this project on Ubuntu 15.10 Willy (32 bit). This project is about making a sensor node using Arduino 101 and some sensors. The final product will look like the following image. openHAB 2 offers a single user interface to different form factors like desktop, tablet and phone. Only three sensors' readings are 'live', namely the temperature, humidity and photocell readings.
.
PrerequisitesopenHAB 2 (follow here for installation on your preferred platform). I am installing openHAB 2 on Ubuntu 15.10 Willy (32 bit).
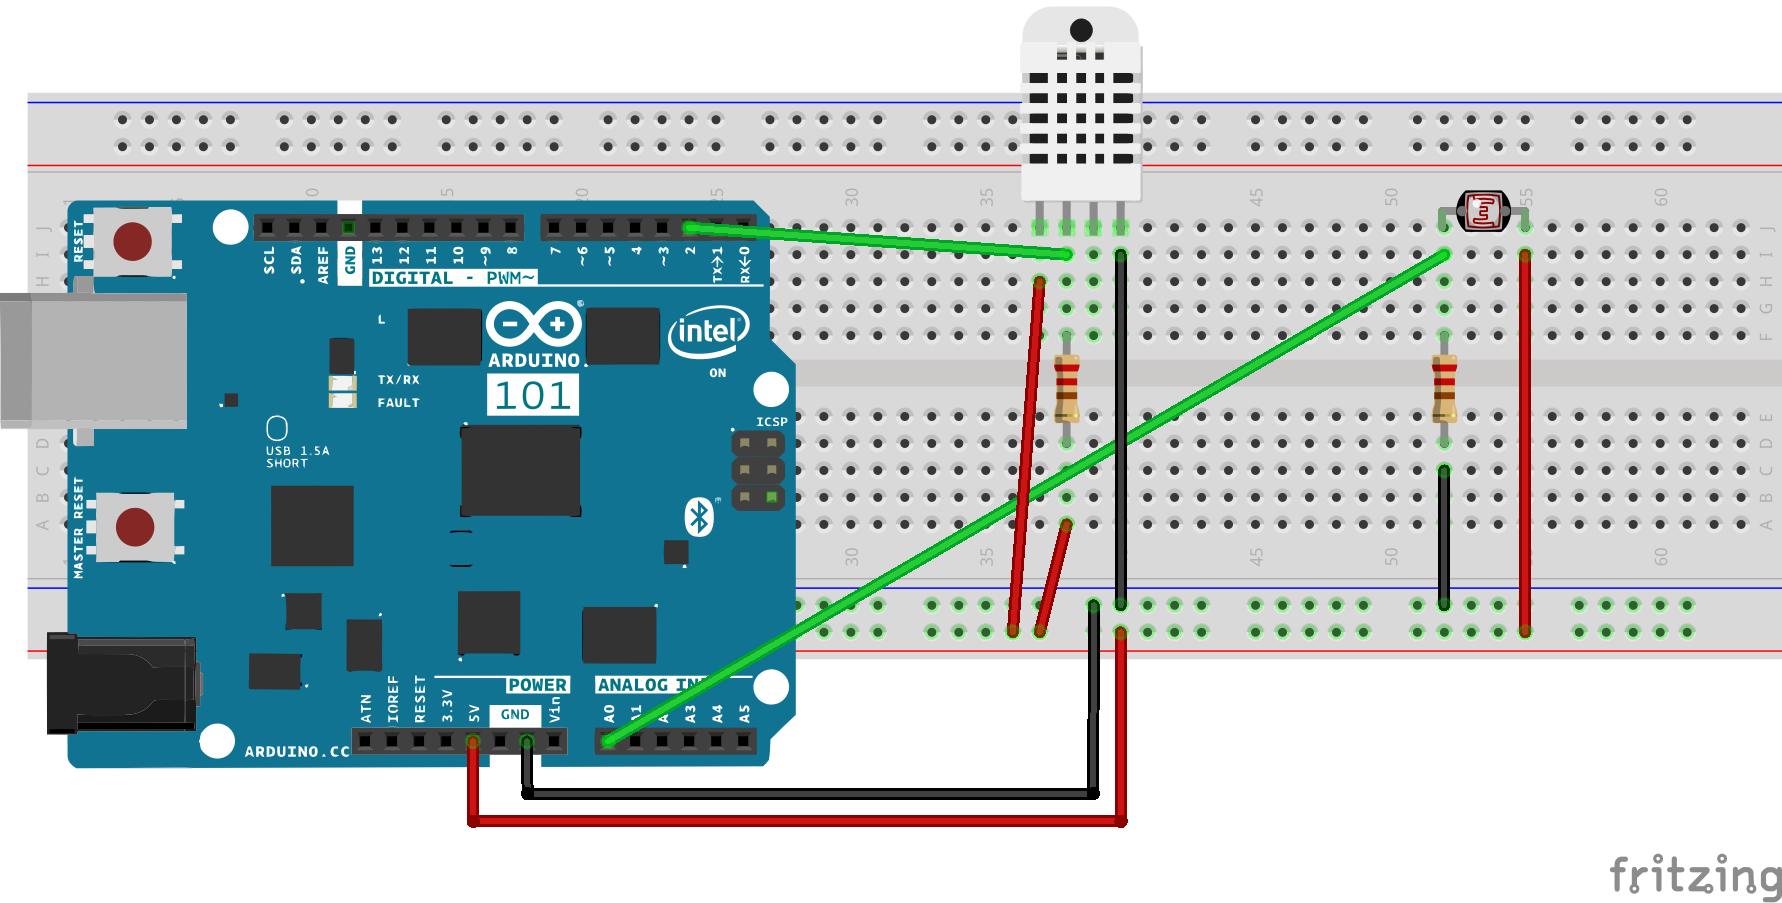
Setup the Arduino 101 and sensorsIn this project, I make use of the DHT11 temperature and humidity sensor and photocell sensor. Arduino 101 is setup to use USB serial port to communicate with the openHAB2 which will be setup below.
The sketch is attached in the code section below. Inside the loop, temperature, humidity and photocell readings are collected and sent thru USB serial port. An openHAB 2 system is setup to received these readings and displayed on its dashboard.
 void loop() {
 // Delay between measurements.
 delay(delayMS);
 // Get temperature event and print its value.
 sensors_event_t event;
 dht.temperature().getEvent(&event);
 if (isnan(event.temperature)) {
   temp = -1.0;
 }
 else {
   temp = event.temperature;
 }
 // Get humidity event and print its value.
 dht.humidity().getEvent(&event);
 if (isnan(event.relative_humidity)) {
   humid = -1.0;
 }
 else {
   humid = event.relative_humidity;
 }
 light = analogRead(LIGTHPIN);
 // print to serial
 sprintf(buffer, "%.1f %.1f %.1f", temp, humid, light);
 Serial.println(buffer);
 //Serial.println(123);
 // delay
 delay(2000);
}
Start openHAB.
cd /usr/share/openhab2
sudo ./start_debug.sh
Open browser and point to http://localhost:8080 or http://IP-of-your-machine:8080
Select Standard package.
Select the PAPER UI.
Install Serial Binding and NTP Binding. These are for serial communication and getting the date time values.
Install Basic UI add-on. This will be the dashboard UI that we are going to see. It's corresponding sitemap configuration is listed the sitemap section below.
Add and configure Things in NTP Binding.
I am using a USB serial adapter. To use that, I need to add the following line to the file /etc/default/openhab2. The port should normally be /dev/ttyACM0 or /dev/ttyACM1.
EXTRA_JAVA_OPTS="-Dgnu.io.rxtx.SerialPorts=/dev/ttyACM0"
Add and configure Items. Add a file named arduino.items to the directory /etc/openhab2/items with the following content. It describes the items that openHAB monitors and tracks. These items and its values can be displayed on a dashboard.
String	Arduino101	"Temperature [%s °C]"	{serial="/dev/ttyACM0@9600"}
DateTime Date  "Date [%1$tA, %1$td.%1$tm.%1$tY %1$tH:%1$tM]"  { channel="ntp:ntp:local:dateTime" }
Number	Temperature	"Temperature [%.1f °C]"	<temperature>
Number	Humidity	"Humidity [%.1f %%]"	<humidity>
Number	Light	"Light [%.1f L]"	<light>
String	LightText	"Study Room Light [%s]"	<light>
You can view these items in the PAPER UI view.
Add some rules. Add a file named arduino.rules to the directory /etc/openhab2/rules with the following content. This is the rules file. Input data transformation will be carried out here. For example, LightText will have the values of DARK, NORMAL or BRIGHT depending on the numeric value of photocell's readings.
import org.openhab.core.library.types.*
import java.util.List
rule "Send the temperature, humidity and light reading"
when
       Item Arduino101 received update
then
	var List<String> items = Arduino101.state.toString().trim().split(" ")
	var Number value
	//value = items.size()
	value = Float.parseFloat(items.get(0))
	Temperature.postUpdate(value)
	value = Float.parseFloat(items.get(1))
	Humidity.postUpdate(value)
	value = Float.parseFloat(items.get(2))
	var String text
	if (value > 800) {
		text = "BRIGHT"
	} else if (value > 200) {
		text = "NORMAL"
	} else {
		text = "DARK"
	}
	LightText.postUpdate(text)
end
Add the Basic sitemap. Add a file named basic.sitemaps to the directory /etc/openhab2/sitemaps with the following content. This is the configuration file for the BASIC UI dashboard. The three 'live' items are Temperature, Humidity and LightText (see explanation above).
sitemap basic label="My home automation" {
   Frame label="Date" {
       Text item=Date icon="calendar"
   }
   Frame label="Demo" {
       Text item=Temperature valuecolor=[>35="orange",>20="green",<=20="blue"]
       Text item=Humidity valuecolor=[>55="orange",>45="green",<=45="blue"]
       Text item=LightText valuecolor=[=="BRIGHT"="orange",=="NORMAL"="green",=="DARK"="gray"]
       Group item=Heating icon="fan"
       Switch item=Lights icon="light" mappings=[OFF="All Off"]
       Text item=Multimedia_Summary label="Multimedia" icon="video" {
           Selection item=TV_Channel mappings=[0="off", 1="DasErste", 2="BBC One", 3="Cartoon Network"]
           Slider item=Volume
       }
   }
}
Visit http://localhost:8080 or http://IP-of-your-machine:8080 and select BASIC UI to view the final dashboard, as shown below. The 'live' sensors are Temperature, Humidity and Study Room Light (see the red box in the image) as setup in section Setup Arduino 101 and sensors above.
Follow this link to view a video to see the three sensors' readings go live. In the video, I used a hair dryer to increase the temperature. You will be able to see the temperature going up and then down. And I used a torch light to shine on the photocell and you will see the Study Room Light status changed to BRIGHT.
SummaryopenHAB is easy to use and configure. It is packed with lots of function and features. Checkout its website to find out more.
Demonstrated in the project, the data flow is from sensors to openHAB. In fact, openHAB can send commands to devices/actuators such as turning on a light or lowering an ACs temperature.
This project uses serial binding for communication. Network binding with MQTT is a good option. But, I do not have a WiFi shield ready for this project. At the moment, the BLE integration is not finished yet. Work is still in progress for the BLE binding implementation.


_baVEVgguW1.jpg?auto=compress%2Cformat&w=48&h=48&fit=fill&bg=ffffff)


Comments
Please log in or sign up to comment.