Sometimes there is a room that always needs just a little help with heating or cooling during extreme days. I have one of those rooms which I use a space heater to heat during the winter months. Being on a college campus or at work the majority of the day many days it would be nice to be able to control the temperature of this room away from home. This along with an extra credit opportunity for my MEGR3171 Instrumentations class at UNCC is the inspiration for my Blynk controlled space heater.
My ideal scenario is to have the space heater come on automatically to supplement the HVAC unit once a certain temperature threshold was reached. What would be even better would be to monitor temperature and control the threshold temperature. this is where the Particle Photon (a WiFi enabled microcontroller) along the Blynk app for iPhone or android really come in handy. This was my first shot at IOT so I started with reading everything I could find. One of the most interesting and helpful projects I found was https://www.hackster.io/gusgonnet/the-minimalist-thermostat-bb0410 although it jumped way over my head very quickly it provided a lot of help to create a dummied down version.
Particles website provides a great tutorial on learning how to get started using your new photon https://docs.particle.io/guide/getting-started/start/photon/ after learning this it is time to hook up your DHT22 temperature and humidity sensor. I used a bread board for prototype purposes but will be soldering to my relay shield soon.
Dht22 Temperature sensor wired to Particle Photon on relay shield
The Circuit
The DHT 22 has 4 pins the farthest left is power in (3.3V-5.0V) pin to the right is data out, third pin has no function and the farthest right pin is ground. which is shown below.
pin diagram from data sheet
VDD comes from the photon and provides 3.3V, Data is writing to a digital pin of the Photon, I chose Digital Pin 2. The 4th pin is a ground and goes to the photons ground. A pullup resistor of 10K ohms connects VDD and the Data pin. as shown in the schematic below. Thankfully there is a library PietteTech_DHT available on https://build.particle.io that allows users to get temperature readings in units of their choice with little programming which was a huge plus for me since I have little prior coding experience. If you purchase the Particle relay shield the photon will sit directly in the headers and the board has pins directly connected to pins I used Relay 1 which is pin D3 to control my space heater going this option there is no need to run a jumper wire from the photon pin D3. The relay shield also has a power port that will power the photon and relays.
Circuit Schematic
From here I pulled the wires apart on the space heater and cut one wire (it does not matter which one). Strip the end off the cut wire and insert one wire into the terminal marked COMM and the other in NO. Using NO instead of NC means that the circuit is normally open (off) so the relay must be receiving power in order for the heater to have power. This prevents the heater from turning on if the relay shield were to lose power or otherwise fail. After wiring this, Relay 1 will turn on and current will flow through the inserted wire whenever photon pin D3 outputs HIGH.
cut wire insert in relay
The Code
The coding was by far the most difficult part of this project for me but spending enough time on Hackster reading other folks code helped me figure it out. I wanted to be able to:
read a temperature on my phone via the Blynk app
turn on a relay for my heater from my phone
set a temperature to turn on the heater automatically
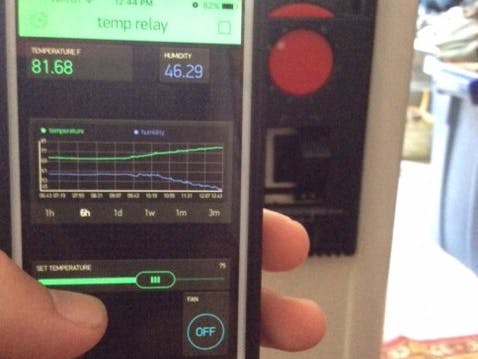
First the Blynk App must be installed on your phone and the Blynk library must be included in your code This website is very useful http://docs.blynk.cc/ getting started with Blynk. Now that you have followed the steps and included the Blynk library the next goal is to get a temperature to the phone, the PietteTech_DHT library is included for this, the code converts readings to measurements we are used to. Line 105 in the posted code allows you to change which scale you will be given, look at the PietteTech_DHT library scroll through and you will see available options. We turn on the relay by digital writing HIGH from the photon, we can easily create a switch in the blynk app to do this manually but I really wanted this to be automated. Virtual pins are very helpful in the Blynk app read about them here http://docs.blynk.cc/#blynk-main-operations-virtual-pins, I added a slider that outputs a value 50 to 90 correlating to degrees Fahrenheit to a virtual pin. This value is inserted in an if statement argument along with the current temperature which eventually turns relay 1 on if the slider temperature is greater than the actual temperature. The video below shows the app and heater in action, to speed up the process I slid the temperature way up to turn the heater on.
watch the heaters indicator light turn on
I also added a temperature and humidity display and a historical graph so I could see what the temperature was doing while I was away from home. The Blynk app makes this very easy, simply add widgets and designate input/output pins.
Summary and Future
I now have a thermostat for my electric space heater, not only that but I have the ability to control set the temperature from anywhere with internet access! This will come in handy when I am away from the house for a while during those cold days. This project peaked my interest in controlling things through the internet and I see myself doing many more projects during the summer when I am not so crunched for time.
The next steps on this project will be permanently solder everything up inside a housing, my plan is to wire multiple outlets to the relays so I can plug in whatever heat system I desire and clean the looks up. When this is done I will be adding more code to control a fan or portable air conditioner as well. I imagine I will also be ordering more parts to control the HVAC soon as well.
Paste the code will need to include blynk and pietTech_DHT libraries Code is commented with help as well as with some trials I may return to later
// This #include statement was automatically added by the Particle IDE.#include"PietteTech_DHT/PietteTech_DHT.h"// This #include statement was automatically added by the Particle IDE.#include"blynk/blynk.h"/*char auth[] = "Blynk authorization code here";void setup() {Serial.begin(9600);delay(5000);Blynk.begin(auth);}void loop() { Blynk.run();}*///started pasting code// system defines#define DHTTYPE DHT22 // Sensor type DHT11/21/22/AM2301/AM2302#define DHTPIN 2 // Digital pin for communications#define DHT_SAMPLE_INTERVAL 60000 // Sample every minute//declarationvoiddht_wrapper();// must be declared before the lib initialization// Lib instantiatePietteTech_DHTDHT(DHTPIN,DHTTYPE,dht_wrapper);// globalsunsignedintDHTnextSampleTime;// Next time we want to start sampleboolbDHTstarted;// flag to indicate we started acquisitionintn;// counter//this is coming from http://www.instructables.com/id/Datalogging-with-Spark-Core-Google-Drive/?ALLSTEPScharresultstr[64];//String to store the sensor data//DANGER - DO NOT SHARE!!!!charauth[]="blynk toke here";// Put your blynk token here//DANGER - DO NOT SHARE!!!!charVERSION[64]="0.04";#define READ_INTERVAL 60000doubletmp=32;//ADDED V2doublelow=65;//ADDED V2doublehigh=70;//ADDED V2//double heatsetting = LOW;voidsetup(){Blynk.begin(auth);DHTnextSampleTime=0;// Start the first sample immediatelyParticle.variable("result",resultstr,STRING);Particle.publish("DHT22 - firmware version",VERSION,60,PRIVATE);pinMode(D6,OUTPUT);// I ADDED THIS 2nd VERSIONParticle.variable("temp",tmp);//ADDED V2Particle.variable("low",low);//ADDED V2Particle.variable("high",high);//ADDED V2}// This wrapper is in charge of calling// must be defined like this for the lib workvoiddht_wrapper(){DHT.isrCallback();}voidloop(){Blynk.run();// all the Blynk magic happens here//Turn heater on ADDED V2//while(heatsetting == HIGH){if(tmp<low){//ADDED V2digitalWrite(D3,HIGH);//ADDED V2}else{digitalWrite(D3,LOW);}//turn heater off added v2/* if (tmp > high){ digitalWrite(D3, LOW); }*///}// Check if we need to start the next sampleif(millis()>DHTnextSampleTime){if(!bDHTstarted){// start the sampleDHT.acquire();bDHTstarted=true;}if(!DHT.acquiring()){// has sample completed?floattemp=(float)DHT.getFahrenheit();tmp=temp;//ADDED V2inttemp1=(temp-(int)temp)*100;chartempInChar[32];sprintf(tempInChar,"%0d.%d",(int)temp,temp1);Particle.publish("The temperature from the dht22 is:",tempInChar,60,PRIVATE);//virtual pin 1 will be the temperatureBlynk.virtualWrite(V1,tempInChar);//google docs can get this variablesprintf(resultstr,"{\"t\":%s}",tempInChar);floathumid=(float)DHT.getHumidity();inthumid1=(humid-(int)humid)*100;sprintf(tempInChar,"%0d.%d",(int)humid,humid1);Particle.publish("The humidity from the dht22 is:",tempInChar,60,PRIVATE);//virtual pin 2 will be the humidityBlynk.virtualWrite(V2,tempInChar);n++;// increment counterbDHTstarted=false;// reset the sample flag so we can take anotherDHTnextSampleTime=millis()+DHT_SAMPLE_INTERVAL;// set the time for next sample}}}/*BLYNK_WRITE(V3) //Button Widget is writing to pin V3{int pinData = param.asInt();digitalWrite(D3, pinData); //Turn ON//OFF heater}*///Temperature Setting in Blynk on Virtual Pin 2BLYNK_WRITE(V4){inttempSetting=param.asInt();low=tempSetting;}/*BLYNK_WRITE(V5) { int heatsyst = param.asInt(); heatsetting = heatsyst;} */


Comments
Please log in or sign up to comment.