Being the clever, loving father that I am, I wanted to make a nerdy yet crafty tree topper for our Christmas tree again this year. Last year (2015) was an angel with the wings made from my daughters' handprint traces. This year, I'm going to make it even nerdier! This year, the angel will have moving wings, a proper NeoPixel ring halo, and sound!
I found a free clip art graphic of an angel shape that makes up the main body, head, hands, and feet. I used Inkscape to convert the image into an SVG. From there, I used svg2stl.com to convert the SVG to an STL that could be imported into SketchUp. In SketchUp, I offset the hands, feet, and head to give the body some depth.
Once I got the main body in shape, I made a copy of the dress shape so that I can print it in a different color and add a little texturing/pleating to the dress to give it more depth.
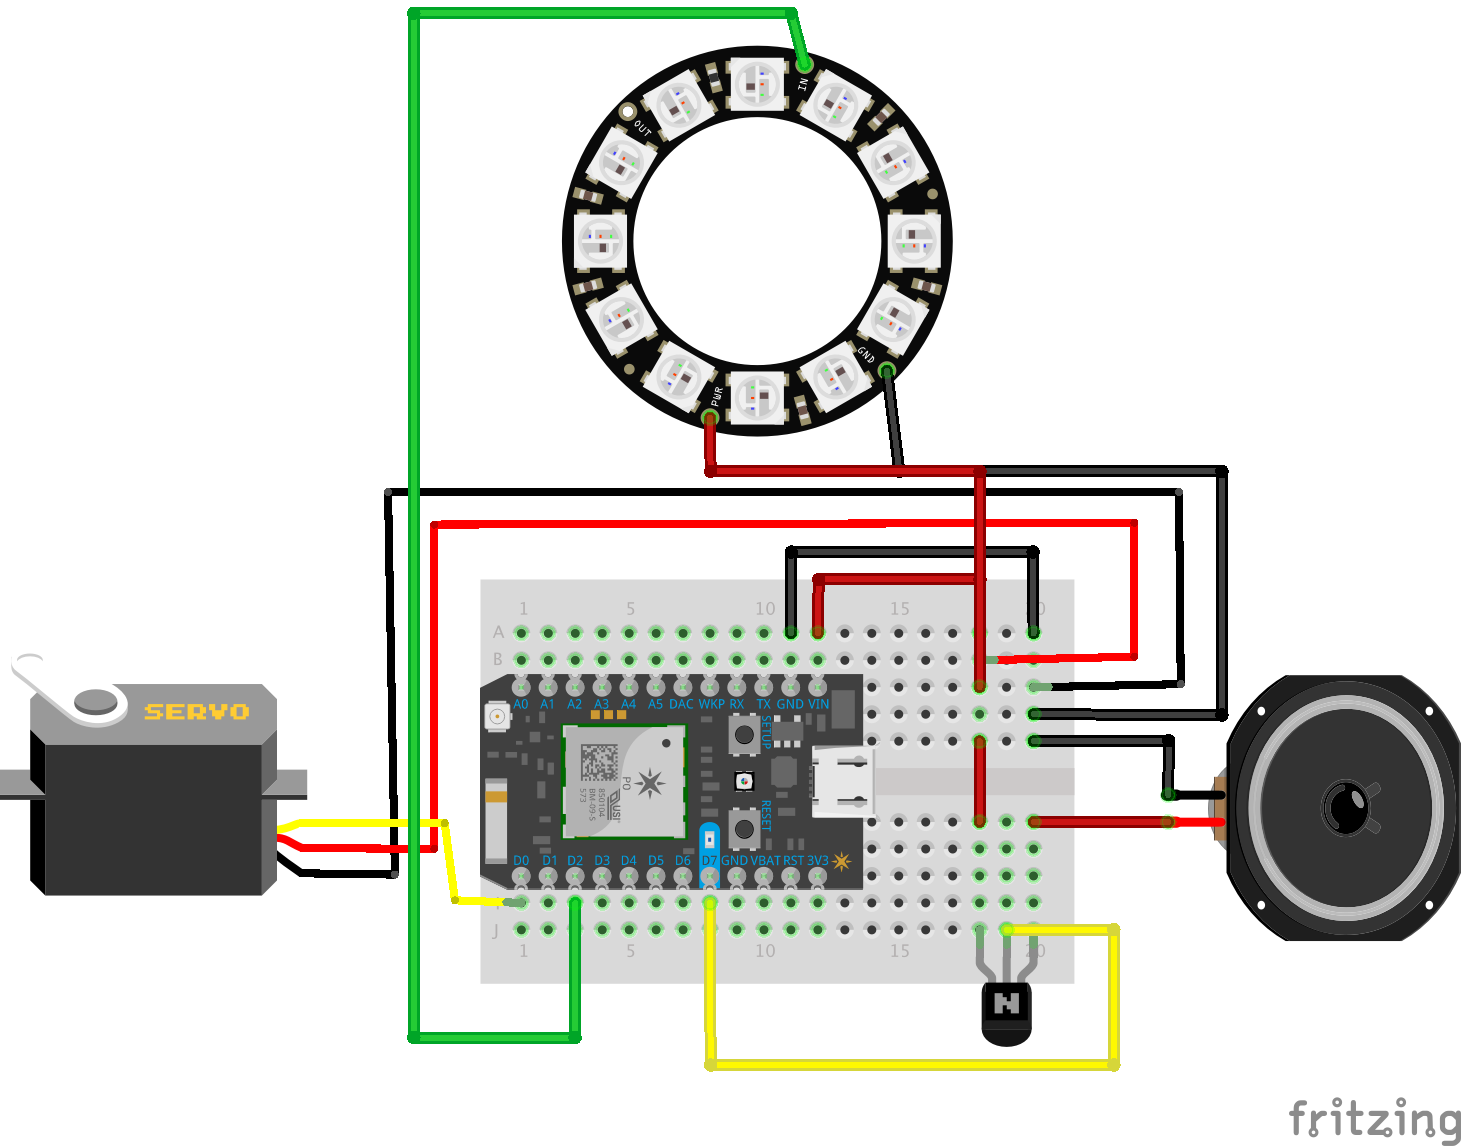
After the dress was copied for the other filament, I went back to the main body and hollowed it out, leaving 3mm walls on the outside but the majority of the body was hollowed out so that I could hide hardware for mounting the wings and backpack. I carefully placed holes in the body to give a place to mount the wings and "backpack". I also manually drilled holes so that the speaker could fit inside the body cavity. It's actually pretty loud in open air, so being inside the body helps keep the volume down.
I started off by taking pictures of the hands and feet tracings and opened them up in Paint.Net. Using some of the filters and the eraser tool, I increased the visibility and contrast of the tracings so that they were 2-color images (black and white--not even gray). The images were imported into SketchUp and roughly traced (yet again) with the line tool to get them into workable surfaces. Then I started playing around with combining the hand and foot shapes into a solid wing object.
Once I was happy with the wing shapes, I added some gear teeth to the upper insides of the wings. This would allow me to mount a server on one wing and allow it to move both. With the servo mounted into one wing, I needed a fulcrum/point of rotation in the other wing. Placing the holes in the precise center of the gears would have put the holes outside of the body, so it would visibly stand out and wouldn't give me a secure way to attach the wings to the body. Since the shape of the wings wouldn't allow for much range of motion anyways, the off-center placement of the holes didn't cause any problems.
One thing I did notice was some slippage of the wing without the servo. To solve that, I created a pocket in the servo-less wing that allowed one of the backpack posts to sit into the wing to prevent any slipping or racking when the wing turned.
HaloThere isn't much to be said about the halo. It is a simple NeoPixel ring controlled by the Photon. A couple of globs of hot glue attach the halo to the head and the wires run down the back to the photon. It's not very complicated, but it doesn't need to be!
BackpackDespite being the least visible and farthest from the front, the backpack is the heart of all the new upgrades. It holds the servo, provides posts for aligning and attaching bolts to the body, and holds the Photon. There were a half dozen revisions of the backpack design to make sure everything was spaced properly and keep everything together.
Once aligned, it's easy to extend the backpack to mount other hardware (should one so desire), but a single Photon is more than capable on its own without needing any other fancy shields or boards to add more functionality.
For the songs, I used a "paraphrased" version of https://www.arduino.cc/en/Tutorial/PlayMelody. The Christmas songs were taken from http://blog.giacomocerquone.com/jingle-bell-with-an-arduino-and-a-buzzer/ (Jingle Bells) and http://forum.arduino.cc/index.php?topic=1390.0 (all the rest of the songs).
Wrapping upThe angel attaches to the top of the tree with zip ties around the top branch and the backpack. It's crude, but I ran out of time on this build! The NeoPixels are constantly cycling unless there is a song playing. When a song is played (triggered manually for now via a web function call), the pixels stop, the wings open, and the song plays. When the song finishes, the wings close and the pixels resume.
In the future, I think I'll make the pixel animation and music run as non-blocking code. Currently, the pixel animation blocks for 1 cycle of the colors and the songs block for the entire duration. I also plan on connecting this with Alexa + IFTTT so that we can trigger songs by voice (the kids will love it!). Particle and IFTTT make Alexa integration a cinch and only takes a minute for each song.


Comments
Please log in or sign up to comment.