


Hardware components | ||||||
_ztBMuBhMHo.jpg?auto=compress%2Cformat&w=48&h=48&fit=fill&bg=ffffff) |
| × | 1 | |||
 |
| × | 1 | |||
 |
| × | 1 | |||
Software apps and online services | ||||||
 |
| |||||
Today, internet is a (daily) need, for messaging, browsing, business meetings and everything else that can be done with this technology. Here I will share about measuring temperature using Arduino and send data through the internet thanks to Arduino Ethernet shield. To do that, I will use thermistor 10K SEN as a sensor, Arduino UNO R3 as microcontroller (to convert analog data to digital), Arduino Ethernet shield to send data via LAN cable, and a simple webserver that's built to receive data and display it in the HTML file.
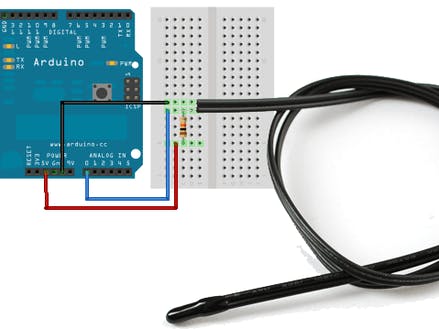
So, Let’s Get DirtyThe above picture is the schematic for the temperature measurement. Connect the 1st pin of the thermistor to the 10K resistor and the 2nd pin to the GND of Arduino. The 10K resistor’s 1st pin is connected to the Arduino 5V as supply and the 2nd pin is connected to the Analog Input 0 (A0) Arduino. After that, we could append the Ethernet shield atop the Arduino, which has exactly the same pin.
The Ethernet shield should use a LAN cable, which is a RJ45 cable, to communicate through the internet. When this is done, the last hardware step is to connect the Arduino with the computer using a USB cable. So, the real picture of the project should be like this.
There will be some files, folders, and language used in order to make this project to succeed. The very first task is to code the Arduino to read analog, convert it to a temperature value and make HTTP POST to the server.
#include 'Ethernet.h'
#include 'SPI.h'
byte mac[] = { 0x00, 0xAA, 0xBB, 0xCC, 0xDE, 0x01 }; // RESERVED MAC ADDRESS
EthernetClient client;
long previousMillis = 0;
unsigned long currentMillis = 0;
long interval = 3000; // READING INTERVAL
float p = 0.00;
String data;
void setup() {
  Serial.begin(9600);
  if (Ethernet.begin(mac) == 0) {
    Serial.println("Failed to configure Ethernet using DHCP");
  }
  delay(10000); // GIVE THE SENSOR SOME TIME TO START
}
void loop(){
  currentMillis = millis();
  if(currentMillis - previousMillis > interval) { // READ ONLY ONCE PER INTERVAL
    previousMillis = currentMillis;
    p = (float) analogRead(A0) * (5.0 / 1023.0); // CONVERT TO ARDUINO READABLE VALUE;
    p = (float) -7.58 * p + 27.309; // CALIBRATION RESULT
  }
  data = "potentio=";
  data = data + p;
  if (client.connect("167.205.43.205",3500)) { // REPLACE WITH YOUR SERVER ADDRESS
    client.println("POST /results HTTP/1.1"); // HTTP POST TO /results
    client.println("Host: 167.205.43.205:3500"); // SERVER ADDRESS HERE TOO
    client.println("Content-Type: application/x-www-form-urlencoded"); // DATA TYPE
    client.print("Content-Length: ");
    client.println(data.length());
    client.println();
    client.print(data);
  }
  if (client.connected()) {
    client.stop();  // DISCONNECT FROM THE SERVER
  }
  delay(5000); // 5 SECONDS DELAY
}
- Calibration result: The equation of graph voltage versus resistance of NTC Thermistor.
- IP Address: You can use IP address or DNS. Pay attention to the port you are using.
- Endpoint: In this project, the endpoint is http://167.205.43.205:3500/results with HTTP POST method.
After coding the Arduino, we need to make a webserver on that IP address (in this case is 167.205.43.205). In this project, I use a simple ExpressJS apps and MySQL database. The sample code is shown below:
app.js
app.post('/results', function(req, res){
    var post = {}
    post.date = new Date(),
    post.temp = req.body.temp
    sql.query('INSERT INTO analog_read SET ?', post, function(err, results, fields){
        if(err) throw err;
        console.log('sent success with value : ', post.temp)
        res.json({'status':'success!'})
    })
})
And display it to the HTML page as shown in the result below:
Pretty easy, right? For the full code, you can download it here.


Comments
Please log in or sign up to comment.