In this project you're going to build a Christmas countdown display using a 20x4 LCD display and a RTC module connected to a Netduino board.
The main objective of this project is to get you familiar on how to wire up a display to your Netduino, and see how easy is the API to display strings on an specific line, clear the screen, and more. Also you'll learn how to use a Real Time Clock (RTC) module, so your clock will always be on time regardless if the project is running or not. The logic is using Netduino.Foundation to build the logic with ease.
Netduino.Foundation is a platform for quickly and easily build connected things using the.NET MicroFramework on Netduino. Created by Wilderness Labs, it's completely open source and maintained by the Netduino community.
If you're new in Netduino development, I suggest you go to the Getting started with Netduino project to properly set up your development environment.
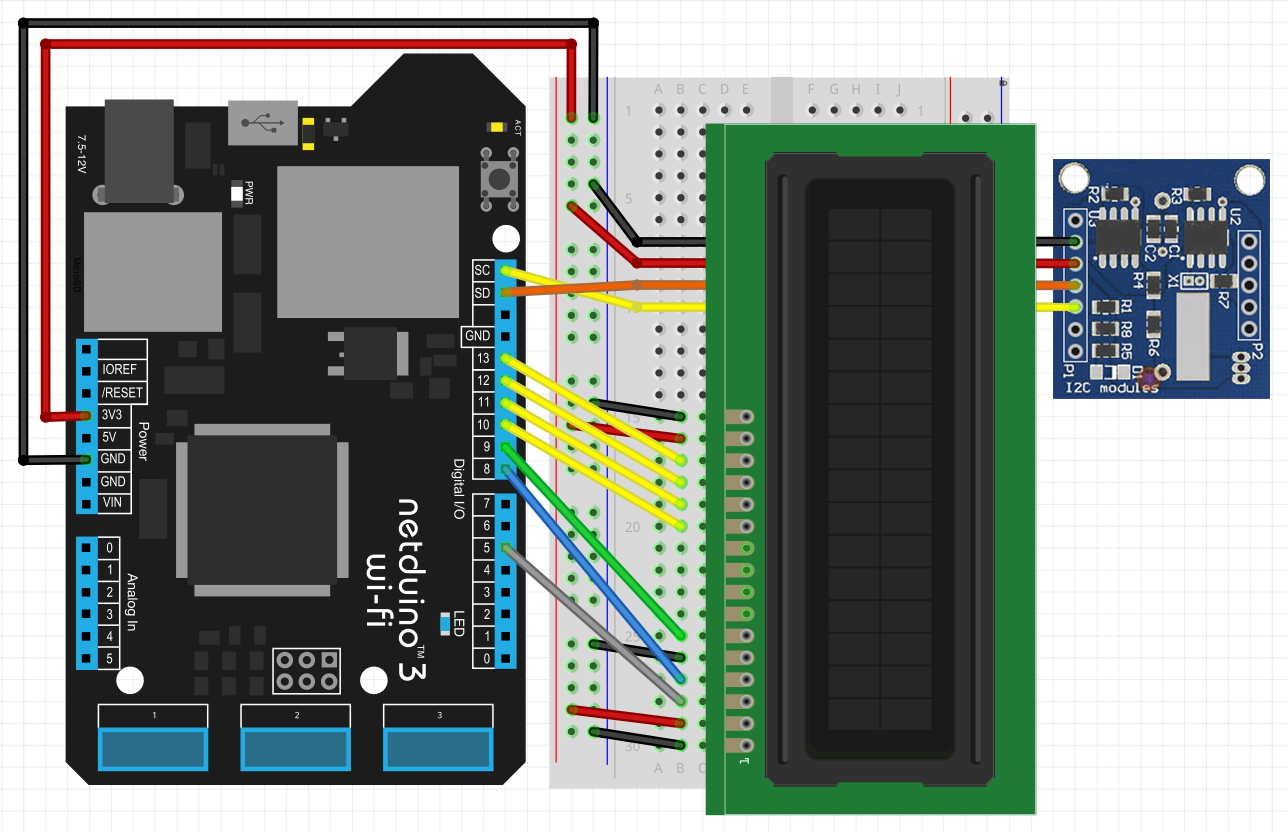
Step 1 - Assemble the circuitFor this project, wire up your breadboard and Netduino as shown in the Fritzing diagram:
Create a Netduino project in Visual Studio 2015 for Windows or the latest Visual Studio for Mac; name the project ChristmasCounter.
Step 3 - Add the Netduino.Foundation NuGet PackageWindows
Right-click on your ChristmasCounter project and click Manage Nuget Packages. In the Browse tab, search for Netduino.Foundation; it should be the first search result. Click the Install button.
Now search for Netduino.Foundation.DS323x, Netduino.Foundation.Lcd2004 and Netduino.Foundation.MCP23008 and add them to your project.
macOS
Alt-click on your ChristmasCounter project in the Solution Explorer, and click Add => Add Nuget Package to open the NuGet Package window. Search for the Netduino.Foundation package and click Add Package to add it to your project.
Now search for Netduino.Foundation.DS323x, Netduino.Foundation.Lcd2004 and Netduino.Foundation.MCP23008 and add them to your project.
Step 4 - Write the code for the ChristmasCounter ProjectAdd App Class
For this project, we implement a common App software pattern that manages all the peripherals and main logic.
Add a new App class to your project, and paste the following code to draw Circles, Rectangles and lines:
using H = Microsoft.SPOT.Hardware;
using N = SecretLabs.NETMF.Hardware.Netduino;
using Netduino.Foundation.Displays.LCD;
using System.Threading;
using Netduino.Foundation.RTCs;
using System;
namespace ChristmasCounter
{
   public class App
   {
       protected DS3231 _rtc;
       protected Lcd2004 _lcd;
       public App()
       {
           InitializePeripherals();
       }
       protected void InitializePeripherals()
       {
           _rtc = new DS3231(0x68, 100);
           // Run once to adjust the time on the RTC
           // _rtc.CurrentDateTime = new DateTime(2018, 12, 17, 22, 41, 0);
           _lcd = new Lcd2004
           (
               RS: N.Pins.GPIO_PIN_D8,
               E: N.Pins.GPIO_PIN_D9,
               D4: N.Pins.GPIO_PIN_D10,
               D5: N.Pins.GPIO_PIN_D11,
               D6: N.Pins.GPIO_PIN_D12,
               D7: N.Pins.GPIO_PIN_D13
           );
           H.PWM _contrast = new H.PWM(H.Cpu.PWMChannel.PWM_0, 1000, 0.6, false);
           _contrast.Start();
       }
       public void Run()
       {
           DateTime ChristmasDate = new DateTime(_rtc.CurrentDateTime.Year, 12, 25);
           _lcd.WriteLine("Current Date:", 0);
           _lcd.WriteLine(_rtc.CurrentDateTime.Month + "/" + _rtc.CurrentDateTime.Day + "/" + "2018", 1);
           _lcd.WriteLine("Christmas Countdown:", 2);
           while (true)
           {
               var date = ChristmasDate.Subtract(_rtc.CurrentDateTime);
               UpdateCountdown(date);
               Thread.Sleep(1000);
           }
       }
       protected void UpdateCountdown(TimeSpan date)
       {
           _lcd.ClearLine(3);
           _lcd.WriteLine(date.Days+"d"+ date.Hours + "h" + date.Minutes + "m" + date.Seconds + "s to go!", 3);
       }
   }
}
In the InitializePeripherals method, we first create a DS3231 object (var _rtc) and we immediately set the current date and time. We only need to set the date and time once, so the RTC will remain having the right time. Next, we instantiate a Lcd2004 object (var _lcd), and notice that we use a PWM signal that its connected to the V0 pin of the display to adjust the display's contrast.
Lastly, in the Run method, we use the WriteLine method on the Lcd2004 to display strings on the screen, and in the infinite while loop, we subtract the current date with Christmas eve to get the remaining time, and we call UpdateCountdown method to format the remaining time and update the 4th line of the screen.
Program Class
Finally, create a new App class object and invoke the Run method. Your code should look like this:
using System.Threading;
namespace ChristmasCounter
{
   public class Program
   {
       public static void Main()
       {
           App app = new App();
           app.Run();
           Thread.Sleep(Timeout.Infinite);
       }
   }
}
Click the run button in Visual Studio to see the project in action! It should look like the following GIF:
This project is only the tip of the iceberg in terms of the extensive exciting things you can do with Netduino.Foundation.
- It comes with a Huge Peripheral Driver Library with drivers for the most common sensors and peripherals available in the market.
- All the peripheral drivers are simplified with built-in functionality, exposed by a clean, modern API.
- This project is backed by a growing community that is constantly working on building cool connected things and always excited to help new-comers and discuss new projects.


Comments
Please log in or sign up to comment.