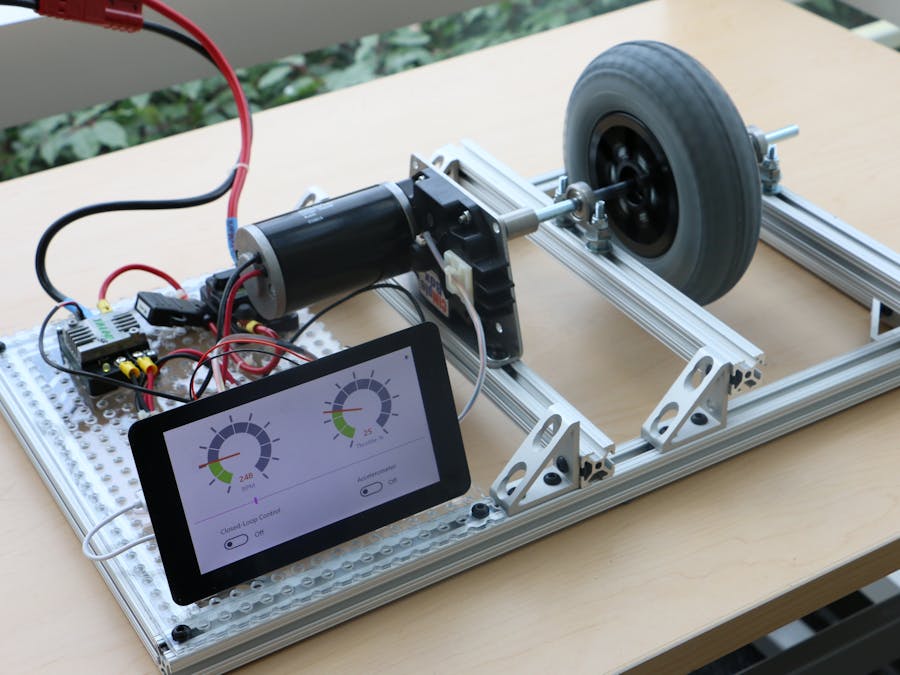
This project showcases how to use Windows 10 IoT Core on a Raspberry Pi 3 to spin a motor by providing input to a motor controller and then measuring the speed of the spinning motor using a digital encoder. We use the digital encoder feedback in a PID loop to control the speed of the motor and by doing this, we created a closed loop control system!
In addition, it demonstrates the Windows 10 IoT Core's capabilities to provide and interact with a Remote UI and sensors.
How We Built It- two 12 inch pieces
- four 14 inch pieces
- two 24 inch pieces
After doing this, we began using the T-Nuts and Corner Brackets to solidify a framing using 90 degree angles and then attached the perforated polycarbonate sheet.
Once the framing has been created, the next step was to attach the Aluminum Base Mount for the Ball Bearings for 3/8" shaft diameter.
Then attached the wheel to pieces of 3/8" shaft using the 375 Key Hub, 3/32" Key Stock, set screw shaft collar, screws, and nuts.
Then we mounted the CIMple Gearbox which had been assembled with the motor, PID controller and the proper gears and shafts.
After which we attached the CIMple Gearbox shaft to the 3/8" shaft using a custom bored reduction coupler (custom bored to reduce from 1/2" to 3/8").
Then we mounted and hooked up the motor controller, fuse, and circuit breaker to the motor and battery.
Hook up the pins for the digital encoder and motor controller to the PWM/Servo HAT:
- Orange to 3.3V on Hat
- Brown to Ground
- Yellow to Pin 16 on HAT (4th from the edge closest to the USB ports)
- Blue to pin 13 (5th from the edge)
Then we hooked up the Touchscreen - follow this guide by the manufacturer.
Like all other Windows 10 IoT Applications, deployment happens through Visual Studio, but you will need to install the latest Windows 10 IoT Core Insider Preview image and follow the setup instructions.
Then download the repository containing the code for the project (Coming soon).
Open up the Visual Studio project.
Then deploy it to your Raspberry Pi 3 (more info on deployment can be found here).
Deep Dive into the SoftwareThis project is a great example of how writing Universal Windows applications allows you to seamlessly operate in a mixed mode of using both C++ and C# components that can run across devices. In addition it utilizes both Arduino Wiring and the Lightning Providers which make use of a direct memory-mapped driver that offers high performance GPIO.
There are four main components.
- Raspberry Pi 3 UI
- PID Controller code - (more info on PID controllers and control loop feedback mechanisms)
- Motor powering through the motor controller
- Remote UX capabilities (more details coming soon)
The DemoApp project contains the main UI for the demo and includes the Motor and PidController projects. The demo can run in two modes.
In throttle mode the slider will adjust the throttle of the motor between 0 and 100%. While the motor controllers used are capable of driving the motor in reverse, this project doesn't use that functionality but it can easily be achieved by setting a negative percentage as the motor throttle.
In closed-loop mode the application will control the motor throttle to achieve the desired RPM which is again set with the slider control.
The Motor project contains the logic for getting the RPM of the motor shaft and controlling the motor throttle. It is written in C++ and uses Arduino Wiring as well as our Lightning Providers. Throttle is controlled using a PWM-controlled motor controller which is attached to an Adafruit PWM Servo Hat. The RPM value is calculated using Lightning and an optical encoder. This is as easy as using the Arduino Wiring attachInterrupt syntax you're already familiar with in C++. This is where the high performance of the Lightning direct memory-mapped driver is necessary so we can process the encoder interrupts at an acceptable rate. Knowing the pulses per revolution value of the encoder along with the elapsed time between interrupts we can easily calculate the RPM. This results in the RPM being calculated hundreds of times a second which can lead to a very noisy output so we used an exponential moving average to smooth it out.
Note: For the Lightning Providers to work you need to enable the direct memory-mapped driver. Directions for doing that can be found here.
The PID Controller project is a Universal Windows Runtime Component written in C# that implements a very simple proportional-integral-derivative controller that can be reused in any project the requires closed-loop control.
More Coming SoonWe will continue to update this post as new functionality is released via the Windows Insider Program. Here are some things to look forward to in the coming months.
- Remote UX - April 2016
- OnBoard WiFi - April 2016
- 2 - 8020 1" x 1" T-Slotted Extrusion 72 inches
- 10 -4 Hole Inside Corner Gusset Corner Brackets
- 1/2" T-Nuts and accompanying screws
- Miniature Aluminum Base-Mount Stainless Steel Ball Bearing ABEC 3 for 3/8" Shaft Diameter
- Set Screw Shaft Collar for 3/8" Diameter
- 3/8" Coupler w/ Set Screws ( bored to act as a reduction coupler from 1/2" to 3/8")
- Spring Steel Standard Key Stock 3/32" x 3/32", 12" Length
- Perforated Plastic Sheet (polycarbonate) 20"x21"x1/8"
- 40 Amp Snap Action Breaker
- MK ES17-12 Batteries for the motor
- Battery Cables
- 375 Key Hub
- 8 inch Pneumatic Wheel
- 2.5" CIM Motor
- USB Power Banks for powering the Raspberry Pi
- Loctite
- Raspberry Pi 7" Touchscreen by Element 14
- Raspberry Pi 3
- PWM/Servo HAT for Raspberry Pi
- Optical Encoder


Comments
Please log in or sign up to comment.