Have you ever left your house and accidentally left your lights on or forgotten to fix the thermostat? Nowadays, there is a lot of electricity loss caused when we accidentally keep the lights, fans, and AC of our home ON. This is a common scenario and leads to massive electricity loss for a household.
The proposed project performs indoor and outdoor temperature forecasts that are used to manage the on/off switching of the air conditioner system and the regulation of the indoor temperature.
Control your temperature based on the weather outside, the time of day, or whether you are home. A smart thermostat system can help you lower your heating and AC bills each month by optimizing the times that it runs.
Differentiation from existing solutionsNowadays, everybody wants to have a smart home, and one of the most important pieces of hardware that a house needs is a thermostat with humidity control. So, this project is about combining smartness with the thermostat. That means the home users will be able to see their house's live temperature and humidity from their phone (smartphone app) or a local webserver. The device is programmed so that if the humidity is not at a normal level in conformity with the outside temperature, then it will notify the users, and if it is connected to a smart humidifier or dehumidifier to start them depending on the situation. This same goes for room temperature with heating and air conditioning.
With temperature control automation, you can adjust the home temperature to the level that suits you best. Intelligent thermostats control the temperature based on configurations set by users in accordance with their preferences. These controllers can check your current activity and change the temperature accordingly.
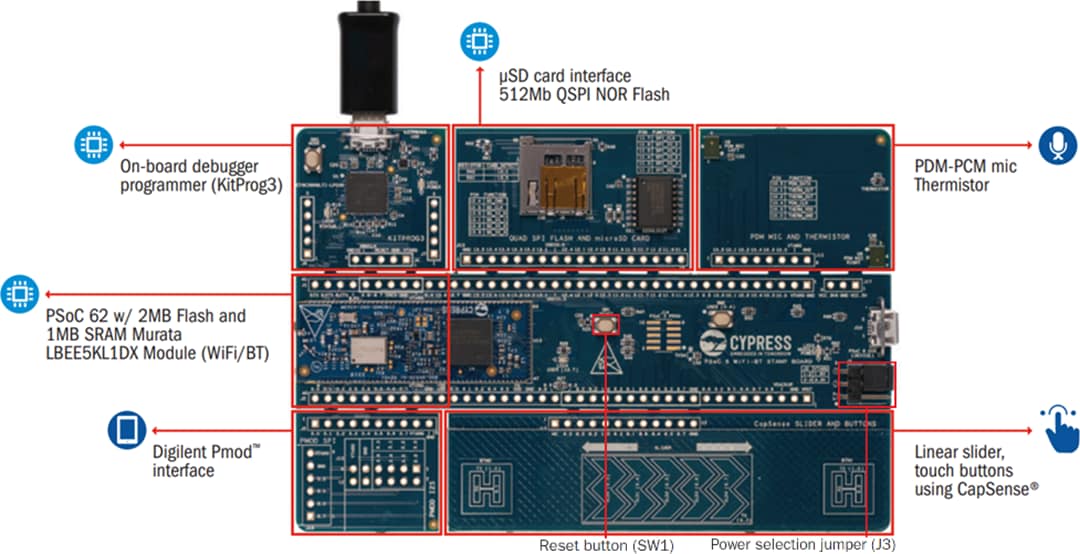
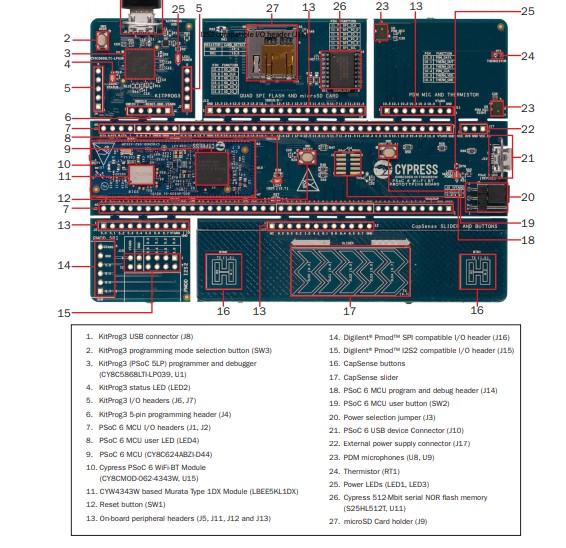
The Solution / How this Project works?This summer season is pretty hot with vast electricity consumption. But there are times when the air conditioner is still running when the weather is cooler. To reduce the energy cost, we are looking into designing and developing a device with the Infineon PSoC™ 6 Wi-Fi BT Prototyping Kit: CY8CPROTO-062-4343W and appropriate sensors that monitor environmental conditions to control heating/cooling systems using the temperature sensor of CY8CPROTO-062-4343W.
With the PSoC™ 6 Wi-Fi BT Prototyping Kit and its build-in sensor, it allows us to wirelessly transfer sensor data over Bluetooth LE to the mobile device and upload it to the cloud for training and download trained ML models to the PSoC™ 6 Wi-Fi BT for deployment and inferencing.
The model can then be wirelessly deployed to the PSoC™ 6 Wi-Fi BT. Inferencing is performed by the PSoC™ 6 Wi-Fi BT and the results can be viewed in the app.
Step-by-Step Guide- Click the New Application link in the Quick Panel (or, use File > New > ModusToolbox™ Application). This launches the Project Creator tool.
- Pick a kit supported by the code example from the list shown in the Project Creator - Choose Board Support Package (BSP) dialog. When you select a supported kit, the example is reconfigured automatically to work with the kit. To work with a different supported kit later, use the Library Manager to choose the BSP for the supported kit. You can use the Library Manager to select or update the BSP and firmware libraries used in this application. To access the Library Manager, click the link from the Quick Panel. You can also just start the application creation process again and select a different kit. If you want to use the application for a kit not listed here, you may need to update the source files. If the kit does not have the required resources, the application may not work.
- In the Project Creator - Select Application dialog, choose the example by enabling the checkbox.
- (Optional) Change the suggested New Application Name.
- The Application(s) Root Path defaults to the Eclipse workspace which is usually the desired location for the application. If you want to store the application in a different location, you can change the Application(s) Root Path value. Applications that share libraries should be in the same root path.
- Click Create to complete the application creation process.
For more details, see the Eclipse IDE for ModusToolbox™ software user guide (locally available at {ModusToolbox™ software install directory}/docs_{version}/mt_ide_user_guide.pdf).
Operation1. Connect the board to your PC using the provided USB cable through the KitProg3 USB connector.
2. Open a terminal program and select the KitProg3 COM port. Set the serial port parameters to 8N1 and 115200 baud.
3. Program the board using one of the following:
- Select the application project in the Project Explorer.
- In the Quick Panel, scroll down, and click <Application Name> Program (KitProg3_MiniProg4).
4. After programming, the application starts automatically. Confirm that "<CE Title>" is displayed on the UART terminal.
5. To test using the EFR Connect BLE Mobile App, do the following (see equivalent EFR Connect BLE Mobile App screenshots in Figure 2-4):
- Turn ON Bluetooth® on your Android or iOS device.
- Launch the EFR Connect BLE Mobile App.
- Press the reset switch on the supported kit to start sending advertisements.
- Swipe down on the EFR Connect BLE Mobile App home screen (BLE Devices) to start scanning for Bluetooth® LE Peripherals; your device ("Thermistor") appears in the EFR Connect BLE Mobile App home screen (BLE Devices or Scan). Select your device to establish a Bluetooth® LE connection. Once the connection is established, LED4 changes from OFF state to always ON state.
- Select Environmental Sensing Service and tap Notify. The temperature values will be updated every 5 seconds (in degrees Celsius).
5. Use the KitProg3 COM port to view the Bluetooth® stack and application trace messages in the terminal window.
6. Once the connection is established, USER_LED1(LED4 USER) starts to change from OFF state to ON state, indicating that Bluetooth LE is advertising, and transfers sensor data over Bluetooth LE to the mobile device, and prints a message on the terminal application as shown in Figure 7.


Comments