

(Look at the GitHub project for a list of parts, schematics, etc.)
Battery capacity tester: With this device you can check the 18650 battery capacity. For safety, I added, using a thermistor, the temperature of the power resistance and battery to prevent explosion. I'm making some changes from the original project:
v0.1- VCC of Arduino is now automatically calculated;
- Added variable to change setting in a more comfortable way.
- Added percentage of discharging
- Added temperature of battery and power resistor
- Added possiblity of battery selection
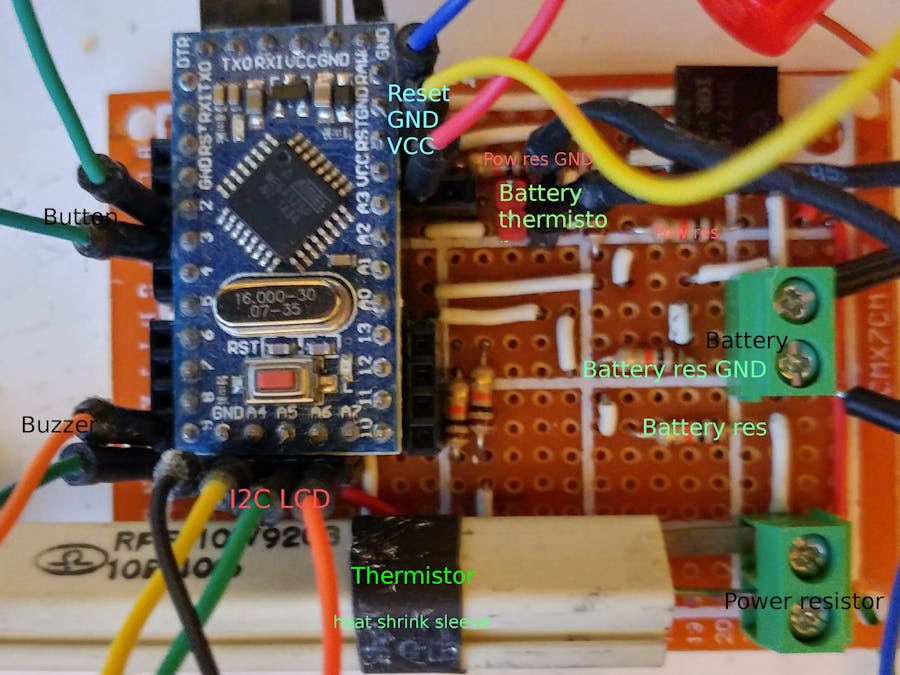
- Created prototype board (look the schematic), with the screen, button and speaker outside of the board because in the future I'd like to create a package.
- Added management of the temperature limit for the power resistor as to block it from rising beyond 70°.
v0.3
Coming soon a board from this service https://www.pcbgogo.com?code=y .
In v0.2 to support various types of batteries I created a structure that must be filled with battery name, min voltage and max voltage (I need help to fill it :P).
// Structure of battery type
struct BatteryType {
	char name[10];
	float maxVolt;
	float minVolt;
};
#define BATTERY_TYPE_NUMBER 4
BatteryType batteryTypes[BATTERY_TYPE_NUMBER] = {
		{ "18650", 4.3, 2.9 },
		{ "17550", 4.3, 2.9 },
		{ "14500", 4.3, 2.75 },
		{ "6v Acid", 6.50, 5.91  }
};
Now I use a 10k resistor for the voltage read. If you want change voltage support, you must change this value (explain better next):
// Battery voltage resistance
#define BAT_RES_VALUE_GND 10.0
#define BAT_RES_VALUE_VCC 10.0
// Power resistor voltage resistance
#define RES_RES_VALUE_GND 10.0
#define RES_RES_VALUE_VCC 10.0
If you don't use thermistor, set this to false:
#define USING_BATTERY_TERMISTOR true
#define USING_RESISTO_TERMISTOR true
If you use a different i2c display, you must rewrite this method:
void draw(void)
In the project, you can find fritzing schematics, photos,and more.
I used a generic character display, and I built the i2c controller and used it with my custom library. But if you want, you can take a normal i2c controller (less than 1€) with a standard library, the code remains the same. All code of display is in draw function so you can change that without change other things.
Created from an idea of OpenGreenEnergy.
RealizationFor measuring voltage we use the principle of a Voltage divider (more information on Wikipedia or Blog). In simple words, this code measures battery voltage.
batResValueGnd / (batResValueVolt + batResValueGnd)
This is the multiplier factor of the reading voltage. I inserted the 2 resistances of batResValueVolt and batResValueGnd after and before the analog read wire.
sample1 -->is the average analog readings;vcc -->reference Arduino voltage;1023.0 -->is the reference maximum value of analog read (Arduino analog read go from 0 to 1023)
The principle is that we measure the voltage after and before the power resistor and so we can calculate milliampere that consumes the battery.
The MOSFET is used to start and stop battery drain from power resistor.I'm pretty scary, so I inserted 2 thermistors to monitor battery and power resistor temperature.
Version v0.2On prototype board: I created a prototype board that is very extendable, but for now I use only a minimal set of pins (in future I'll add an LED and other buttons). If you want support voltage greater than 10v you must change the resistor value of battery and resistance in according to the formula (BAT_RES_VALUE_GND / (BAT_RES_VALUE_VCC + BAT_RES_VALUE_GND) in the schema Resistor power voltage GND 1/2 / (Resistor power voltage 2/2 + Resistor power voltage GND 1/2)
.
Soldering prototype:
List of parts:
Amount	Part Type	Properties
2	5mm Screw TermInal PCB Mount Screw TermInal Block 8A 250V LW SZUS
1	Arduino Pro Mini clone (compatible Nano)
1	Basic FET P-Channel IRF744N or IRLZ44N
11	10kΩ Resistor	resistenza 10kΩ
1	Temperature Sensor (Thermistor) 10kΩ; tipo thermistor
*	Generic male header	form ♂ (male);
*	Generic female header	form ♀ (female);
1	PerfBoard board	Prototype board 24x18
On github I add link to buy.
https://github.com/xreef/BatteryCapacityTesterArduinoNANO
Display
On breadboard:
Serial output for debug:
Volt: 2.94V - B Volt: 2.94V - Res Volt: 0.00V - Curr: 292mA - mAh: 219.4 - DISCHARGING: 1 - Battery temp: 19.47 - Resistance temp: 32.28
Volt: 2.94V - B Volt: 2.94V - Res Volt: 0.00V - Curr: 292mA - mAh: 219.4 - DISCHARGING: 1 - Battery temp: 19.47 - Resistance temp: 32.24
Volt: 2.94V - B Volt: 2.94V - Res Volt: 0.00V - Curr: 292mA - mAh: 219.4 - DISCHARGING: 1 - Battery temp: 19.44 - Resistance temp: 32.28
Volt: 2.92V - B Volt: 2.92V - Res Volt: 0.00V - Curr: 292mA - mAh: 219.7 - DISCHARGING: 1 - Battery temp: 19.49 - Resistance temp: 32.28
Volt: 2.94V - B Volt: 2.94V - Res Volt: 0.00V - Curr: 292mA - mAh: 219.7 - DISCHARGING: 1 - Battery temp: 19.46 - Resistance temp: 32.26
Volt: 2.94V - B Volt: 2.94V - Res Volt: 0.00V - Curr: 292mA - mAh: 219.7 - DISCHARGING: 1 - Battery temp: 19.42 - Resistance temp: 32.28
Volt: 2.92V - B Volt: 2.92V - Res Volt: 0.00V - Curr: 292mA - mAh: 219.7 - DISCHARGING: 1 - Battery temp: 19.46 - Resistance temp: 32.22
Volt: 2.94V - B Volt: 2.94V - Res Volt: 0.00V - Curr: 294mA - mAh: 220.0 - DISCHARGING: 1 - Battery temp: 19.46 - Resistance temp: 32.26
Wire schema v0.1
Breadboard
Thermistor on power resistor (heat shrink sleeve to hold).
Thermistor on battery.

Comments