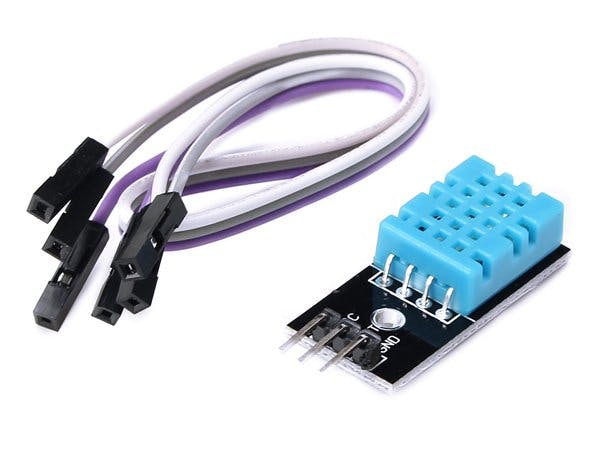
I started a small project to make my raspberrypi zero to monitor temperature and humidity. This was relative easy by controlling some pins and sending commands to the pi. I decided to extend this project and create a web server where I could access it remotely and monitor weather conditons. This article assumes you have some understanding how to connect sensors to the raspberrypi, write code using python3 and some basic knowledge of web development.
What is a web serverA web server according to wikipedia is a server software, or hardware dedicated to running this software, that can satisfy client requests on the World Wide Web and in general, contain one or more websites. Link
For the pi zero I ve chosen Flask a lightweight WSGI web application framework. It is designed to make getting started quick and easy, with the ability to scale up to complex applications. With Flask you can easily get started with as a beginner. Check here for a great tutorial.
So, lets start.
What you will needA raspberypi zero w.
DHT11 sensor
To connect the DHT11 with the raspberrypi there are many articles out there. Find one an follow it.
Software SetupInstall and setup FlaskFirst of all install Flask in your PI. Open a terminal window and type
sudo apt-get install python3-flaskAfter a while the flask will be installed.
Now follow this steps to setup you environment.
- The first thing you need to do is to choose a folder wher your server will run from. So, you either do this from the GUI or you can type
mkdir myWebServerThis will create a folder myWebServer under the path /home/pi/. Then go to the folder either by using the GUI or by typing
cd myWebServerand create 2 more folders
mkdir static
and
mkdir templates
Static folder is used to store all the CSS and javascript files and the templates is used to store all the HTML pages. So the final folder tree will look like this:
myWebServer - static - templates
Create the home pageCreate a file index.html under myWebServer folder and write inside the following:
<!doctype html>

<head>
   <title>My Server</title>
   <meta charset="utf-8">
   <meta name="viewport" content="width=device-width, initial-scale=1, shrink-to-fit=no">
  </head>
<body>
<div class="container">
<div class="row">
        <div class="col-sm">
            <h2>{{title}}</h2>
            The date and time on the server is: {{ time }}
        </div>
    </div>
</div>
</body>
The {{ }} is a placeholder where the data from server will be written. For example {{title}} will contain the title of the page. Check below to see how this will be returned from the server
Setup Python web serverLets write some code. Open your Thonny app and create a new python file called myserver.py and type in the following
from flask import Flask, render_template, request, Response, jsonify,make_response
import datetime

app = Flask(__name__, template_folder='templates')

@app.route("/")
def home():
   now = datetime.datetime.now()
   timeString = now.strftime("%d-%m-%Y %H:%M")
   templateData = {
      'title' : 'HELLO!',
      'time': timeString,
      }
   return render_template('index.html', **templateData)

if __name__ == "__main__":
   app.run(host='0.0.0.0', port=80, debug=True)
The server will run under your local environment and you need your IP. To find it just go to your terminal and type
ifconfigOn the results search for the wlanO section and record your IP ie 10.0.0.1
Running the serverOk lets run it to see what will happen.
sudo python3 myserver.pyIf this runs correctly you should see this in the terminal
* Serving Flask app "myserver" (lazy loading)
 * Environment: production
   WARNING: This is a development server. Do not use it in a production deployment.
   Use a production WSGI server instead.
 * Debug mode: on
 * Running on http://0.0.0.0:50/ (Press CTRL+C to quit)
 * Restarting with stat
 * Debugger is active!
 * Debugger PIN: 210-353-387
Now open a browser and type the IP you find on the previous step and press enter. You should see this
Lets analyze the page.
The Hello word is set from this line <h2>{{title}}</h2> and is set from the server's response. Same for the date. If you see it then this is a success.
Lets now write some code to get the temperature from the DHT11.
How to read Temperature and HumidityOpen again the file myserver.py and add the following:
- import Adafruit_DHT. This imports the Adafruit library which contains commands and makes it easier to read the temperature and humidity.
- And a function called read_sensor as it is below
from flask import Flask, render_template, request, Response, jsonify,make_response
import datetime

import Adafruit_DHT

app = Flask(__name__, template_folder='templates')

@app.route("/")
def home():
   now = datetime.datetime.now()
   timeString = now.strftime("%d-%m-%Y %H:%M")
   t,humidity=read_sensor()
   templateData = {
      'title' : 'HELLO!',
      'time': timeString,
      'temp':t,
      'hum':humidity
      }
   return render_template('index.html', **templateData)

def read_sensor(*args):
    try:

       humidity, temperature = Adafruit_DHT.read_retry(11,4)

       print('Temp: {0:0.1f}* C  Humidity: {1:0.1f} %'.format(temperature, humidity))
       t ='{0:0.1f}'.format(temperature)
       return t,humidity
    except Exception as e:
       print ('error '+str(e))
       GPIO.cleanup()

if __name__ == "__main__":
   app.run(host='0.0.0.0', port=80, debug=True)
The function read_sensor when called will return a Tuple with 2 values the temp and the humidity.
The Adafruit_DHT.read_retry(11, 4) will read the values from the DHT sensor from the GPIO pin 4. If you have another pin then set the correct one. The print command will also print the results on the terminal.
When the server runs on the line 12 will call the read_sensor function and on lines 16, 17 will pass them to the index.html page, as described below.
Open the index.html page and add the following lines:
<!doctype html>

<head>
   <title>My Server</title>
   <meta charset="utf-8">
   <meta name="viewport" content="width=device-width, initial-scale=1, shrink-to-fit=no">
  </head>
<body>
<div class="container">
<div class="row">
        <div class="col-sm">
            <h2>{{title}}</h2>
            <p>The date and time on the server is: {{ time }}</p>
            </br>Temp is: {{temp}}C and Humidity is: {{hum}}%
        </div>
    </div>
</div>
</body>
Now run the server again
sudo python3 myserver.pyYou should see now
This was a simple example on how to create lite web server and read some values from a sensor. You can follow also my other post http://jragas.blog/2020/09/29/remote-access-raspberry-pi-using-dataplicity/ on how control your pi remotely using dataplicity and use it to check the temperature and humidity.


Comments
Please log in or sign up to comment.