
Hardware components | ||||||
 |
| × | 1 | |||
 |
| × | 1 | |||
 |
| × | 1 | |||
 |
| × | 1 | |||
 |
| × | 1 | |||
Hand tools and fabrication machines | ||||||
 |
| |||||
 |
| |||||
The LED Brightness Control System is a comprehensive project aimed at optimizing energy consumption and enhancing lighting efficiency in a large-scale setting. With the increasing demand for energy-efficient solutions, especially in urban areas, this project addresses the need for smarter lighting management systems. By employing advanced technology and innovative control mechanisms, this system aims to regulate the brightness of LED lights efficiently.
Things used in this project-:
1. Hardware Components-Jumper Wire
- Jumper Wire
5mm LED
- 5mm LED
Volt Meter
- Volt Meter
Breadboard
- Breadboard
Potentiometer
- Potentiometer
Heat sink
- Heat sink
lm317 voltage regulator
- lm317 voltage regulator
12 Volt Connector
- 12 Volt Connector
Zero PCB Board
- Zero PCB Board
Banana connector
- Banana connector
Soldering iron (generic)
- Soldering iron (generic)
Solder Wire, Lead-Free
- Solder Wire, Lead-Free
Solder Flux, Soldering
- Solder Flux, Soldering
Story-📷
The LED brightness control system utilizes a potentiometer to regulate light intensity effortlessly. With a simple twist, users can fine-tune the brightness of LED lights to suit their preferences, creating a customized lighting environment. The potentiometer acts as a variable resistor, adjusting the voltage supplied to the LEDs and consequently altering their brightness levels. This intuitive control mechanism offers convenience and flexibility, allowing for seamless adjustments without the need for complex interfaces or programming. Whether for ambiance creation or energy efficiency, the potentiometer-based LED brightness control system puts illumination control directly at users' fingertips.
CKT Diagram -Before we can get started, first of all, we have to design the circuit, after creating the circuit, and then we have to design the PCB. As you can see here, I have designed a PCB for an LED brightness control circuit using zero PCB.
To build this LED brightness control device, you will need the following components
- Jumper Wire
- 5mm LED
- Volt Meter
- Breadboard
- Potentiometer
- Heat sink
- lm317 voltage regulator
- 12 Volt Connector
- Zero PCB Board
- Banana connector
You can purchase all these components from “ Winsource Electronics”
Volt Meter-A voltmeter is an electrical instrument designed to measure voltage, typically in volts. It consists of a sensitive galvanometer connected in parallel with a high resistance, allowing it to measure the potential difference between two points in a circuit. Voltmeters come in various types, including analog and digital, and can measure both AC (alternating current) and DC (direct current) voltages. They play a crucial role in electrical engineering, electronics, and physics, aiding in diagnosing circuit problems, monitoring electrical systems, and ensuring safety. Voltmeters are essential tools for engineers, technicians, and scientists, providing accurate readings to facilitate efficient operation and maintenance of electrical equipment.
Voltmeters provide real-time monitoring of voltage levels at different points in the single-line diagram, ensuring that electrical equipment operates within safe limits. By measuring voltage, voltmeters help detect faults such as overvoltage, undervoltage, or voltage fluctuations, enabling timely intervention to prevent equipment damage or failures. Voltmeter readings assist in optimizing system performance by ensuring that voltage levels are maintained within specified ranges, thereby enhancing the efficiency and reliability of electrical systems. Regular voltage measurements using voltmeters contribute to ensuring the safety of personnel and equipment by identifying potential hazards associated with abnormal voltage conditions. Voltmeter data aids in planning maintenance activities by providing insights into voltage trends and patterns, facilitating proactive maintenance to prevent unexpected downtime and costly repairs. Voltmeter readings help verify compliance with regulatory standards and industry guidelines regarding voltage levels, ensuring that the single-line diagram meets safety and performance requirements.
Potentiometer -A potentiometer is a variable resistor device commonly used to measure and control electrical potential difference (voltage) in circuits. It consists of a resistive element with three terminals: the input terminal, the output terminal, and the wiper terminal. By adjusting the position of the wiper along the resistive track, users can vary the output voltage in proportion to the input voltage. Potentiometers find applications in various fields, including electronics, instrumentation, and control systems. They are utilized for tasks such as volume control in audio equipment, brightness control in displays, and precision voltage adjustment in electronic circuits. Potentiometers are versatile components that offer precise voltage regulation and are integral to many electrical and electronic devices. Potentiometers allow for precise adjustment of voltage levels in electrical circuits, enabling fine-tuning of equipment performance and ensuring optimal operation. They provide a simple and versatile means of controlling various parameters such as volume, brightness, speed, and temperature in electronic systems, offering users customizable control over device functionality. Potentiometers are used for signal conditioning purposes, such as attenuating signals or adjusting signal levels, which is crucial in signal processing and communication systems. Potentiometers are utilized in calibration procedures to calibrate instruments and equipment by adjusting output voltages or signal levels to known reference values, ensuring accuracy and reliability in measurements play a vital role in feedback control systems, where they are employed as feedback elements to regulate system performance by adjusting control signals based on measured output values. 📷
The LM317 is a widely used voltage regulator integrated circuit capable of regulating output voltages with high precision. Operating as an adjustable linear regulator, it accepts an input voltage and delivers a regulated output voltage that can be adjusted through an external resistor network. With its adjustable output voltage and current capability, the LM317 is versatile, finding applications in various electronic devices, power supplies, battery chargers, and voltage reference circuits. Its stability, reliability, and ease of use make it a popular choice for voltage regulation in both hobbyist and professional electronics projects. It provides accurate and stable output voltage regulation, ensuring consistent performance across a wide range of input voltages and load conditions. The LM317's output voltage can be easily adjusted using external resistor networks, offering flexibility in voltage selection for different applications. It incorporates current limiting and thermal overload protection features, safeguarding both the regulator and connected components from damage due to excessive current or temperature. While linear regulators like the LM317 dissipate excess power as heat, their simplicity and low dropout voltage contribute to relatively high efficiency in voltage regulation tasks. The LM317 voltage regulator provides precise, adjustable, and reliable voltage regulation capabilities, making it a preferred choice for various voltage control applications due to its efficiency, versatility, and cost-effectiveness.
To build the LED brightness controller, follow the steps below:
As per our circuit design 1st, we assemble all the components on the breadboard
- As per our circuit design 1st, we assemble all the components on the breadboard
After assembling all these components on the breadboard we will connect the 12 Volt power supply adapter to the DC female jack.
- After assembling all these components on the breadboard we will connect the 12 Volt power supply adapter to the DC female jack.
Now for the output we connect the Banan connector and check the output using a multimeter
- Now for the output we connect the Banan connector and check the output using a multimeter
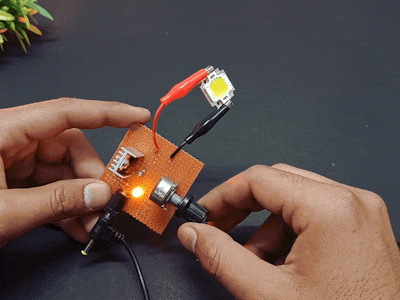
Now we are controlling the brightness by using any 4V voltage LED
Let’s Check the results
After Testing on the breadboard now assemble all the components on zero PCB board and solder it according to the circuit diagram
So I hope you like this post and if you have liked this one then don't forget to visit my other posts.
_qgh8yE51H8.png)
_qgh8yE51H8.png)

Comments
Please log in or sign up to comment.