


Hardware components | ||||||
| × | 1 | ||||
| × | 1 | ||||
 |
| × | 1 | |||
| × | 4 | ||||
| × | 1 | ||||
Software apps and online services | ||||||
 |
| |||||
| ||||||
Hand tools and fabrication machines | ||||||
 |
| |||||
The Zumo CC3200 is the third generation of TInk (a project completed by the TI Santa Barbara interns in the summer of 2013), a WiFi controllable motorized bot that includes Inertial Measurement (IMU) sensors for guidance and balancing.
The Zumo CC3200 is easy to build, easy to program, costs less than $130, and all development tools and software libraries needed to create interesting applications are entirely free and Open Source.
- Demos - more examples of Zumo CC3200 in action
- Project Repo - sources for all demos and the ZumoCC3200 library
- Project Wiki - home page the Zumo CC3200 project
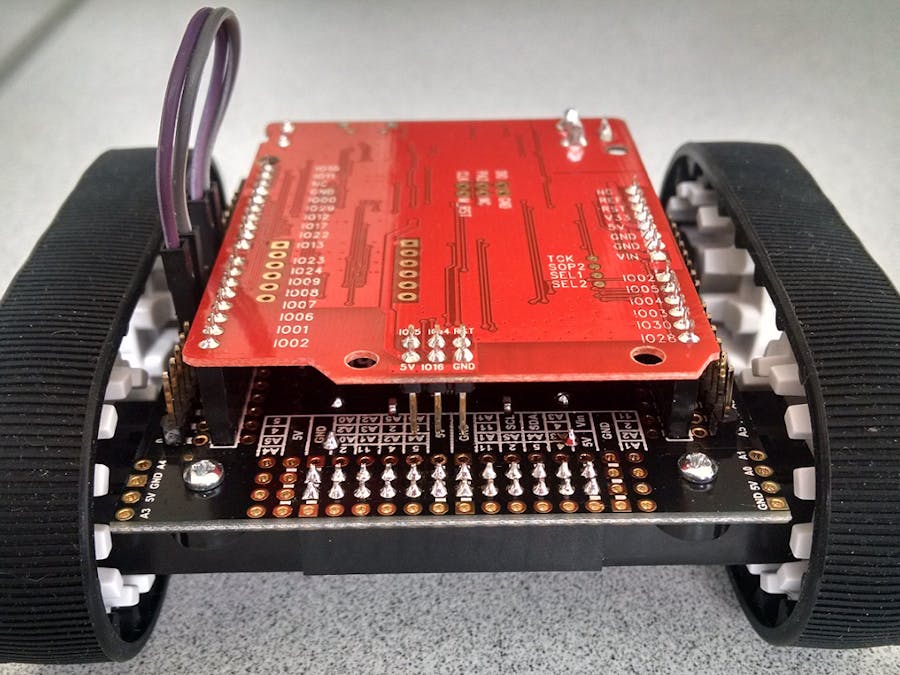
The Zumo CC3200 robot hardware consists of a RedBearLab CC3200 motherboard combined with the Pololu Zumo Robot for Arduino and two wires.
Chassis: The tank chassis and Arduino shield can be purchased fully assembled from Pololu: Zumo Robot for Arduino, v1.2 (Assembled with 75:1 HP Motors). The shield combines a TI dual H-Bridge motor driver (DRV8835) with numerous motion sensors, LEDs, push buttons, and a buzzer for simple tone playback. The Zumo Robot from Pololu does not include a microprocessor but is designed to support any Arduino compatible motherboard.
Motherboard: Since we're interested in wireless motor control and telemetry, we use the TI CC3200. Rather than adapt the CC3200 LaunchPad to the Zumo Bot Arduino Shield's headers, we opted to use the RedBearLab CC3200 board which is designed to be Arduino Shield compatible. The RedBearLab CC3200 provides an almost "plug-and-play" motherboard solution allowing us to focus on developing software for the Zumo.
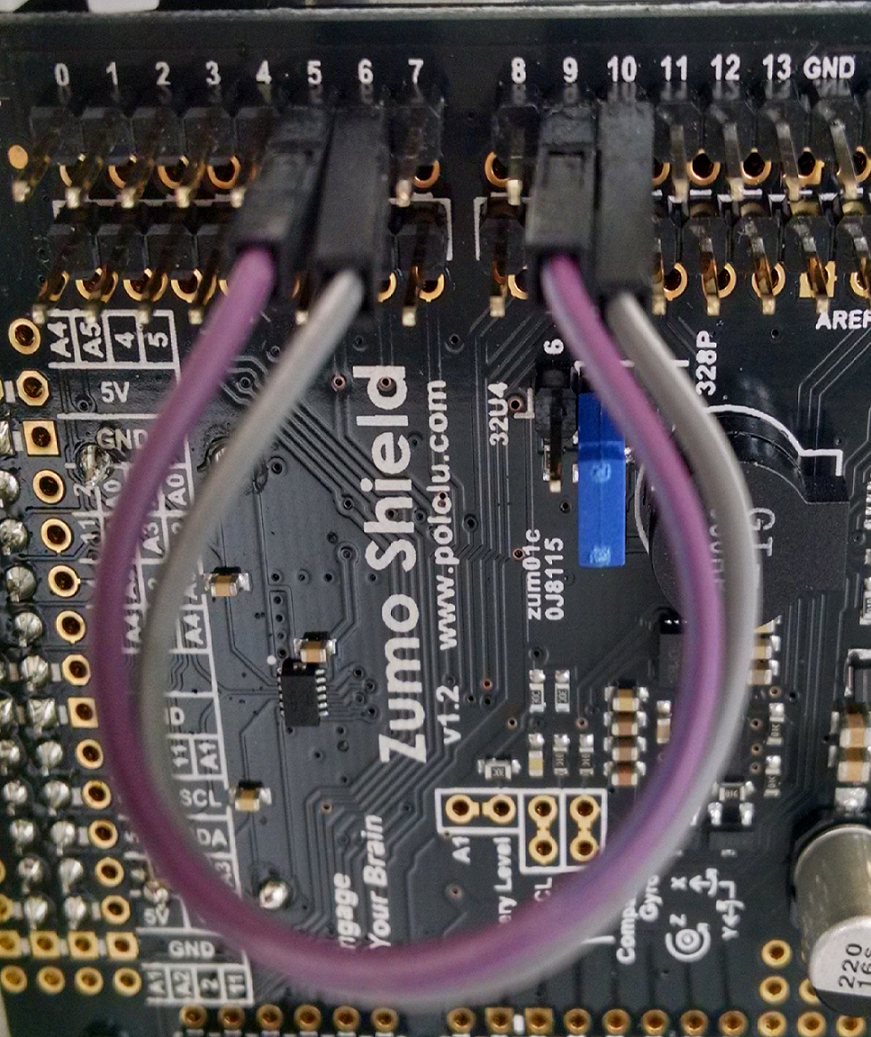
Two Wires: The CC3200 has a limited number of pins that support PWM output. As a result, the RedBearLab mother board only supports PWM output on pins 5 and 6. However, the Zumo for Arduino Shield connects pins 9 and 10 to the PWM inputs of the DRV8835 motor driver. But, with the addition of just two wires and a few lines of code, we can safely connect the CC3200 PWM outputs to the DRV8835 inputs and reuse the original ZumoMotors library from Pololu.
Since the Zumo for Arduino shield is designed to enable the addition of expansion headers, it's quite straightforward to physically connect pin 5 to pin 9 and pin 6 to pin 10 without limiting any future use of the Zumo for Arduino shield.
Software OverviewOne of the goals of this project is to create reusable libraries and sketches that enable you to easily create new applications for the ZumoCC3200. To that end, we use popular development IDEs (Energia and Processing) and created the Zumo CC3200 library that provides commonly needed motor control and sensor reading functions.
To leverage more powerful micro-controllers and wireless communication in this project, we built atop Energia which provides the same easy to use embedded development environment as Arduino but also includes support for the CC3200.
To control the ZumoCC3200 from a laptop or tablet, we use Processing. This has the advantage that, despite having to concurrently manage GUI input and network communication with the ZumoCC3200, Processing applications are quite simple, its development IDE is almost identical to Energia, and, like Arduino, its supported by a huge collection of third-party libraries.
Energia MT
Energia MT (Multi-Threaded) is a natural extension of the basic Arduino Wiring framework to support concurrent execution of multiple sketches in a single program. This single extension greatly simplifies the creation of sketches that must concurrently manage both real-time motor control and WiFi communication.
Energia MT version 16 (and above) supports TI's MSP432 and CC3200 and is available for download from here.
The ZumoCC3200 LibraryTo simplify the examples and eliminate duplicate code from Energia sketches that run on the ZumoCC3200, we created the ZumoCC3200 library. This library contains a number of reusable "modules" that make the creation of new ZumoCC3200 applications easier.
Motor Control Modules
- PID Controller - used for feedback control by calculating motor powers based on error and user specified P, I and D "gains", or constants.
- Zumo Motors - used to drive the motors on the bot.
- Balancer - uses IMU data and PID control to send stabilizing motor commands in order to balance the bot horizontally or vertically.
- Motion Planner - used for advanced motion control and executing autonomous drives along complex paths.
Inertial Measurement Modules
- IMU Manager - used to incorporate sensor data from an accelerometer, gyroscope, and magnetometer and does useful operations such as gyro integration for angle and angle calculation from accelerometer data.
- Direction Cosine Matrix (DCM) Module - taking accelerometer, gyroscopic, and magnetometer data as input, calculates and maintains the bot's orientation in the form of a Direction Cosine Matrix (DCM), which fully defines its orientation in three-dimensional space.
With novice soldering skills, a Zumo CC3200 can be built in about an hour.
Hardware
- RedBearLab CC3200 - the main CPU running your Zumo application
- Zumo Robot for Arduino v1.2 - the tank frame, wheels, treads, motors, and sensors.
- 2.54 mm male headers (e.g., these) - to enable easy access to the Zumo Robot's I/O pins
- Soldering iron, solder, and two wires (e.g., two short male-male jumpers)
- Four double A batteries
Software
All software tools used to develop and run Zumo CC3200 applications are available for Windows, MacOS, and Linux.
- Energia MT 17 (free) - to build and run apps that execute on the RedBearLab CC3200 motherboard
- Processing 2.2.1 (free) - to run a host-side program that controls the Zumo CC3200
To enable future contributions, all sources are maintained in this repo. However, this project page contains everything you need to build and run a simple functional demo of the Zumo CC3200.
Hardware AssemblyStarting from the pre-assembled Zumo Robot for Arduino v1.2, there are just four steps to build a new Zumo CC3200:
- Solder a row of headers to the Zumo shield that provide access to pins 5, 6, 9, and 10
- Connect a wire between pins 5 and 9 and another wire between pins 6 and 10 (see picture below)
- Unplug the Zumo reflectance sensor array from the bottom front of the Zumo
- Plug the RedBearLab CC3200 atop the Zumo shield
More detailed hardware assembly instructions are available here.
Software InstallationThis section describes the minimum software installation steps required to build and run a basic test of the Zumo CC3200 robot.
- Install Energia MT 17 (download): so you can create and build sketches that run on the Zumo
- If you're using Windows, you must also
- install the RedBearLab USB drivers (download): to enable Energia MT to download programs to the RedBearLab CC3200 and enable serial communications with the CC3200 via a Windows COM port
- install the CC3200 Drivers for Windows (see the Energia 17 instructions under the "CC3200 LaunchPad" section of How to set up Energia on Windows for details)
- Install Processing 2.2.1 (download): so you can easily create sketches that communicate with the Zumo via the WiFi
More detailed installation instructions are available here.
Basic System TestAfter hardware assembly and installation of the software tools described above, the Zumo CC3200's hardware functionality can be demonstrated using a simple Energia MT sketch that communicates with a Processing sketch. Together, these sketches provide simple keyboard control of the Zumo's motors and real-time display the Zumo's accelerometer and gyro data.
Detailed instructions for building and running this basic demo can be found here. In summary, building and running this test is a simple 3 step process:
- Open this Energia MT sketch in Energia, build for the RedBearLabs CC3200 board, upload to the Zumo CC3200, and reset the Zumo CC3200 to start the sketch running.
- Connect your PC to the zumo-test access point created by the Energia sketch above.
- Open this Processing sketch in Processing 2.x, click run, and, when this sketch has focus, type the character 'c' on the keyboard.
The Processing sketch shows three separate line plots of acceleration data, one for the x, y, and z axis. Any movement of the Zumo should be reflected in immediate changes to these plots. You can switch to displaying real-time gyro data by typing 'G' when the graph window has focus and switch back to the real-time acceleration display by typing 'A'.
You can also drive the Zumo CC3200 using the keyboard keys 'w', 'a', 's', 'd', and ' ' (space).
- 'w' - drive forward
- 'a' - turn left
- 's' - drive backwards
- 'd' - turn right
- ' ' - stop


Comments
Please log in or sign up to comment.