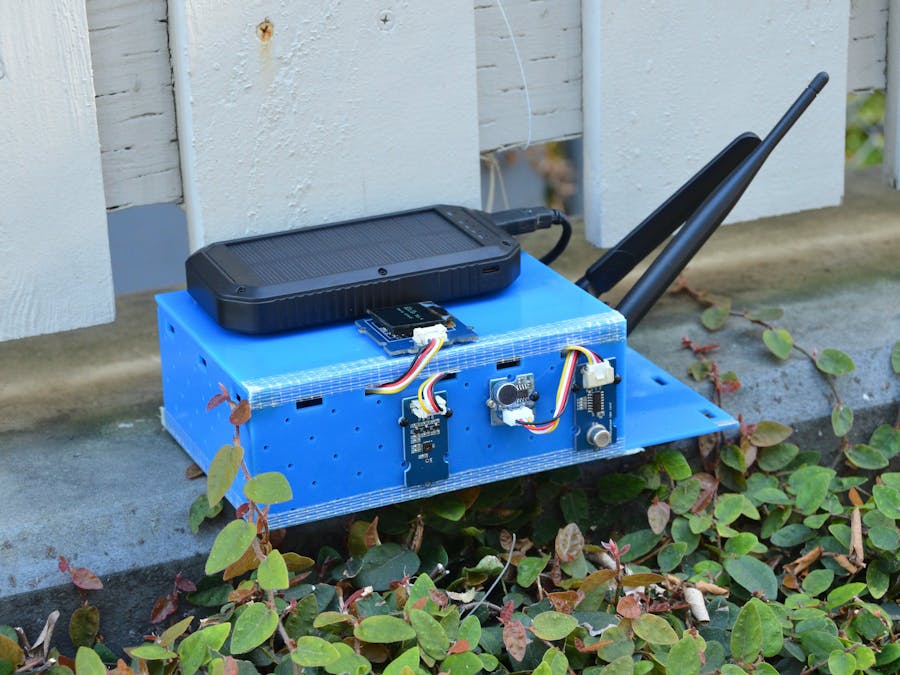
Air quality and noise pollution throughout the city has always been hard to measure, mainly due to maintenance for sensors all across the city. With this guide, we can build air quality sensor and sound sensor that self maintaining through solar power. Making it easy and simple to place it across the city and collect data via Helium IoT Hub.
InspirationAir quality throughout the city has always been hard to measure, solar air quality monitor uses air quality sensor attaching to the solar panel to monitor the air quality throughout the city.
This idea originally came from Pigeon Air Patrol, where they use pigeon to monitor air quality in London, other ones such as Spare the Air from Bay area only gives overall air quality in the city, but not in detailed way of mapping. Independent solutions like Smart City Air Monitor requires too many devices and can need constant human maintenance. We believe that using solar panels and Helium IoT Kit would have much better results since we can put it almost anywhere, and we want to build it in a way where no one needs to constantly maintain the device.
Parts are very simple, one hub can handle about several mile radius, outside of the Hub everything else cost less than $60. In the future, we can install Helium Hub that cellular based across the city, making dependencies even less.
- Arduino UNO
- Helium Atom and Arduino Breakout Board
- Helium Hub
- Air Quality Sensor, Sound sensor, Temperature and Humanity Sensor, OLED output
- Solar Power with Battery
The hub can be used to handle multiple locations
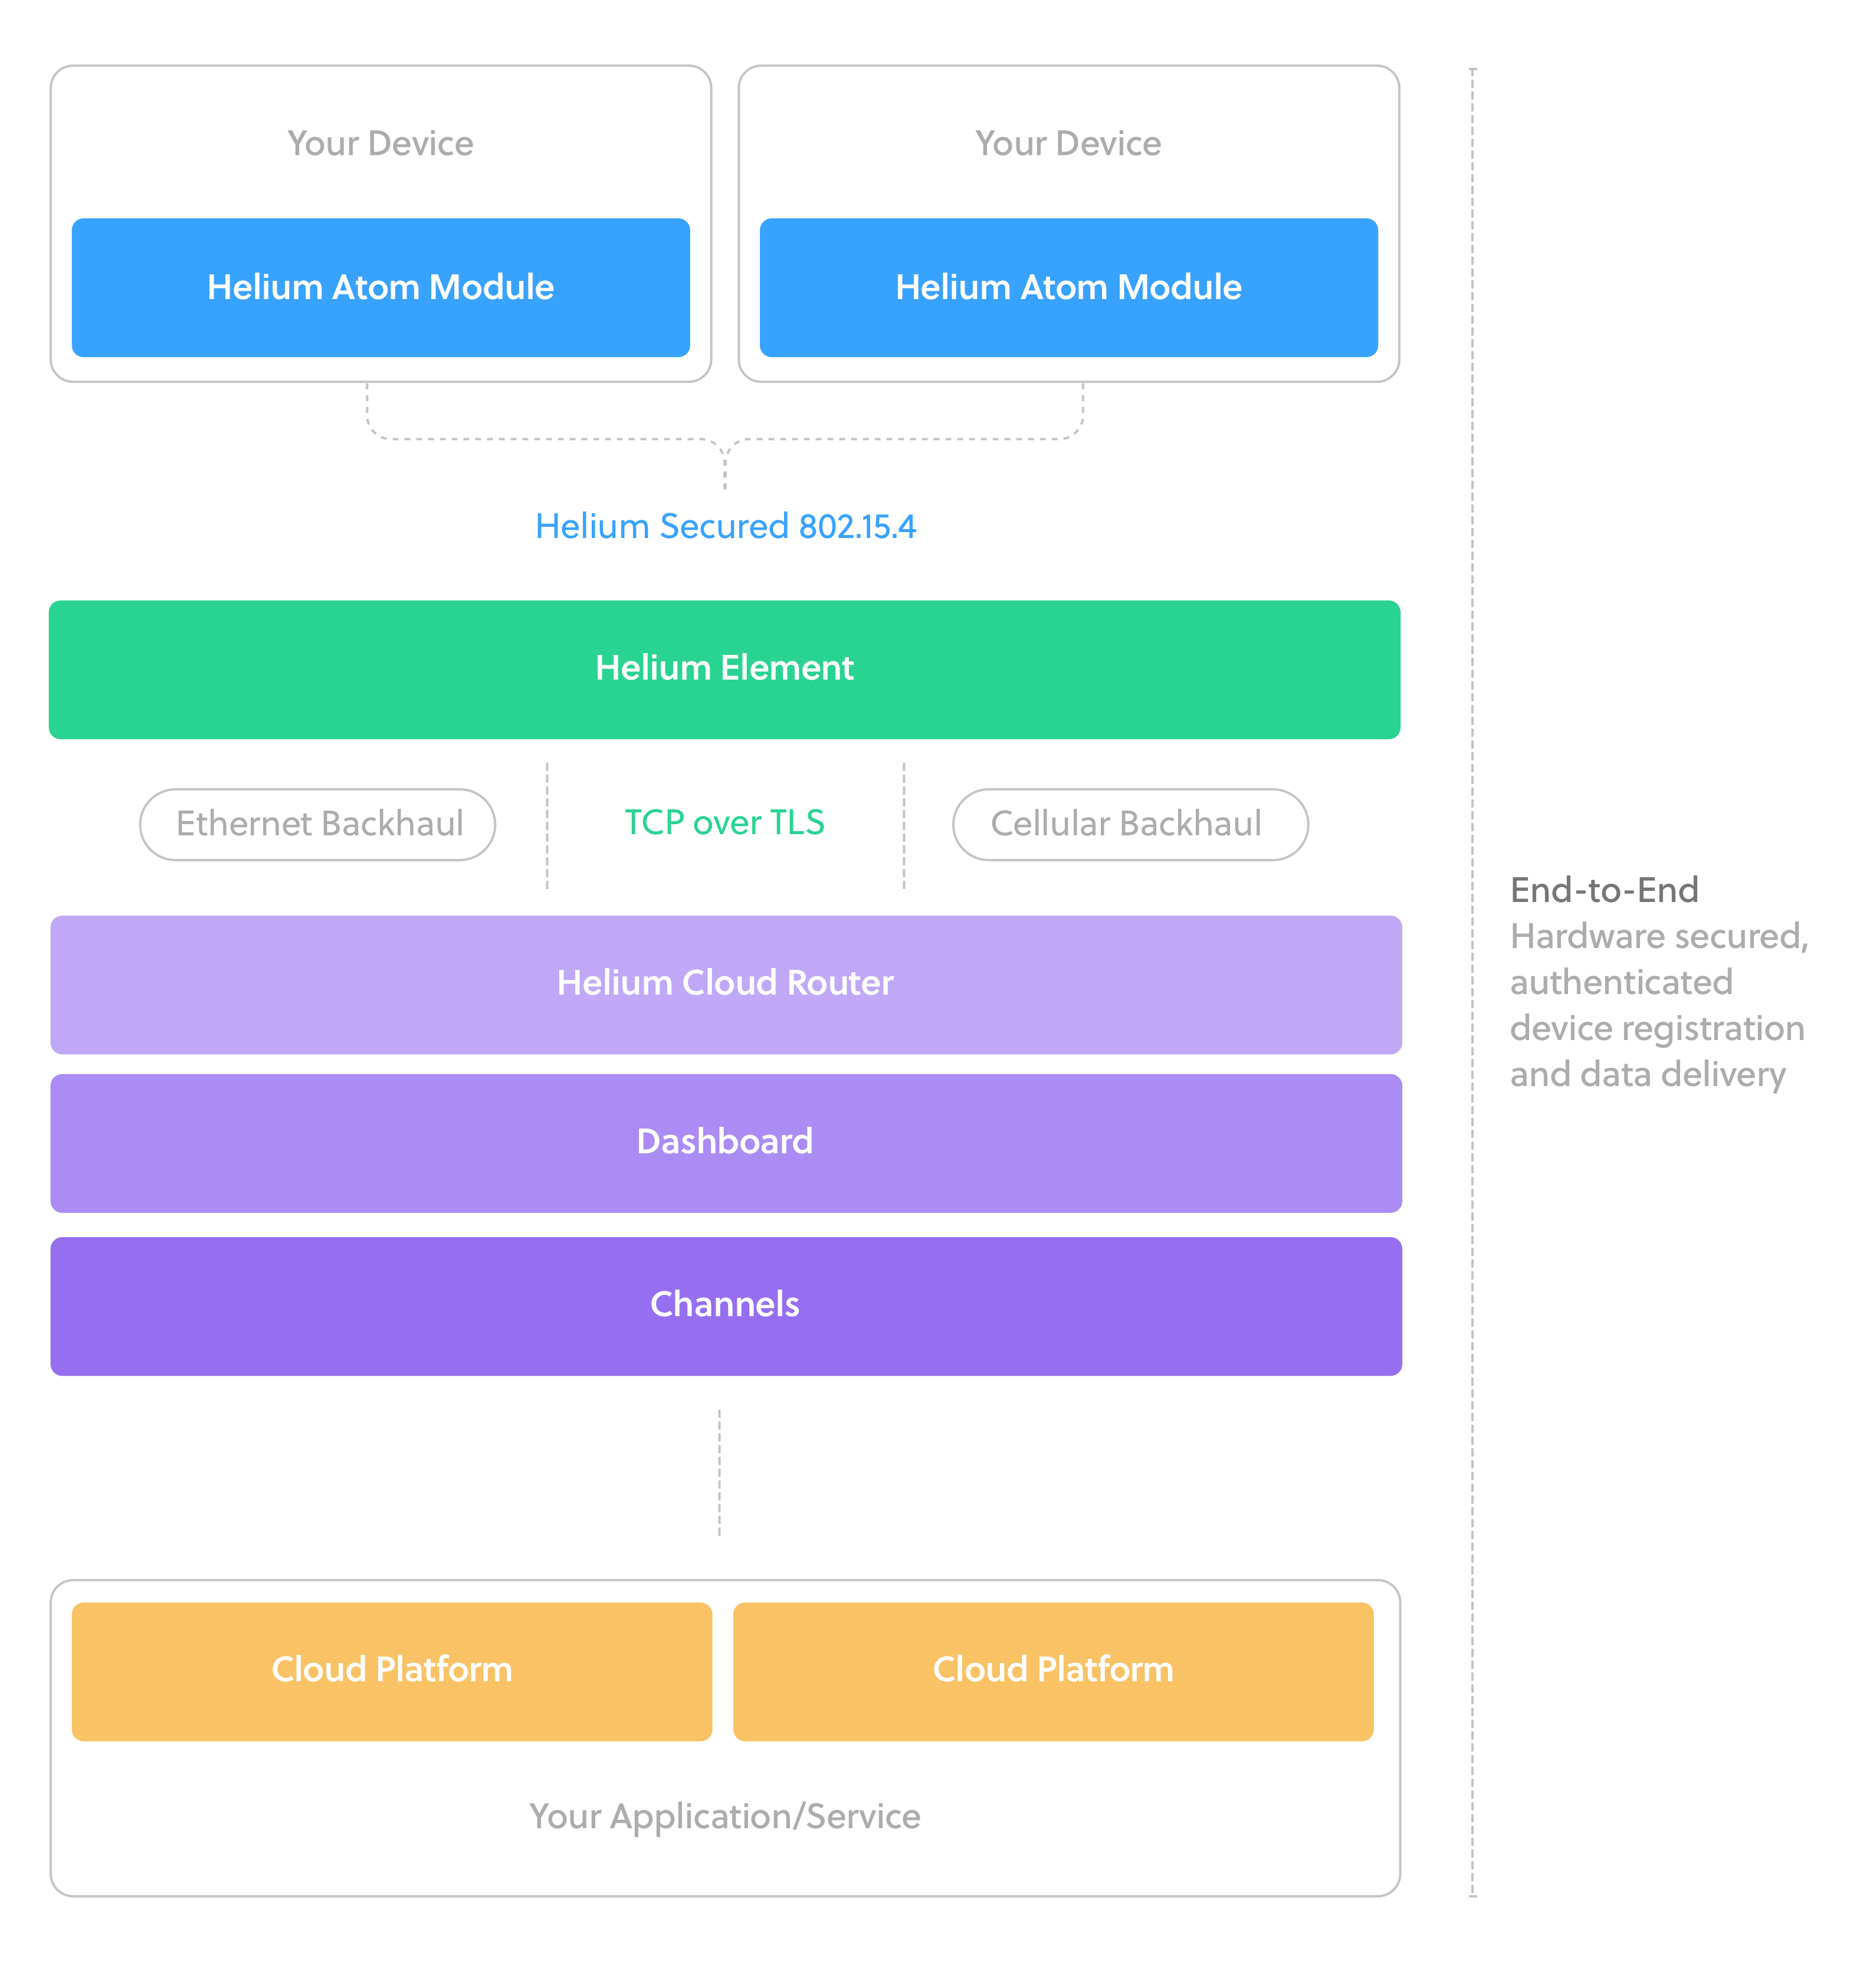
We first have to register our Atom on Helium Network Dashboard.
After setting up the Atom we'd also have to register Element as they are the access point, (for those who has cellular version powering it up would do).
After activating element we should see it on Access Point.
Now that we have Helium set up, we need to store the information on the cloud so that data can be stored and monitored in real-time. In this guide we will be using Google IoT Core, Google gives $300 signup credit which we can use to try out different products within Google Cloud Platform, and here we will be using Google IoT Core.
We first have to create a service account under GCP
Location of Service account
This way we can create a new service account and get the private key in json.
After that we create a registry as well as pub/sub within Google IoT Core, in this case we use air_quality as topic for the pub/sub.
After that, we can link it in our Helium portal
Helium and Google Cloud IoT Core are now link up
And now we have Helium completely connected with Google Cloud Platform's IoT Core.
Step 3: Set Up Helium Breakout BoardHelium has documented a pretty good guide on how to set up the Arduino Breakout board.
https://www.helium.com/dev/hardware-libraries/arduino
Most important part is setting up the jumper for Arduino UNO as the following image.
This part looks like this after everything is connected
Afterwards, you can upload the following code to test out air quality.
#include "Arduino.h"
#include "Board.h"
#include "Helium.h"
#include "HeliumUtil.h"
#define CHANNEL_NAME "SPAQM"
Helium  helium(&atom_serial);
Channel channel(&helium);
void setup() {
 // put your setup code here, to run once:
 Serial.begin(9600);
 DBG_PRINTLN(F("Starting"));
 // Begin communication with the Helium Atom
 // The baud rate differs per supported board
 // and is configured in Board.h
 helium.begin(HELIUM_BAUD_RATE);
 // Connect the Atom to the Helium Network
 helium_connect(&helium);
 // Begin communicating with the channel. This should only need to
 // be done once. The HeliumUtil functions add simple retry logic
 // to re-create a channel if it disconnects.
 channel_create(&channel, CHANNEL_NAME);
}
void loop() {
 //Set quality from 0 to 255, with one to 100 being normal
 int sensorValue = analogRead(A0);
 int quality = map(sensorValue, 0, 1023, 0, 255);
 String dataString = String(quality);
 char data[dataString.length()];
 dataString.toCharArray(data, dataString.length());
 channel_send(&channel, CHANNEL_NAME, data, strlen(data));
 Serial.println(data);
 delay(60000);
}
Make sure to add Board.h from Helium's example as well. Once this is uploaded, you'd be able to see it in Google IoT Core.
After this let's put all the sensors to use. we can try again, This is also part of the github repo
#include "AirQuality.h"
#include "Arduino.h"
#include "Board.h"
#include "Helium.h"
#include "HeliumUtil.h"
#include <TH02_dev.h>
#include "Arduino.h"
#include "Wire.h"
#include <SeeedGrayOLED.h>
#include <avr/pgmspace.h>
AirQuality airqualitysensor;
#define CHANNEL_NAME "SPAQM"
Helium  helium(&atom_serial);
Channel channel(&helium);
void setDisplayToOriginalState()
{
   SeeedGrayOled.init(SSD1327);
}
void setup() {
 // put your setup code here, to run once:
 Serial.begin(9600);
 delay(150);
 /* Reset HP20x_dev */
 TH02.begin();
 delay(100);
 Serial.println("TH02_dev is available.\n");
 DBG_PRINTLN(F("Starting"));
 // Begin communication with the Helium Atom
 // The baud rate differs per supported board
 // and is configured in Board.h
 helium.begin(HELIUM_BAUD_RATE);
 // Connect the Atom to the Helium Network
 helium_connect(&helium);
 // Begin communicating with the channel. This should only need to
 // be done once. The HeliumUtil functions add simple retry logic
 // to re-create a channel if it disconnects.
 channel_create(&channel, CHANNEL_NAME);
 Wire.begin();
 airqualitysensor.init(14);
}
void loop() {
 //Set quality from 0 to 255, with one to 100 being normal
 //Air Quality Pollution
//  int sensorValue = analogRead(A0);
//  int airquality = map(sensorValue, 0, 1023, 0, 255);
   int airquality = airqualitysensor.slope();
   //Sound Pollution
   long sound = 0;
   for(int i=0; i<32; i++)
   {
       sound += analogRead(A1);
   }
   float temper = TH02.ReadTemperature();
   float humidity = TH02.ReadHumidity();
   String dataString = "air=" + String(airquality) + "&noise=" + String(sound) + "&temperature=" + String(temper) + "&humidity=" + String(humidity);
   char data[dataString.length()];
   dataString.toCharArray(data, dataString.length());
   channel_send(&channel, CHANNEL_NAME, data, strlen(data));
   Serial.println(data);
   setDisplayToOriginalState();
   SeeedGrayOled.clearDisplay();     //Clear Display.
   SeeedGrayOled.setNormalDisplay(); //Set Normal Display Mode
   SeeedGrayOled.setVerticalMode();  // Set to vertical mode for displaying text
   SeeedGrayOled.setTextXY(0,0);           //Set the cursor to 0th line, 0th Column
   if (airquality==0)
     SeeedGrayOled.putString("High pollution!!!!");
   else if (airquality==1)
     SeeedGrayOled.putString("High pollution!");
   else if (airquality==2)
     SeeedGrayOled.putString("Low pollution!");
   else if (airquality==3)
     SeeedGrayOled.putString("Fresh Air");
   SeeedGrayOled.setTextXY(2,0);
   String temperaturestring = String(temper) + " C";
   char tempbuffer[temperaturestring.length()];
   temperaturestring.toCharArray(tempbuffer, temperaturestring.length());
   SeeedGrayOled.putString(tempbuffer);
   SeeedGrayOled.setTextXY(3,0);
   String humidstring = "Humid: " + String(humidity);
   char humidbuffer[temperaturestring.length()];
   humidstring.toCharArray(humidbuffer, humidstring.length());
   SeeedGrayOled.putString(humidbuffer);
   SeeedGrayOled.setTextXY(5,0);
   if(sound > 5000)
   {
     SeeedGrayOled.putString("Very Loud");
   }
   else if(sound < 4000)
   {
     SeeedGrayOled.putString("Very Quiet");
   }
   else
   {
     SeeedGrayOled.putString("Sound: Normal");
   }
   delay(60000);
}
ISR(TIMER1_OVF_vect)
{
 if(airqualitysensor.counter==61)//set 2 seconds as a detected duty
 {
     airqualitysensor.last_vol=airqualitysensor.first_vol;
     airqualitysensor.first_vol=analogRead(A0);
     airqualitysensor.counter=0;
     airqualitysensor.timer_index=1;
     PORTB=PORTB^0x20;
 }
 else
 {
   airqualitysensor.counter++;
 }
}
When that works, we can see it from the OLED Screen, and these IoT information is also being pushed into Google IoT Core through Helium IoT Hub.
The whole thing look like this
Step 4: Set Up Pub/Sub Server on GCPIf you havn't, please instead gcloud from https://cloud.google.com/sdk/install
Now that hardware part of the IoT is working, we need to set up server and data storage. The BigTable is kind of expensive and I don't have enough credits to mess around with it, in this step we will be using Node.js server and Datastore. We first need to launch a nodejs app engine like below.
Once set up, you will see the below, to start, we will use the hello world nodejs app from https://github.com/GoogleCloudPlatform/nodejs-getting-started/tree/master/1-hello-world or do a simple
git clone https://github.com/Nyceane/SPCPM.git
cd SPCPM
gcloud app deploy
Afterwards you should be able to see this under services. If you want to use any other service than default please update your app.yamlfile under service: service_name, if no service name is being selected, default will be used.
It should take a few minute to deploy, here is the code. This part can get a little complicated as you can go https://cloud.google.com/appengine/docs/flexible/nodejs/writing-and-responding-to-pub-sub-messages to find out full guide on how to get this done
We first need add following to app.yaml
env_variables:
 PUBSUB_TOPIC: YOUR_TOPIC_NAME
 # This token is used to verify that requests originate from your
 # application. It can be any sufficiently random string.
 PUBSUB_VERIFICATION_TOKEN: YOUR_VERIFICATION_TOKEN
You can switch to any topic, token can be created for additional verification.
app.post('/pubsub/push', jsonBodyParser, (req, res) => {
 if (req.query.token !== PUBSUB_VERIFICATION_TOKEN) {
   res.status(400).send();
   return;
 }
 // The message is a unicode string encoded in base64.
 const message = Buffer.from(req.body.message.data, 'base64').toString('utf-8');
//We are pushing the data into DataStore next
 console.log(message);
 res.status(200).send();
});
Afterwards, we need to ad ad a subscription under
Afterwards you should see the data is hitting
Now that we have a place to push our data to, we need a Datasource for the data. we can create Datasource under GCP under Datasource. Under Datastore Entities we can create an entity.
After that we will be adding following code to store our data, if you get confused here feel free to check out Google's Documentation at https://cloud.google.com/nodejs/getting-started/using-cloud-datastore
First create config.json
{
After that merge the package.json dev dependencies. in app.js first we will visit back the push message, After that we are going to store them in Datastore
app.post('/pubsub/push', jsonBodyParser, (req, res) => {
 if (req.query.token !== PUBSUB_VERIFICATION_TOKEN) {
   res.status(400).send();
   return;
 }
 // The message is a unicode string encoded in base64.
 const message = Buffer.from(req.body.message.data, 'base64').toString('utf-8');
 //messages.push(message);
 var data = qs.parse(message);
 data.timestamp = new Date().getTime();
 console.log(data);
 getModel().create(data, (err, entity) => {
   if (err) {
     next(err);
     return;
   }
   res.json(entity);
 });
 //res.status(200).send();
});
Once that happens we will see our data in DataSource, the arduino code making it update every 60 seconds,
We now have IoT inside GCP from end to end, only thing left is display the data, use following code to get the latest data which can be displayed over the webpages.
app.get('/', (req, res) => {
 res.render('./view/map.html');
});
app.get('/data', jsonBodyParser, (req, res) => {
 getModel().list(1, (err, entities, cursor) => {
   if (err) {
     next(err);
     console.log(err);
     return;
   }
   else
   {
     if(entities.length > 0)
     {
       res.json(entities[0]);
     }
     else res.status(200).send();
   }
 });
});
From that, we can get the data and use html to display the data as needed.
Because of the range on the Helium Hub, we can easily implement the solution by covering the entire city through hub range with less than 50 Helium Elements. Through that we can easily monitor entire city's pollution information.


_ztBMuBhMHo.jpg?auto=compress%2Cformat&w=48&h=48&fit=fill&bg=ffffff)


Comments
Please log in or sign up to comment.