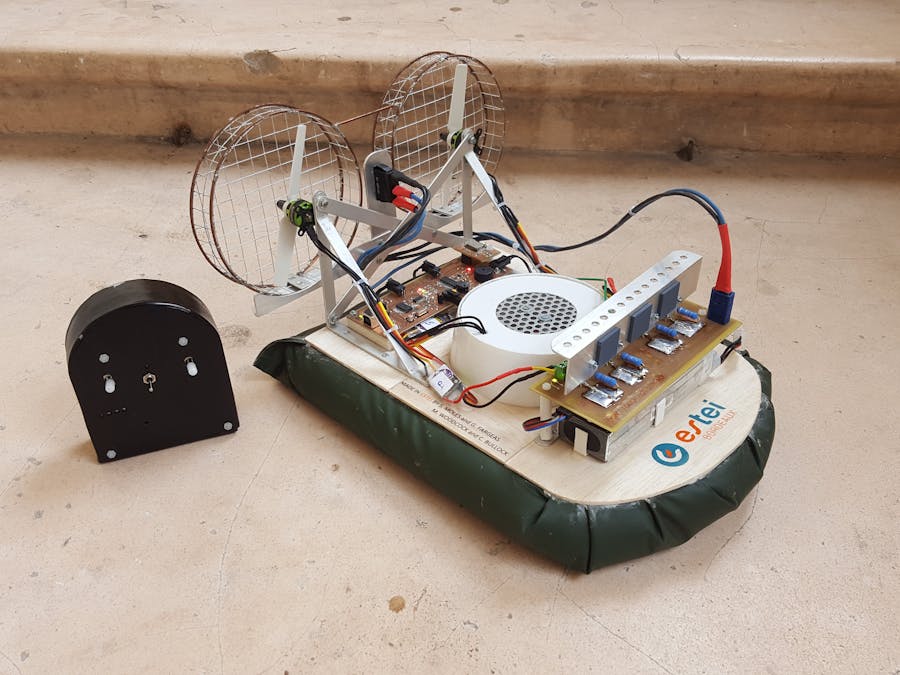
A hovercraft, also known as an air-cushion vehicle or ACV, is a vehicle capable of travelling over land, water, mud, ice, and other surfaces. The hovercraft use blowers to produce a large volume of air below the hull that is slightly above atmospheric pressure.
The pressure difference between the higher pressure air below the hull and lower pressure ambient air above it produces lift, which causes the hovercraft to float above the running surface. For stability reasons, the air is typically blown through slots or holes around theoutside rounded platform, giving most hovercraft a characteristic rounded-rectangle shape. Typically this cushion is contained within a flexible "skirt," which allows the vehicle to travel over small obstructions without damage.
The objective of this project is to create a hovercraft from scratch. This project needs to be simple to use. That project increased our knowledge in electronic CAO and programmation. We made two major electronic cards.
This project was separated in two parts, the hovercraft and the remote control.
The hovercraft has many parts to make it all work :
- A microcontroller to control the engines and to communicate with the remote control
- 2 brushless engine to make it move
- A chassis
- A power system, using a rechargeable battery
- A microcontroller to control the joystick and to communicate with the hovercraft
- A power system, using a rechargeable battery
- A chassis
Specifications has been imposed upon us by a customer, we had to respect the constraints on the hovercraft (p.1 : hovercraft, p.2 : remote control).
We studied different ways to make a hovercraft, in the end we created our own chassis using polystyrene, wood, aluminum and metal.
I will explain how we did that chassis just now :
Construction of the base and the skirt
We want to make a skirt to the format "Vented Bag skirt" that allows a good distribution of air to improve lift and stability.
The patern
Dimensions take into account the size of the propellers
The base
The base is extruded polystyrene, a material that is light and simple to transform
Hole on sides
To pierce the polystyrene used an aluminum tube that we have honed in advance
Result holes + base
In this step, we solidified the base by doubling it and we also closed th bottom.
Drilling of the skirt
The skirt comes from rain pants, holes are of the same dimensions as the sides of the base
Nozzle levitation
The lift nozzle is a recovery of a former pot of dough spread industrial. We cut it and added a protection grid.
Balsa
We stuck our based with bits of balsa to facilitate the fixing of the engine supports
Engine Supports
Here are two engines supports. The support of propulsion is aluminium folded, it is of curtain rod.
We studied and realize the engine management of the hovercraft, that part contains the most important part of the project, we had to make the electronic card to control the brushless engine as well asall the programming part on the microcomputer. We used the PWM (Pulse WidthModulation) of the microcomputer to make the engines work.
We created the microcontroller card which is embedded in the hovercraft.
This card is composed of:
- 4 PWM (Pulse WidthModulation) output used to control engines.
- A radio module used to comunicate with the remote control.
- 4 LEDs used to show battery level.
- A buzzer.
For this project, it was necessary to configure the computer to be able to program the microcontroller MC9S08QE16CWL. To do this, I used USBDM designed by PGO. All steps for drivers and software are available, on www.usbdm.sourceforge.net.
For more information or any question about the USBDM specifications, contact us.
c. Power systemWe studied and realize the power supply for the hovercraft. For that project, we used a rechargeable battery. We added a battery level on the hovercraft to know when the hovercraft needs to berecharged. We use a lipo battery 3S 5100mAh 10C of the brand Tattu.
We set up the communication between the hovercraft and the remote control. We had to create our own electronic card that contains the embedded system and we had to set up the protocol communication between the two technical objects. For this we use the RFD21733 component
We created the chassis of the remote control using mainly Plexiglas to do the mainstructure.
The shape of this remote control is ergonomic and has a size of 10 x 10 cm. To make the holes in the plexiglass, I simply used a dril of 8mm. The curve at the top of the remote was done with a pot of paint and heating the plexiglass at the same time.
We created the microcontroller card which is embedded in the remote control.
The remote control uses a battery of 800 mAh that can be recharge from your computer thanks to the USB plug, placed on the bottom of the remote control.
The electronic assembly named "Battery Charger" uses an intelligent electronic component (MCP73831T) to recharge the Li-po battery. It provides protection against reverse charging, automatic power off and thermal regulation.
A voltage regulator is used to power the microcontroller board with 3.3V voltage.
This list represent all the components that you need to great the remote control and hovercraft electronic card.
The price on this chart is based on March 30, 2017.
VI. Video


Comments
Please log in or sign up to comment.