In several systems, there is a need to read the system temperature and to indicate the value for the user. Through these systems, it is possible to monitor its value and to perform interventions to solve problems in the machines or processes.
Therefore, through this article, we'll create a temperature indicator using the DS18B20 sensor to read the temperature, the Arduino to process the sensor signal and the TM1637 module to show the temperature value.
Now, we'll initialize the step by step explanation of the project.
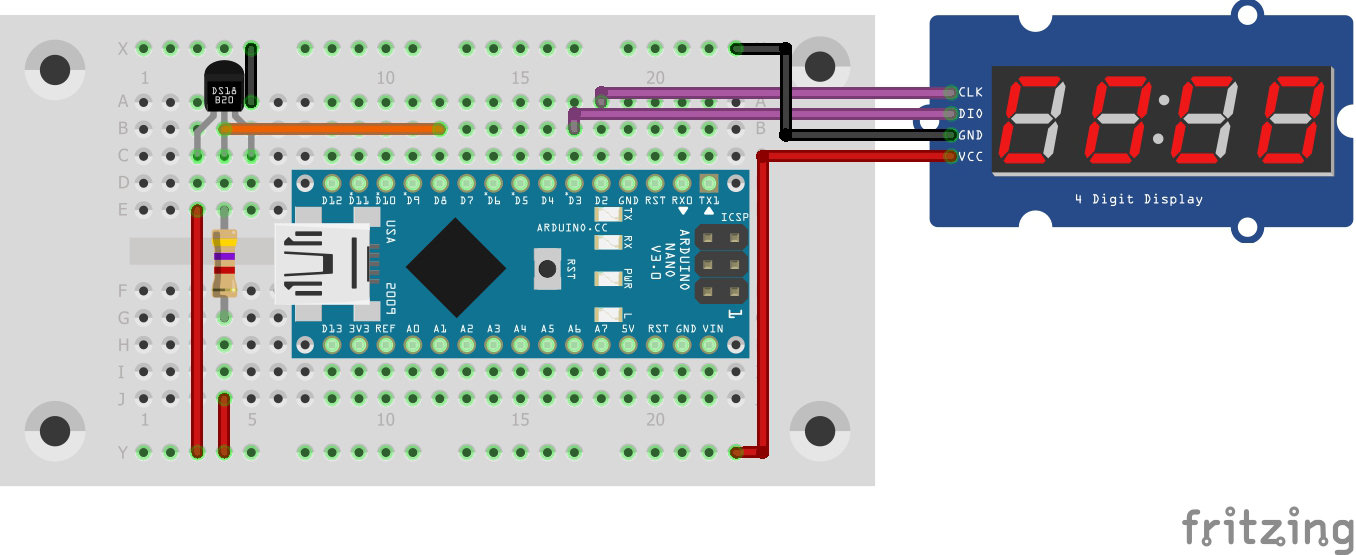
Project DevelopmentInitially, we presenting the schematic circuit of the project. in Figure 1. Through this schematic is possible to see all devices used to create the project and its connections.
Based on this circuit, the following will be explained all the programming logic of the Arduino.
Programming Logic of the Arduino
Firstly, was declared all libraries and performed pin definition of the DS18B20 sensor.
#include <OneWire.h>
#include <DallasTemperature.h>
#include <TM1637Display.h>

#define ONE_WIRE_BUS 8 //Digital Pin to connect the DS18B20 Sensor
OneWire oneWire(ONE_WIRE_BUS);

DallasTemperature sensors(&oneWire);
DeviceAddress sensor1;
Soon after, it was defined as the pins used to connect the TM1637 in the Arduino and the vector DEGREES. The vector DEGREES is used to store the degree symbol and the letter C, to signalize the centigrade degrees.
Following, the variables were declared and the code execution flow will enter in the void setup function.
TM1637Display display(2,3);

const uint8_t DEGREES[] = {
  0x0, 0x0,
  SEG_A | SEG_B | SEG_G | SEG_F,    // Degree Symbol
  SEG_A | SEG_F | SEG_E | SEG_D,    // C
  };

byte PreviousValue = 0;
After this, in void setup function, the DS18B20 sensor will be initialized and the brightness of the TM1637 Display will be configured.
void setup()
{
      sensors.begin();
      display.setBrightness(7);      // set display to maximum brightness
      if (!sensors.getAddress(sensor1, 0))
      {
        Serial.println("Sensor not found!");
      }
}
Finally, in void loop function will be read the value of temperature through the sensor. Following, the value will be shown in TM1637 display with acentigrade symbol.
void loop()
{
       //Request sensor data
       sensors.requestTemperatures();
       int tempC = sensors.getTempC(sensor1); //Read temperature of DS18B20 Sensor

            if(tempC != PreviousValue)
            {
              PreviousValue = tempC;
              display.setSegments(DEGREES); //Display the Variable value
              display.showNumberDec(tempC,false,2,0);
              delay(2000);
            }
}
Through the condiction presented below, the value will be shown only when occurring a new variation in the value of temperature.
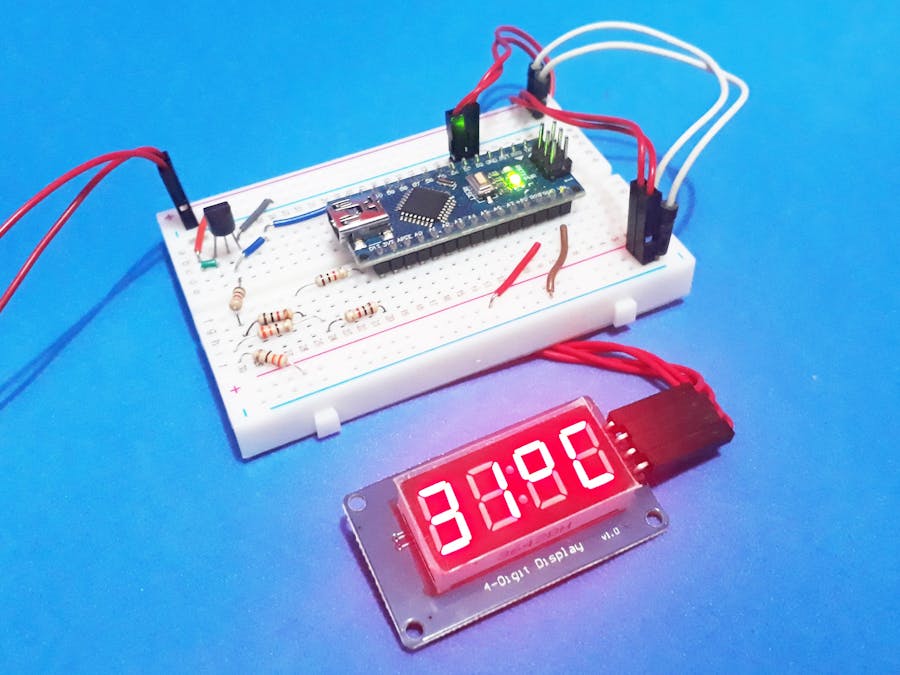
if(tempC != PreviousValue)The read value is shown in Figure 1.
Therefore, this system was possible to create a temperature indicator using Arduino Nano and DS18B20 sensors.
Now, you can create new projects with this temperature indicator.
AcknowledgmentThanks to the PCBWay for support the our YouTube Channel and produce and assembly PCBs with better quality.
The Silícios Lab thanks UTSOURCE to offer the electronic components.


Comments
Please log in or sign up to comment.