


Hardware components | ||||||
| × | 20 | ||||
| × | 10 | ||||
| × | 20 | ||||
| × | 1 | ||||
Hand tools and fabrication machines | ||||||
 |
| |||||
| ||||||
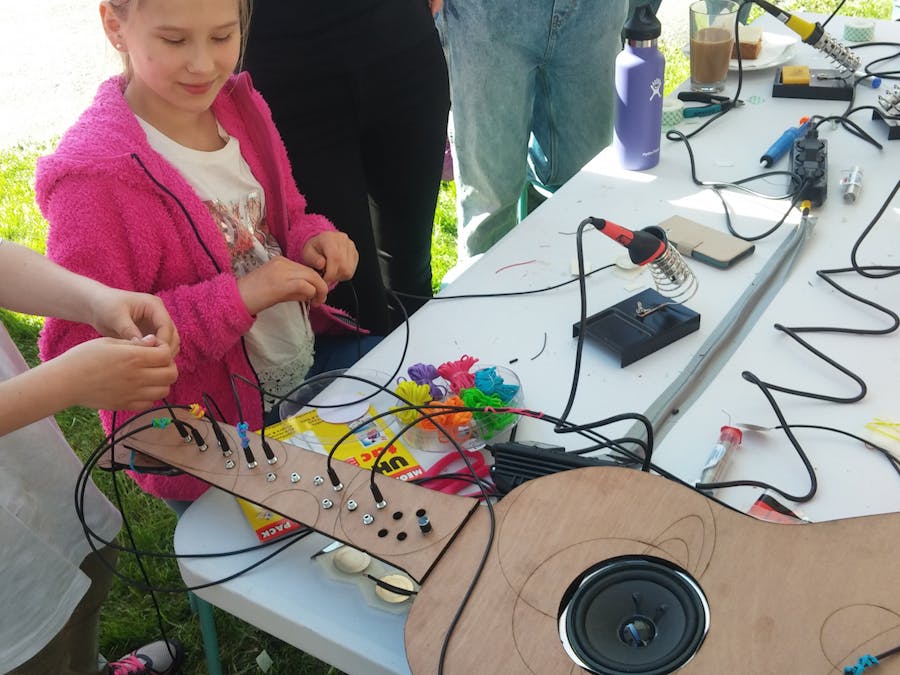
This workshop incorporates two parts:
- Each student makes a personalized contact-mic necklace: Design your own like this!
- The instructor builds an amplifier with loads of inputs, so everyone can jam together! See the amp tutorial here.
It's a quick introduction to soldering; we had kids 7 years old making these. It involves just two solder joints, and they can be big and blobby!
Making the Piezo NecklaceFirst, prepare your audio output cable.
The cables I bought were 2 meters long, so each one is cut in half. This leaves each person with one cut end to work with.
Strip about 1" (2.5cm) of the black sheath, and twist together the silver ground wires.
Then, strip about 1/4" (or half a centimeter) from the smaller wire(s). We had stereo cables, which means we had two small wires: red and white, for the two audio channels. If you have two, strip both and then twist them together to make one small cable.
Tin both the silver ground line and the small audio line with a bit of solder.
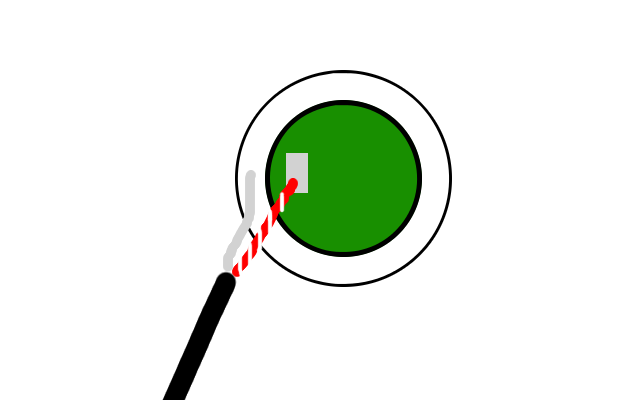
Next, tin the pads on your piezo. Put some solder on one rectangular pad – you may have two, in which case, just pick one. And put a blob on the silver disc edge.
Then, solder the audio line to the central pad; you can just press them together and hold the soldering iron on top, and they'll flow together. Make sure you cover the wire with solder! Then, do the same with the ground wire, attaching it to the blob of solder on the silver rim.
Make sure that your audio line is still covered with plastic where it crosses the silver disc: if you short them together, you won't get any sound!
This is a great time to test! Plug your new contact mic into the amplifier (which should be switched on). Then, flick it with your fingernail or tap it with some pliers. You should hear clicks coming from the amp!
Finally, attach the crystal pendant. Flip it over so you can see the X and two lines, on the flat side.
Put a square of double-sided foam tape on the piezo, on the same side as the wires. Then, stick it on the X, so that the audio cable goes off in the direction of the two other lines.
Finished! Woohoo! Loop the cable around your neck, and snap the free end into the holder.
We've included the STL file for the crystal in this tutorial. Most 3d model slicers (such as Cura) should be able to turn this into a file for your specific printer. We used an Ultimaker.
We brought multicolored rubber bands, so everyone could personalize theirs (very important when they all get plugged into the same place!).
Some of the high-schoolers made a pair of headphones out of two of these spliced together! Since any microphone also works as a speaker, they make a weak sound that you can hear.
Others built on this by trying to amplify the sound through different objects.
If the cable doesn't go into the holder, you can trim down the printed plastic a bit with your wire cutters.
If you don't get audio from your piezo, make sure that the solder connections are good. Don't be afraid to use a big blob. If the audio line disconnects, and you have a piezo with 2 pads in the center, try again using the other one. Also, make sure that your audio cable is still covered by plastic where it crosses the silver disc!


Comments
Please log in or sign up to comment.