Introduction: Science Fair Project for StudentsThe project is based on LDR sensor, I made the rotatable Solar system which has the home position during night time but when the light is available in day time the solar system automatically waking up through sensing the light presence and all the solar panels rotate counter clockwise and open like a sunflower and follow the sun rotation, after the sun fallen down all the solar panels are automatically rotate clockwise and go to the home position for next day sun light.
This project Sponsor by NextPCB
Thank You NextPCB:
This project is successfully completed because of the help and support from NextPCB.
NextPCB is one of the most experienced PCB manufacturers in Global, has specialized in the PCB and assembly industry for over 15 years. Not only could NextPCB provide the most innovative printed circuit boards and assembly technologies in the highest quality standards, the fastest delivery turnaround as fast as 24 hours.
Guys if you have a PCB project, please visit their website and get exciting discounts and coupons
Only 0$ for 5–10pcs PCB Prototypes :- Click Here
Register and get $100 from NextPCB :- Click Here
See more info about PCB Assembly Capabilities: Click Here
Supplies- SOLAR PANEL
- LI-ION BATTERY
- ARDUINO NANO
- L293D DRIVER
- 7806 TRANSISTOR1
- 0K RESISTORS
- LDRs
- SERVO MOTOR
- SMALE & FEMALE HEADER
- SN20 GEAR MOTOR
LDR = Light Dependent Resistor = Photoresistor
You’re asking what is LDR?
It stands for Light Dependent Resistor or Photoresistor, which is a passive electronic component, basically a resistor which has a resistance that varies depending of the light intensity. A photoresistor is made of a high resistance semiconductor that absorbs photons and based on the quantity and frequency of the absorbed photons the semiconductor material give bound electrons enough energy to jump into the conduction band.
Light dependent resistors come in different shapes and colors. LDRs are very useful in many electronic circuits, especially in alarms, switching devices, clocks, street lights and more. There are some audio application uses such as audio limiters or compressors. It is used to turn ON or OFF a device according to the ambient light.
Step 2: Working Principle of This ProjectYou can see the fifth resistor is placed on the middle position of the solar top, when the light is minimum, the micro controller Arduino read the resistance value and the the threshold value is sated in the coding section, when the light is available and the threshold level breaks,
the Arduino rotate the n20 servo gear motor anti clockwise through the L293D motor Driver till the limit switch level high, when anticlockwise limit switch pressed the panel stop rotating and panel is fully opened position
when the button is pressed, now the main work is going to progress, according
the sun rotation other 4 LDRs sense the light and send data to the Arduino, and Arduino process the data then rotate the servo motors according the sun rotation, the rotation position of the servo is max 170 degrees, when the sun goes down the fifth LDR sense data again and this time the process is reverse condition,
the LDR data goes down blow the threshold level and Arduino Rotate the N20 motor clockwise till the 2nd limit switch press and run the servo in home position, when light is available in next day the same process goes on again.
Step 3: Solar PanelWe are going to use 6 pieces of solar panel and each has 6V 70mAh power output, We will wire the one pair of panels in series and 3 pairs in parallel, then the voltage output will be 6+6=12v, So basically when the panels are fully opened the voltage output is 12V and when the panel goes on in home position the voltage output will be 1-3 volts
Step 4: Li-ion BatteriesA lithium-ion (Li-ion) battery is an advanced battery technology that uses lithium ions as a key component of its electrochemistry.
During a discharge cycle, lithium atoms in the anode are ionized and separated from their electrons.
Li-ion batteries typically use ether (a class of organic compounds) as an electrolyte.
We are going to use 18650 3.7v Li-ion rechargeable battery pack for this project, this batteries are getting charged when the sunlight is available and give power to LEDs during charge or at night time.
*Note- Li-ion batteries have high current rating, may be the short circuit caused the fire so stay safe during work.
Step 5: 3D Printed PartsAll the 3D files are designed by techboystoys and It is not possible to make myself form scratch materials in sort period of time so I decide to print it through 3D printer and getting the high quality parts, you can download all the 3D file is given below. and prepare the model by following the video.
Download 3D fille (click here)
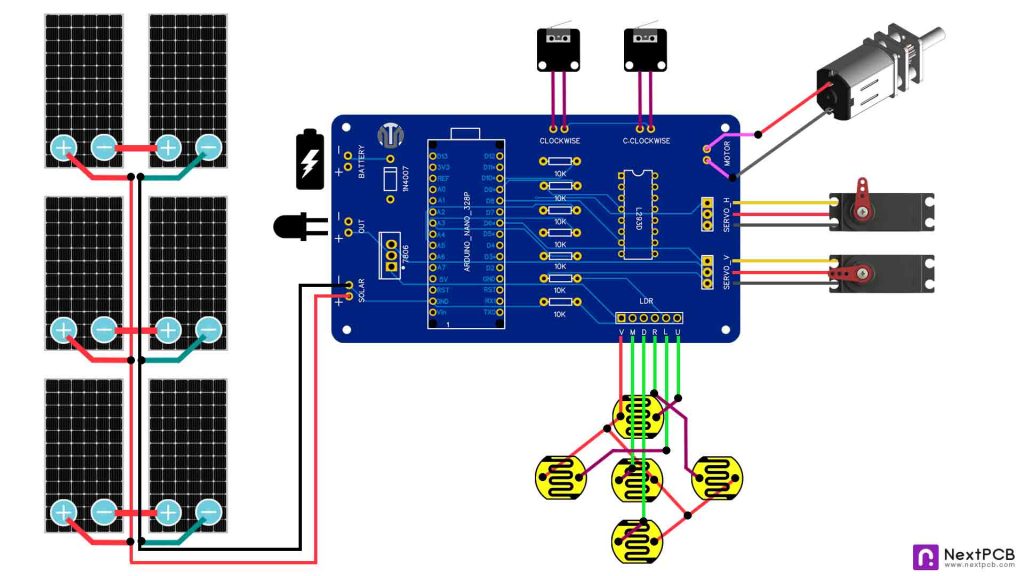
Step 6: Schematic & CircuitThe custom Designed PCB is suitable for this work, this pcbs are not that complicated for project work and the short-circuit free also.
Download Gerber (click here)
Download the Gerber file and Order it from NEXTPCB
After got the PCB, Now you can follow this Circuit to make your project happen.
Step 7: ProgrammingHere is the program to Run the whole project as we want, Just download the code and burn it to The Arduino Nano.
Download Code - (CLICK HERE)
Step 8: Run the ProjectYou have connected all the wires to its appropriate location and turn the power button on and see the magic.
I hope you will love this project and Increase my courage to share this project.
Step 9: Video of Best Science Project Idea Complete Building and Working


_3u05Tpwasz.png?auto=compress%2Cformat&w=40&h=40&fit=fillmax&bg=fff&dpr=2)


Comments
Please log in or sign up to comment.