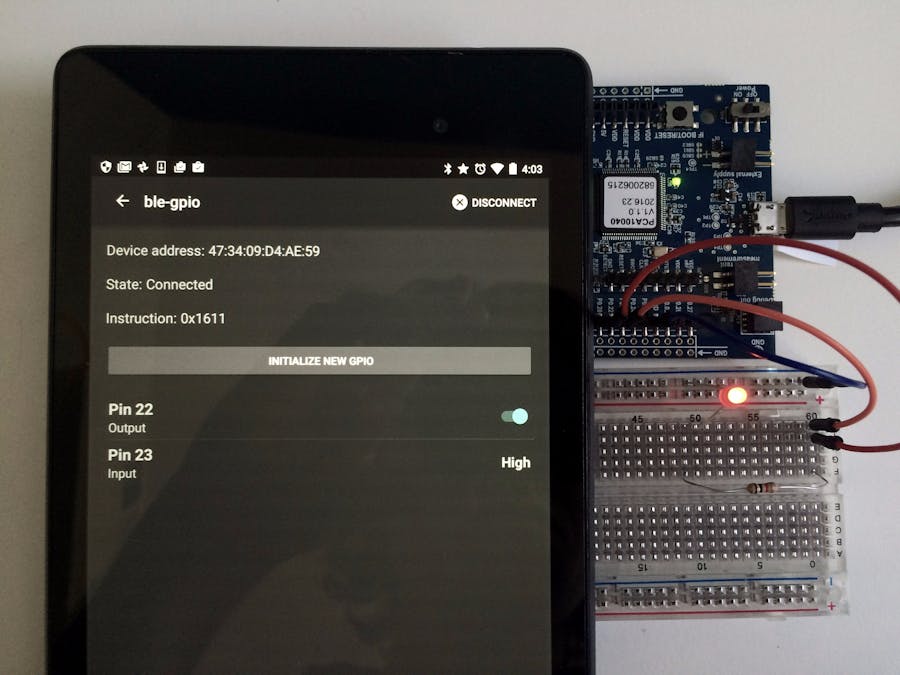
This project uses an Android device to control the digital general purpose input output (GPIO) of nRF52dk over Bluetooth Low Energy (BLE) using Apache Mynewt OS and the open source nimBLE stack that comes with it.
Unlike other dongles, shields, etc, this project uses a non-standard BLE service profile to communicate between the peripheral and the central. This custom service highlights the flexibility of the Mynewt OS and nimBLE stack to control the nRF52dk's digital GPIO. Custom services give amateur developers the ability to break away from BLE standard profiles and services to create new and exciting projects.
If you'd like to learn more about this custom service, take a look at the Mynewt app code in the blegpio repository file located at apps/blegpio/src/gatt_svr.c.
You will use an open-source build tool named Newt to build an Apache Mynewt OS image for the nRF52dk board. Hence you will first install Newt on your computer. Here is the link to the Newt tool quick start guide.
You are also encouraged to try out at least one sample non-BLE app e.g. the Blinky project for the nRF52dk before diving into this BLE project to familiarize yourself with Newt tool and the core Mynewt OS.
Clone the BLE GPIO ProjectIn order to save time setting up a new project, I have uploaded the blegpio project to Github. First, change into your directory of choice and clone the project:
$ git clone https://github.com/bgiori/blegpio.git
Now we must install the Mynewt core repository which is defined in the project.yml file in the project's root folder.
$ newt install
First make sure your board is plugged into your computer through a MicroUSB cable. Now build the and load the boot loader onto our nRF52dk.
$ newt build nrf52dk_boot
$ newt load nrf5dk_boot
Next, run the blegpio app.
newt run blegpio 0.0.0
After the app builds and loads onto our device, you should see GDB start and prompt you. Whenever you initially run our app, you should always reset the board first by running the monitor reset command. After the board has been reset, we run the app using continue.
(gdb) monitor reset
Resetting target
(gdb) continue
Continuing.
Note: If you're having trouble connecting to the board or controlling the GPIO, your best bet is to interrupt the debugger (Ctrl-C) , quit gdb
(quit), and reset the board (monitor reset).
In order to notice the GPIO changes let's wire an LED into the board from Pin 22 and Pin 23. The LED should have two metal prong, one longer than the other. The longer prong, visualized as a kink in the diagram below, must be connected to power (i.e. the GPIO pin) while the shorter prong should be connected to ground. A resistor can be used between the GPIO pin and the LED but is usually not necessary. Use the Image below as a guide if you are new to using bread boards.
If you have an Android device (phone or tablet) which has BLE functionality, download our Bluetooth LE GPIO Client from the Google Play Store.
Connect to the BoardIf your app runs fine, it's time to connect your Android to the board using Bluetooth LE. Start the app and chose the ble-gpio
device name from the list of devices. Now you should see the GPIO control panel.
A digital GPIO pin (labeled by number on the board) can be either an input or an output and must be initialized as such. Currently, the nRF52dk board support package does not support reinitializing GPIO so once a pin has been set it cannot be reinitialized (unless you reset the board).
To initialize a GPIO pin, press the Initialize New GPIO button and enter the desired attributes into the dialog.
The switch next to the direction selector serves a dual purpose based on whether you choose Input or Output:
Input
- ON: Pull-up input
- OFF: Pull-down input
Output
- ON: Initial value HIGH
- OFF: Initial value LOW
Let's initialize Pin 22, as an Output pin with a HIGH initial value. Press Initialize and you should see your LED turn on! Next initialize Pin 23 to a pull-down input and you should see the pin show up in the list with a HIGH value.
You can toggle an output value using the switch on the right side of its list item. If you toggle Pin 22 you should also see the value of Pin 23 change after a short delay.
ResourcesThe code for both the Mynewt application and the Android application can be found on Github:
- Mynewt blegpio app: https://github.com/bgiori/blegpio
- Android Client: https://github.com/bgiori/mynewt-ble-gpio-client-android
If you'd like to learn more about newt, Apache Mynewt OS, or the nimBLE stack, take a look at the Apache Mynewt documentation.


Comments
Please log in or sign up to comment.