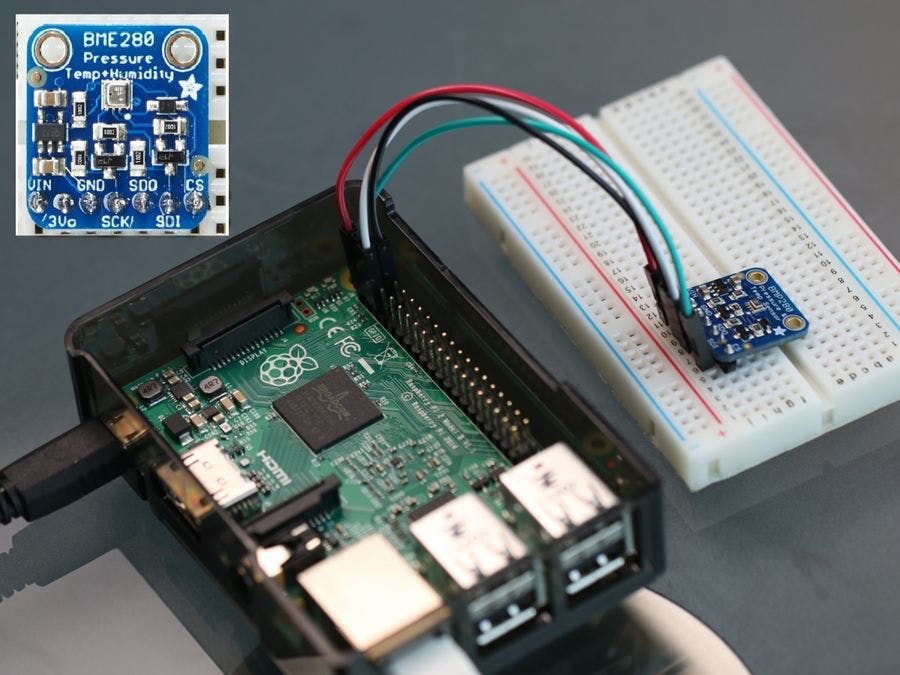
This project uses the Adafruit Starter Pack for Windows 10 IoT Core on Raspberry Pi kit components to create a project that uses a sensor to read the temperature, barometric pressure, humidity and altitude. This works just fine with either the older Raspberry Pi 2 kit or the newer version with the Raspberry Pi 3.
NOTE: This project assumes you have the version of the kit that comes with the BME280 Sensor.
This project is derived from the original Weather Station V 2.0 project created by Microsoft.
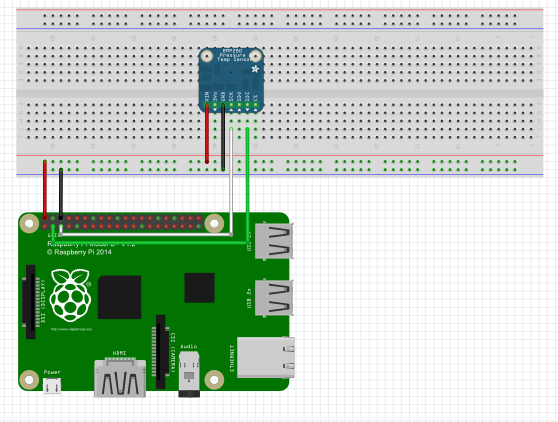
HardwareConnect the Raspberry Pi 2, Breadboard, and BME280 Sensor according to the layout within the Wiring Diagram in the "Schematics" section of this project.
SoftwareTo start, you'll need Visual Studio 2015 installed, go to "New -> Project" and create a new "Blank App (Universal Windows)" app template to start from a new, blank UWP app.
Coding Step by Step1. Create a new, blank UWP app as described above.
2. Add Reference to the "Windows IoT Extensions for UWP" Windows Universal Extension.
3. Add a reference to the BuildAzure.IoT.Adafruit.BME280 Nuget Package to the UWP App.
4. Add a variable to hold a reference to DispatcherTimer to the MainPage class.
5. Add the following setup code to setup the DispatcherTimer and Tick event handler within the MainPage class using an override of OnNavigatedTo.:
DispatcherTimer _timer;
public MainPage()
{
 this.InitializeComponent();
}
protected override async void OnNavigatedTo(NavigationEventArgs e)
{
 base.OnNavigatedTo(e);
 _timer = new DispatcherTimer();
 _timer.Interval = TimeSpan.FromSeconds(5);
 _timer.Tick += _timer_Tick;
 _timer.Start();
}
private void _timer_Tick(object sender, object e)
{
}
6. In the MainPage class, add a variable to hold reference to the BME280Sensor object along side the "_timer" variable.
BuildAzure.IoT.Adafruit.BME280.BME280Sensor _bme280;
6. In the "OnNavigatedTo" method, add code to initialize the BME280Sensor object somewhere before the "_timer.Start()" method call.
_bme280 = new BuildAzure.IoT.Adafruit.BME280.BME280Sensor();
await _bme280.Initialize();
7. In the MainPage class, add constant, float variable to hold the pressure value that represents Sea Level.
const float seaLevelPressure = 1022.00f;
8. Within the "_timer_Tick" handler, add the following code to read the Temperature, Humidity, Pressure and Altitude values from the BME280 Sensor:
var temp = _bme280.ReadTemperature();
var humidity = _bme280.ReadHumidity();
var pressure = _bme280.ReadPressure();
var altitude = _bme280.ReadAltitude(seaLevelPressure);
9. Next, add code to write to the Debug console the BME280 Sensor readings:
Debug.WriteLine("Temp: {0} deg C", temp);
Debug.WriteLine("Humidity: {0} %", humidity);
Debug.WriteLine("Pressure: {0} Pa", pressure);
Debug.WriteLine("Altitude: {0} m", altitude);
10. Your app is ready to deploy to the Raspberry Pi!
Expected OutputTemperature: 24.46189 deg C
Humidity: 54.372%
Pressure: 99738.73 Pa
Altitude: 205.1726 m
P.S. You can view / download the full code from the Code section of this project.


Comments
Please log in or sign up to comment.