


Hardware components | ||||||
 |
| × | 1 | |||
 |
| × | 1 | |||
| × | 1 | ||||
 |
| × | 1 | |||
 |
| × | 2 | |||
 |
| × | 2 | |||
 |
| × | 1 | |||
 |
| × | 3 | |||
Hand tools and fabrication machines | ||||||
 |
| |||||
 |
| |||||
 |
| |||||
Introduction:
The idea of the disinfection robot comes from the concept of the spray gates or known as the disinfection gates. Many countries use the spray gates nowadays believing it will prevent the spread of coronavirus, by sanitizing people before entering any place.
Eventually, the world health organization (WHO) said: “Spraying alcohol or chlorine all over your body will not kill viruses that have already entered your body”; therefore, that will not help control the cases of coronavirus. Besides, WHO also mentioned that sprinkling these substances can be dangerous to clothing or the eyes and mouth but are beneficial for disinfecting surfaces; consequently, sanitizing surfaces are important than sanitizing people as everyone touches the surface. Therefore, sanitizing the objects around the person will destroy any virus on it, control the spread of the virus, and protect people.
Therefore, there are several ways to sanitize the surrounding; for example, getting group of man to sanitize by the sanitize gun. However, this might be an expensive process, as sanitizing must be an everyday process for the case of coronavirus and it can take time to sanitize the whole place if it is a mall or university or other huge places. Accordingly, the disinfection robot is programmed to sanitize everywhere automatically; when a person switch the button on, it moves around and rotates as it consists or sensors that manages not to hit anything. In addition, the disinfectant robot can be used in several places; for example, malls, cafes, schools, universities, hospitals, and it can also be used at home.
Materials
To build the robot, some materials and fabrication methods are needed. The materials have been selected for the purpose of achieving the design requirement. We chose affordable materials to meet our prototype design requirement (Affordability).
- 4P3 Power 2200mAh 12V Lipo Pack
Quantity: 1
Source: Electronic store
Price: 950 EGP
- LiPo Battery Charger 3s
Quantity: 1
Source: Electronic store
Price: 350 EGP
- Micro Metal Gearmotor HP 6V 298:1
Quantity: 2
Source: Electronic store
Price: 190 EGP
- Micro Metal Gearmotor Bracket Pair
Quantity: 1
Source: Electronic store
Price: 50 EGP
- Wheel 42×19mm Pair
Quantity: 1
Source: Electronic store
Price: 30 EGP
- Arduino Nano Board
Quantity: 1
Source: electronic store
Price: 110 EGP
- Breadboard
Quantity: 1
Source: Electronic store
Price: 30 EGP
- HL-52S Relay Module
Quantity: 1
Source: Electronic store
Price: 40 EGP
- H-bridge L298 Dual Motor Driver
Quantity: 1
Source: Electronic store
price: 65 EGP
- Sharp Distance Sensor GP2Y0A41SK0F (4 - 30cm)
Quantity: 3
Source: Electronic store
Price: 100 EGP
- Motor Pump
Quantity: 1
Source: Electronic store
Price: 150 EGP
- Water Sensor
Quantity: 1
Source: Electronic store
Price: 35 EGP
- Heat shrink
Source: Electronic store
Price: 15 EGP
- LEDs
Quantity: 2
Source: Electronic store
Price: 5 EGP
- On/Off Switch
Quantity: 1
Source: Electronic store
Price: 2.50 EGP
- M3 bolts with (3mm diameter)
Quantity: 20
Source: Electronic store
Price: 10 EGP
- M3 nuts
Quantity: 20
Source: Electronic store
Price: 10 EGP
- #8-32 screw
Quantity: 2
Source: Electronic store
Price: 2 EGP
total cost = 2, 544.5 EGP
Material Selection:
PLA:
This thermoplastic type is affordable and the most important reason to choose it, that it does not corrode from cleaning disinfectants such as chlorine and alcohol.
Some characteristics why we choose this type:
- It is a type of thermoplastic
If any mistake happened, reheat the material and it can be reshaped.
- Easy to print
As temperatures are flexible, warping is minimal, and is also known for its print quality.
- Environmentally-friendly plastic
Having good biodegradability, which biodegrade within water in 48 months, and 50 days in industrial composers.
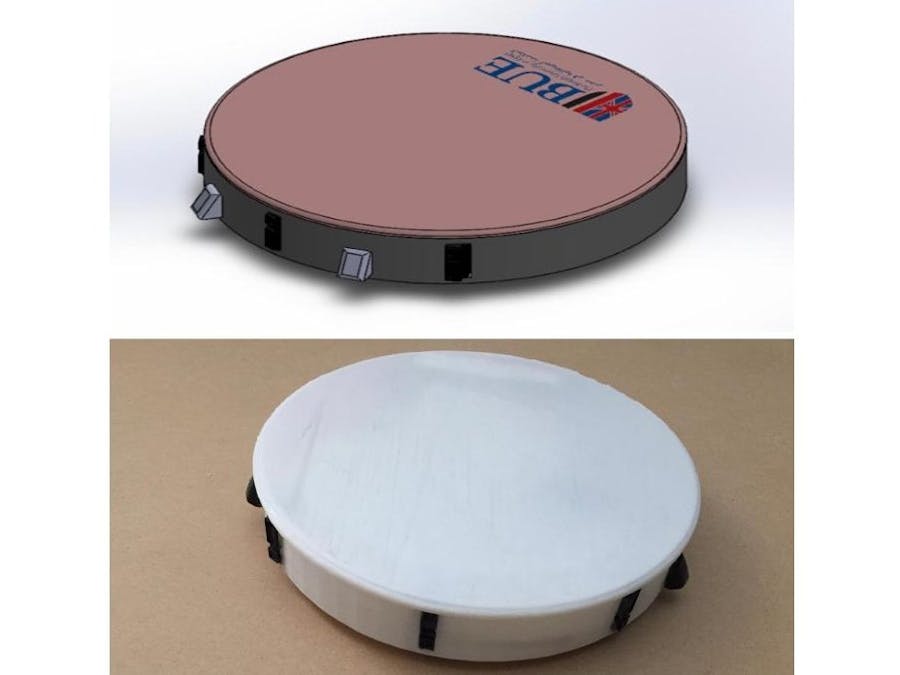
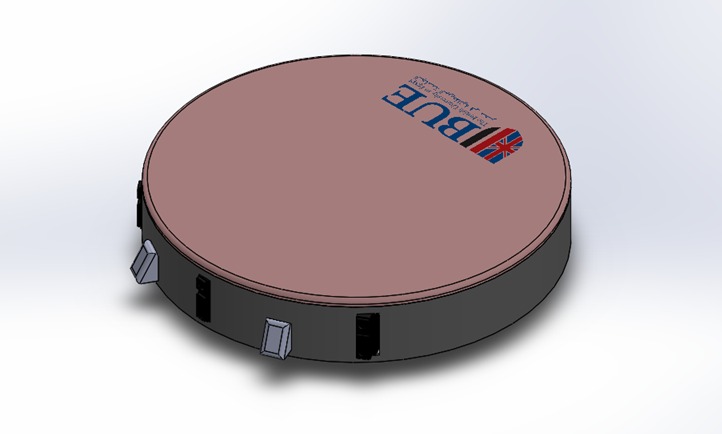
The design:
Specification
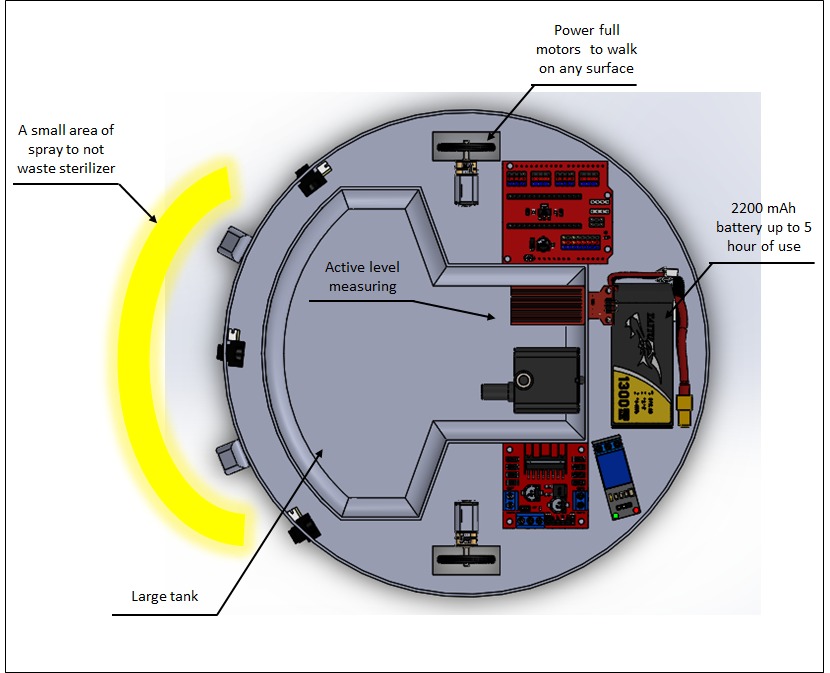
o Large sterilizer tank 0.5 L
o Powerful motor to help robot to move on any surface
o Large battery 2200 mAh to keep it running for 5 hours
o Automatic shutoff when the sterilizer tank is empty
o Sterilizer sprayer cover the whole area under the robot
o 3 IR sensor to move autonomously indoor
Manufacturing Process
® The design was done so that all the parts could be 3d printed.
® The robot consists of 2 parts.
® Printing settings:
0.32 mm layer height
1.2 mm shell thickness
30% fill density
190°C printing temperature
Support type everywhere
Retraction: 50 mm/s 0.7mm
Printing Speed 60mm/s
Assembly:
The cad design is integrated which help to assembly the whole robot is just 30 minute.
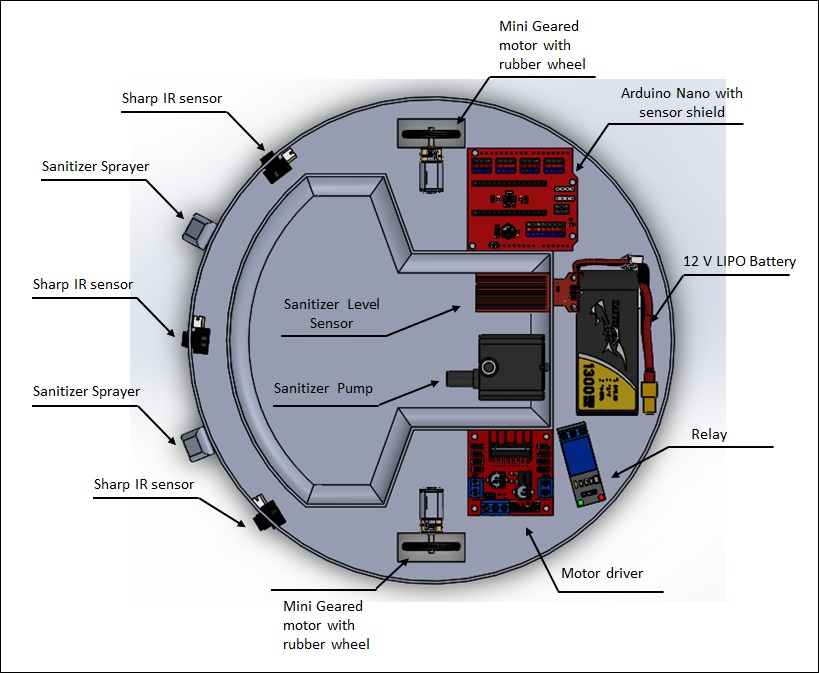
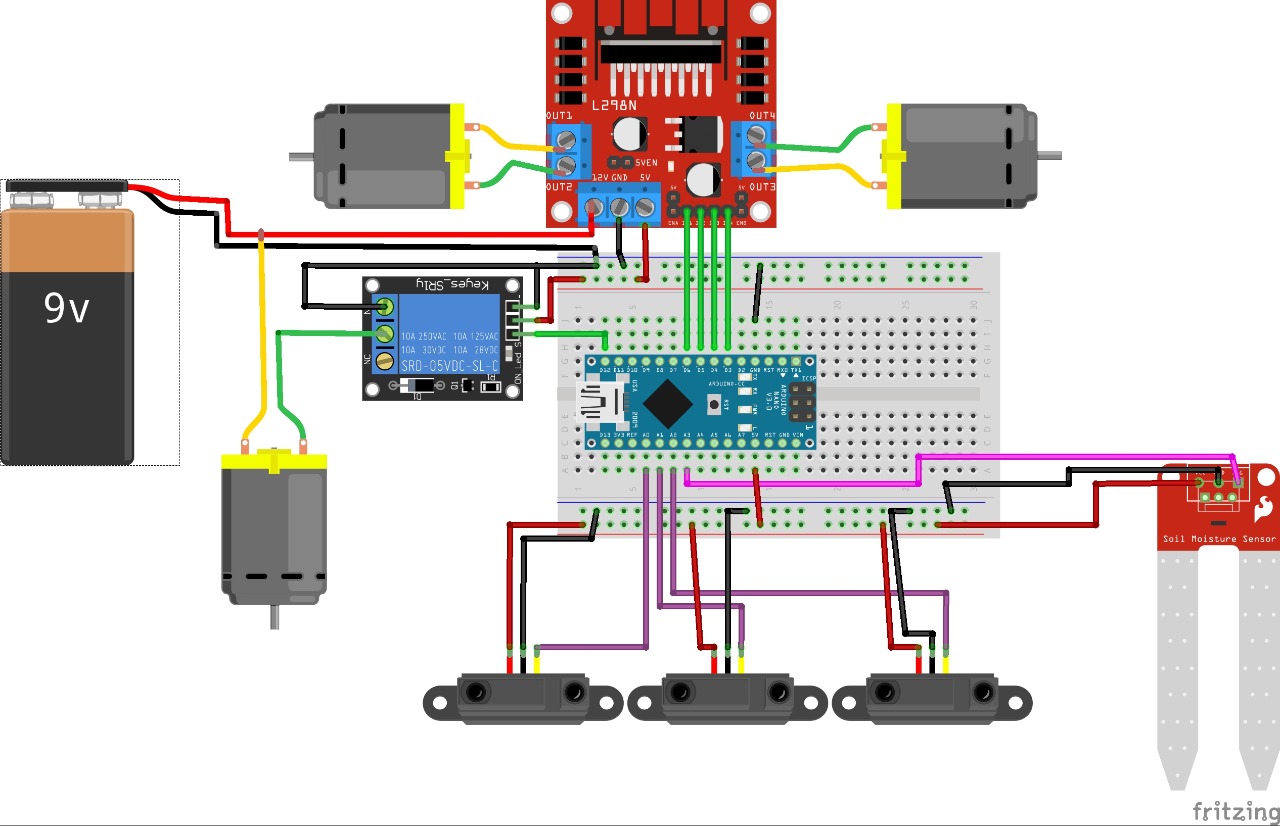
Circuit assemblyThe circuit is assembled as shown below using a breadboard or a DIY craft PCB
Arduino:
- Take order from sharp distance sensor
- Give order to H bridge
Pump
- Take order from Arduino indirectly through the relay
Water sensor
- Take order from tank
- Give order to Arduino
Sharp distance sensor
- Take order from surrounding
- Give order to Arduino
H bridge
- Take order from Arduino
- Give order to motor
On/off switch
- Take order from a person
How it works?
- Movement
1. When the sharp IR sensor which is in front and on the sides senses anything near, it sends orders to the Arduino to move left or right.
2. Arduino then sends the H bridge orders.
3. H Bridge then send it to the motor.
4. It then changes the direction.
- Disinfectant solution finishes
1. Water sensor send orders to the Arduino
2. When the sensor signal in lower than threshold value that means the fluid level inside the tank is low.
3. The relay switch the pump off.
4. Pump will stop spraying.
- Pump is constantly spraying the disinfectant when the robot is moving.
Arduino Code
//Distance Analog Sensors (Sharp)
const int SD1 = 2; //left  sensor
const int SD2 = 1; //right  sensor
const int SD3 = 4; //front side sensor
const int SD4 = 3; //front side sensor
// fluid sensor
const int tank_level = 5; //fluid sensor
// Define motor pins
#define in1 6
#define in2 7
#define in3 4
#define in4 5
const int pump =  3;      // Pump relay pin
int green_led = 12;   // geen led indicator
int red_led = 9;     // red led indicator
void setup() {
// define motor pins as OUTPUT
pinMode(in1, OUTPUT);
pinMode(in2, OUTPUT);
pinMode(in3, OUTPUT);
pinMode(in4, OUTPUT);
// define led indicator as output
pinMode(green_led, OUTPUT);
pinMode(red_led, OUTPUT);
// define sharp ir sensor as input
pinMode(SD1, INPUT);
pinMode(SD2, INPUT);
pinMode(SD3, INPUT);
pinMode(SD4, INPUT);
// define pump as an output
pinMode(pump, OUTPUT);
// start serial comunication to print sensor values
Serial.begin(9600);
}
// turn the robot left
void left() {
digitalWrite ( in1 , HIGH);
digitalWrite ( in2 , LOW);
digitalWrite ( in3 , HIGH);
digitalWrite ( in4 , LOW);
digitalWrite ( red_led , HIGH);
digitalWrite ( green_led , LOW);
}
// go back
void back() {
digitalWrite ( in1 , HIGH);
digitalWrite ( in2 , LOW);
digitalWrite ( in3 , HIGH);
digitalWrite ( in4 , LOW);
digitalWrite ( red_led , LOW);
digitalWrite ( green_led , LOW);
}
// go forward
void forward() {
digitalWrite ( in1 , LOW);
digitalWrite ( in2 , HIGH);
digitalWrite ( in3 , HIGH);
digitalWrite ( in4 , LOW);
digitalWrite ( green_led , HIGH);
digitalWrite ( red_led , LOW);
}
// turn right
void right() {
digitalWrite ( in1 , LOW);
digitalWrite ( in2 , HIGH);
digitalWrite ( in3 , LOW);
digitalWrite ( in4 , HIGH);
digitalWrite ( red_led , HIGH);
digitalWrite ( green_led , LOW);
}
// stop the robot
void STOP() {
digitalWrite ( in1 , LOW);
digitalWrite ( in2 , LOW);
digitalWrite ( in3 , LOW);
digitalWrite ( in4 , LOW);
}
void loop() {
// start to read data  from ir sensor
float volts_front_1 = analogRead(SD3) * 0.0048828125; // value from sensor * (5/1024)
int dist_front_1 = 13 * pow(volts_front_1, -1); // worked out from datasheet graph
//**********************
float volts_front_2 = analogRead(SD4) * 0.0048828125; // value from sensor * (5/1024)
int dist_front_2 = 13 * pow(volts_front_2, -1); // worked out from datasheet graph
//**********************
float volts_right = analogRead(SD2) * 0.0048828125; // value from sensor * (5/1024)
int dist_right = 13 * pow(volts_right , -1); // worked out from datasheet graph
//**********************
float volts_left = analogRead(SD1) * 0.0048828125; // value from sensor * (5/1024)
int dist_left = 13 * pow(volts_left , -1); // worked out from datasheet graph
Serial.println(dist_front_2);
//Serial.println(sdSHARP(SD2));
if (dist_front_1 && dist_front_2 > 8) {  // go forward
forward();
// turn the pump on
digitalWrite(pump, HIGH);
Serial.println ("forward");
}
if ( dist_front_2 < 5) {
right();
// turn the pump on
digitalWrite(pump, HIGH);
Serial.println ("rigth ");
}
if ( dist_front_1 < 5) {
left();
// turn the pump on
digitalWrite(pump, HIGH);
Serial.println ("left");
}
else {
}
//delay(100);
}
Conclusion
Robot is very important invention that cleanses the place without harming any person. It does not consume time and it do not need a specialist to operate it.
This robot can be in any size, but the size we did allows us to move it anywhere and it can be carried around. In addition, it is low-cost invention that allows anyone to have it; even at home.
References
Dejan. (2018, August 4). Control High Voltage Devices - Arduino Relay Tutorial. Retrieved from https://howtomechatronics.com/tutorials/arduino/control-high-voltage-devices-arduino-relaytutorial/.
Desk, W. (2020, April 16). Coronavirus: Are disinfectant walk-through gates effective? Retrieved July 15, 2020, from https://www.thenews.com.pk/latest/645289-can-disinfectant-walk-through-gates-help-halt-coronavirus.
February, D. (2019, February 8). Arduino DC Motor Control Tutorial - L298N: PWM: H-Bridge. Retrieved from https://howtomechatronics.com/tutorials/arduino/arduino-dc-motor-controltutorial-l298n-pwm-h-bridge/.
Green, J. (2019, April 9). Arduino and MPU6050 Accelerometer and Gyroscope Tutorial. Retrieved from https://howtomechatronics.com/tutorials/arduino/arduino-and-mpu6050-accelerometer-andgyroscope-tutorial/.
Junaidi, I. (2020, April 09). More walk-through gates could help prevent spread of coronavirus: Experts. Retrieved July 15, 2020, from https://www.dawn.com/news/1547605/more-walk-through-gates-could-help-prevent-spread-of-coronavirus-experts.


_3u05Tpwasz.png?auto=compress%2Cformat&w=40&h=40&fit=fillmax&bg=fff&dpr=2)
Comments
Please log in or sign up to comment.