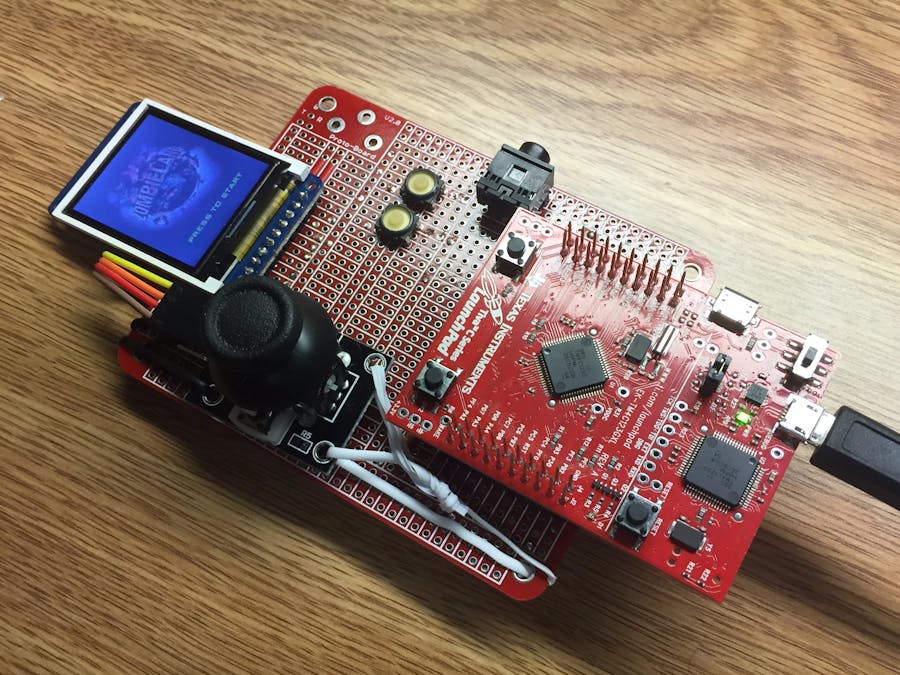
Wouldn't it be cool if you could create your very own handheld portable game? Well, by reading on, you'll learn how to take the first steps on actually doing so! Zombieland was a game created as a final project for an embedded systems class. The project incorporates the use of an LCD display, ADCs (Analog to Digital Converter), DAC (Digital to Analog Converter), buttons, and the TI TM4C123GXL microcontroller.
How It Works?Game Rules:
Within the game, the player is the main character that can move around by moving the joystick up, down, left, and right. As the player is doing this, zombies will randomly appear from the left, right, and bottom sides of the screen, and it is up to the player to shoot all the zombies that enter the screen in order to advance to the following level. The best part is that the zombies follow wherever the player goes, meaning it is important for the player to shoot the zombies before they get to close and kill the player.
The right button is used to shoot a bullet, and by doing so, 1 point is deducted from the total score. The reason for this is so the player does not shoot in every direction possible to kill all zombies. Therefore, this system punishes players for not being accurate when playing. Every zombie killed by shooting, earns the player ten points. If the player is struggling, or if there are many zombies around the player, the left button can be used as a "bomb", which clears the screen of the zombies. The player only has 3 bombs to begin with, and every 750 points earned gives the player an additional bomb. However, no points are awarded for zombies killed using the bomb, as it only helps when attempting to reach the next stage.
The objective of the game is to earn the highest score and to advance through all 15 levels without being touched by a zombie, which ends the game. Each level has a greater number of zombies than the previous one, with a faster speed as well, making it more challenging as the player progresses.
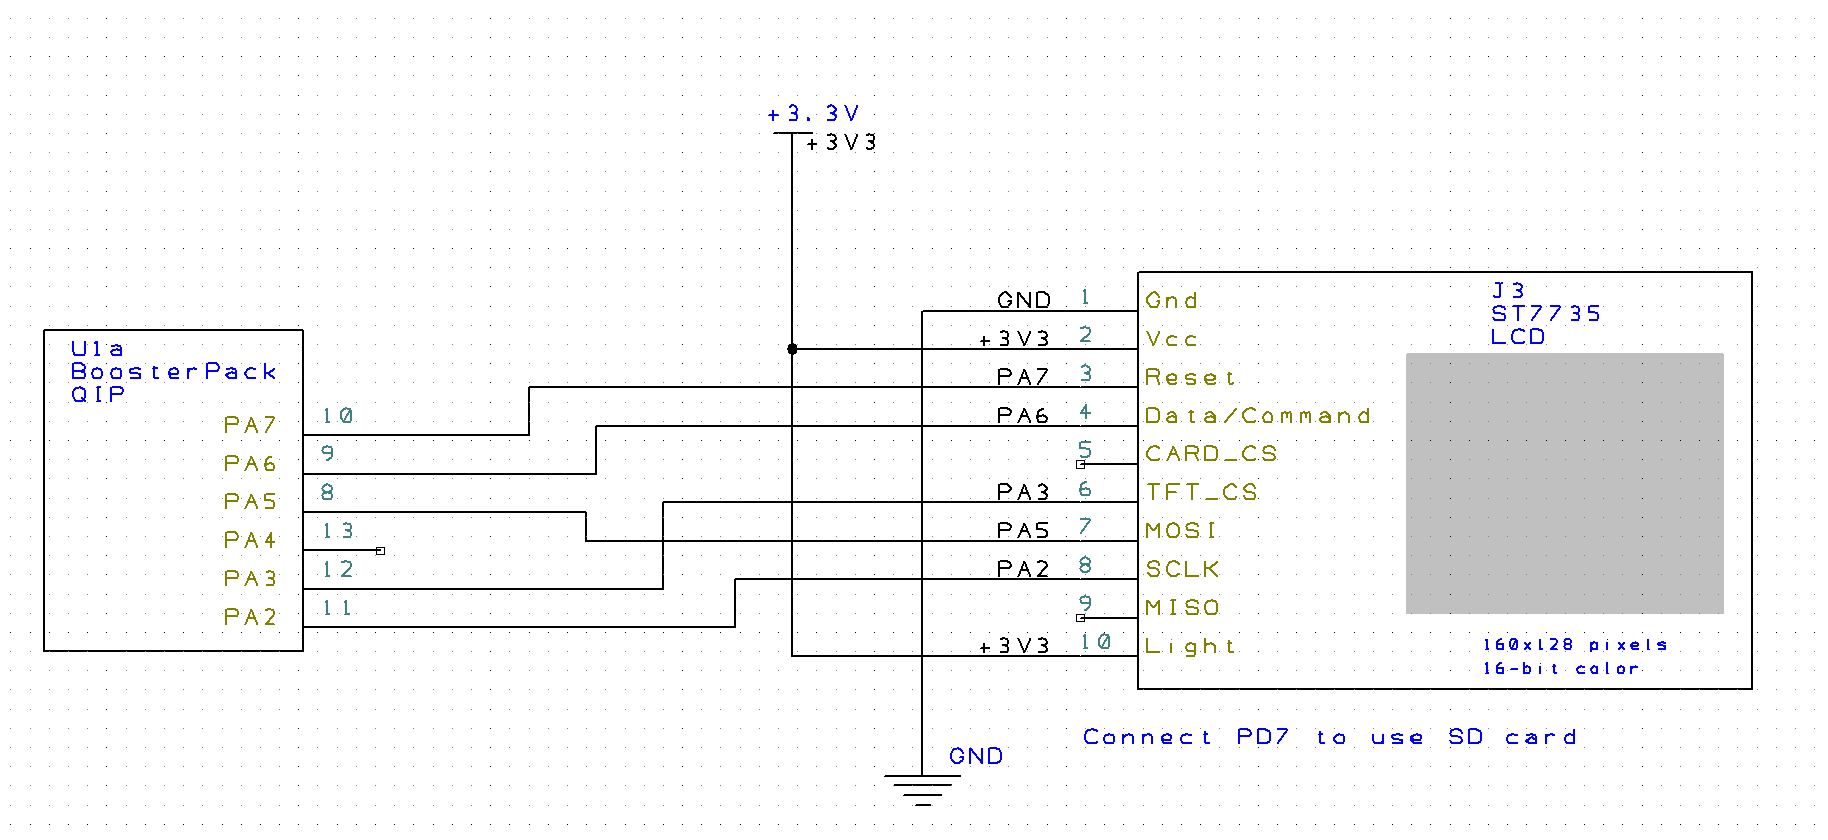
HardwareThe LCD display has an output of 128 by 160 pixels, and it is used to show the gameplay of the user's input.
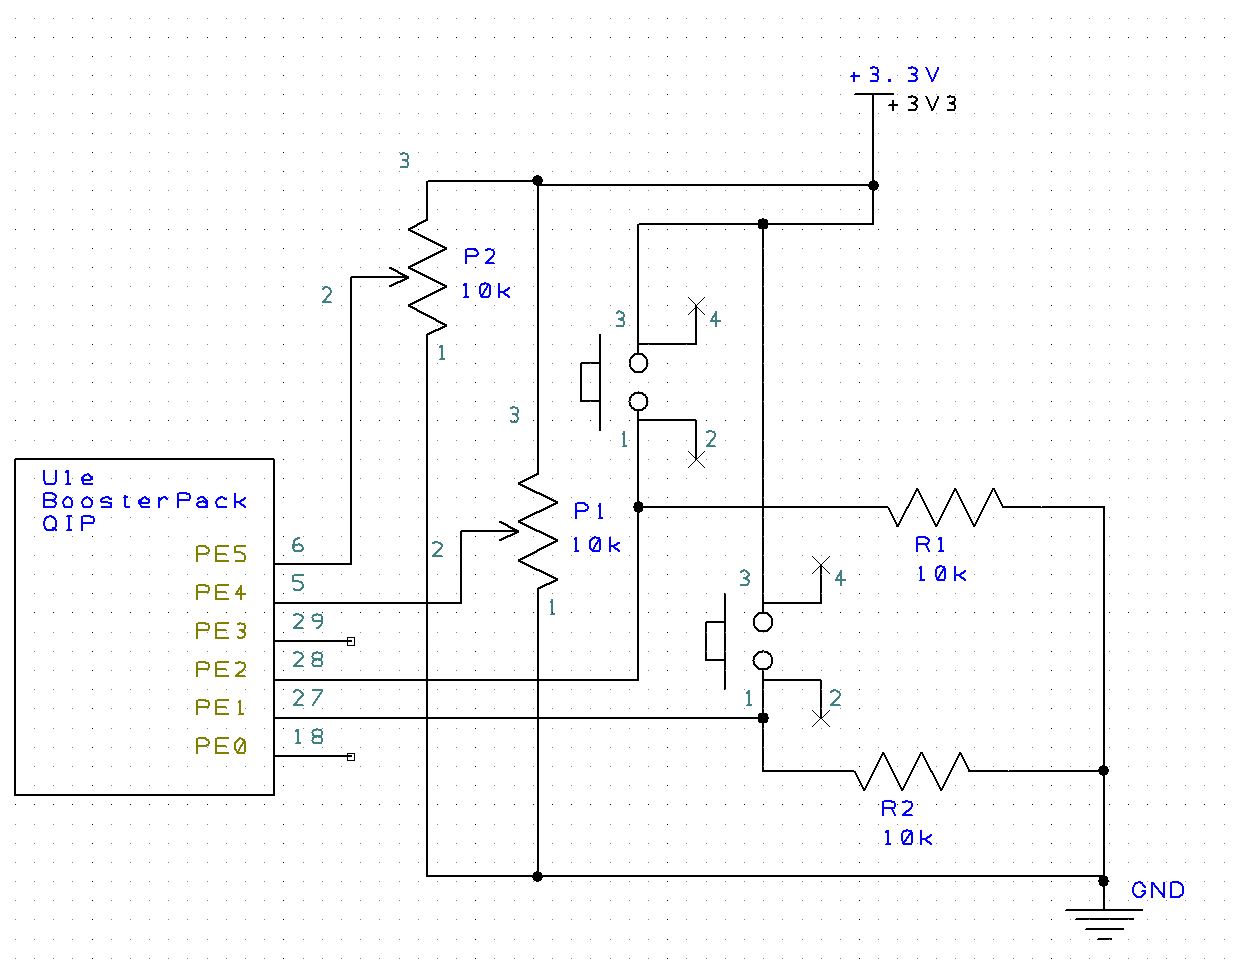
The joystick is technically made of two slide potentiometers. These potentiometers are interfaced using two separate analog to digital converters (ADC). The microcontroller can tell changes in movement of the joystick because each position is marked with a specific voltage input, meaning the joystick acts as two variable resistors for two separate inputs, one for the joystick's Y position and one for the X position.
The two external buttons utilized in the project are used as digital inputs using positive logic. This means that when the switch is not pressed, the microcontroller reads LOW or 0, but when the switch is pressed, the microcontroller reads HIGH or 1. This is very different from the onboard button used for the project, which is used as the pause button. This button uses negative logic, which means that when the switch is not pressed, the microcontroller reads HIGH or 1, but when the switch is pressed, the microcontroller reads LOW or 0.
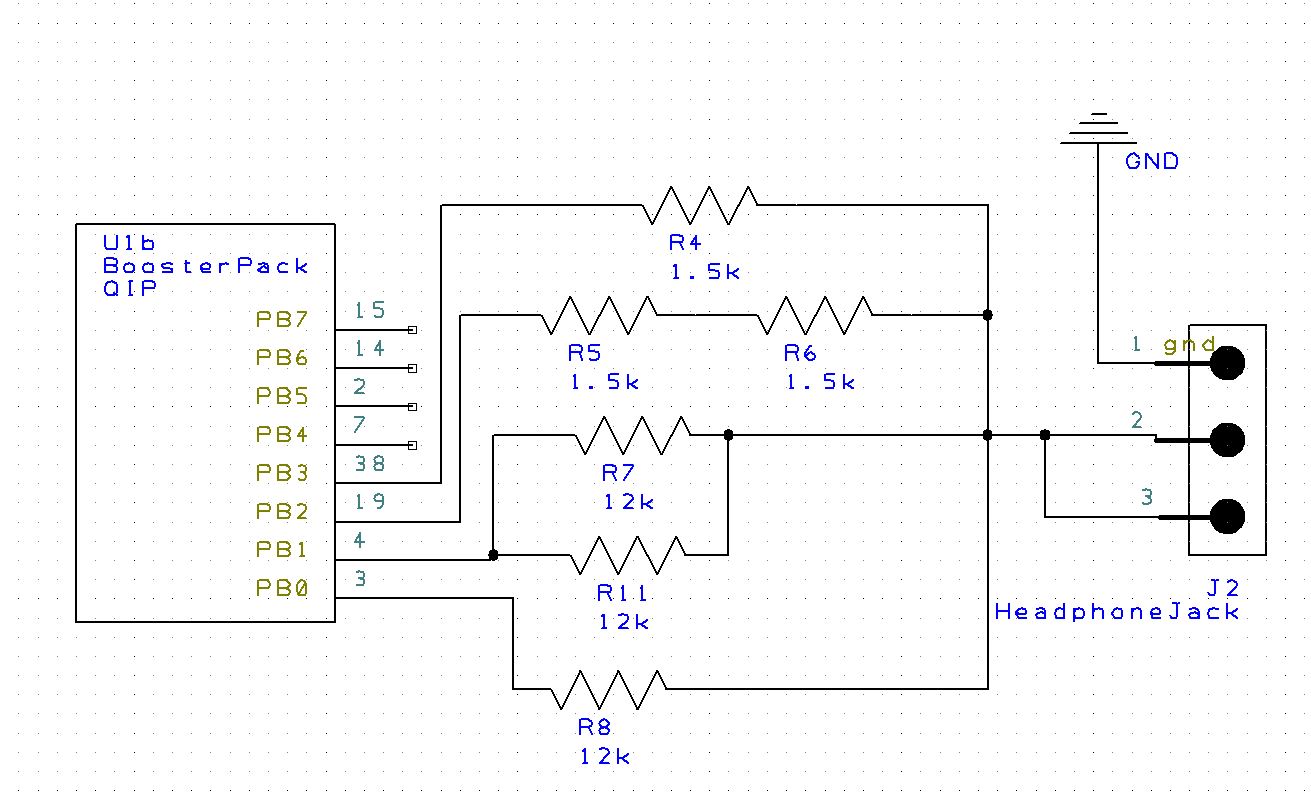
The digital to analog converter (DAC) and audio jack is used to generate sound for the game. This is done by connecting a series of pins on the microcontroller with resistors of varying values, which all end up connecting together to the audio jack. The resistor values for each of the pins do not matter, but the proportions for them are important. The first pin must have a resistor of the value R, the second with 2R, the third with 3R, and the fourth with 4R. This means the audio generated will be 4 bit, which actually is not the best sound out there. Regular earphones generally use 12 bit, which is significantly better. For reference, 5 bit is twice as good as 4 bit, 6 bit is twice as good as 5 bit, and so forth, meaning the quality of the audio for the game will not be that great, but it will work for just learning how everything works. By all means, if you do wish to have better audio, I suggest making at least a 6 bit DAC.
The wiring for the project can be found below, under schematics. You will find three separate schematics because it shows the wiring for each port on the LaunchPad, one for the user interface, one for the DAC (sound), and one for the LCD.
Software: Game EngineWhen thinking of how a game works, you start to notice how there are many different things happening at once. The game has to pick up the input from the user, update the content of the screen, and play sound all together. In reality, only one thing is happening at once, but the program switches between what to do at a very rapid pace, which gives the illusion of simultaneous action.
The program is split up into a foreground thread and multiple background threads, meaning that there is the main loop, but also side functions that carry out functions at different intervals of time or from different actions. Each of the background threads have some sort of trigger, that tells the program to carry out a different function. These are what interrupts are, and this game utilizes three different interrupts. Two of them are triggered by specific intervals of time, and the third one is triggered by the press of a button.
The user input is taken at a frequency of 40Hz, which means that 40 samples of the joystick value and external button values are taken per second. When this is not happening, the program is in an endless while loop until the user is touched by a zombie. The following function is called every 25ms (Background thread) to obtain the user input.
void SysTick_Handler(void){
	ADC_In(ADCval);	//sample ADC (Obtain Joystick Values)
        //Checking if user moved the joystick to move player...
        //If so, the direction of the player is updated
	if((ADCval[0] > ADCval[1])&&(ADCval[1] < 1000)){
		shooter.direction = 0;//UP
		shooter.walk = 1;
	}
	else if((ADCval[0] < ADCval[1])&&(ADCval[0] < 1000)){
		shooter.direction = 1;//RIGHT
		shooter.walk = 1;
	}
	else if((ADCval[0] < ADCval[1])&&(ADCval[1] > 3000)){
		shooter.direction = 2;//DOWN
		shooter.walk = 1;
	}
	else if((ADCval[0] > ADCval[1])&&(ADCval[0] > 3000)){
		shooter.direction = 3;//LEFT
		shooter.walk = 1;
	}
	else shooter.walk = 0;//STAY
	ADCStatus = 0x01; //sets flag (Tells main program input was taken)
	if(pressShootFlag == 0)pressShootFlag = (GPIO_PORTE_DATA_R&0x04)>>2;
	else if(pressShootFlag == 1){ //Checking if user clicked shoot button
		if((GPIO_PORTE_DATA_R&0x04)>>2 == 0){
			shootGun = 1;
			pressShootFlag = 0;
		}
	}
	if(pressBombFlag == 0)pressBombFlag = (GPIO_PORTE_DATA_R&0x02)>>1;
	else if(pressBombFlag == 1){ //Checking if user clicked bomb button
		if((GPIO_PORTE_DATA_R&0x02)>>1 == 0){
			useBomb = 1;
			pressBombFlag = 0;
		}
	}
        //Time remaining to deploy next zombie is decremented
	Stage_Info[CurrLvl].countdown--;
}
Within the endless loop, the program is updating the position of bullet that was shot, as well as checking to see whether to advance to the next level or not. However, there is another while loop within the endless while loop that also checks to see if the user input has been taken, and if so, it updates everything else, including the player's position, zombies' positions, if a bullet has collided with a zombie, if a zombie has collided with the player, and much more. The following code is part of the foreground thread that runs when no interrupts are occurring.
while(1){
        stageChange(); //Checks if game should continue to next level
	Update_Bullets();//Updates position of bullets
            //If player is dead, advance to Game Over screen
	if(shooter.alive ==0){
		break;
	}

        //Rest of function only executes when input is read
        //It is used to update display based on input received
	while(ADCStatus){
            //...
        }
}
There is also another background thread that is used to generate sound. Sound is developed through a sinusoidal wave at a certain frequency. Each note corresponds to a different frequency. To play a song or enable a sound effect at a certain moment, it is useful to have a large array of values, and output those values to the DAC periodically, until all the values have been sent. The following code shows what happens each time, the background thread for sound is called.
void UserTask(void){
	if(soundLength > 0){ //Checking if sound should be played
		DAC_Out(*currentSound); //Send sound value to DAC
		currentSound++; //Increment to next value
		soundLength--; //Account for sound value being outputted
	}
}
Many parts of the game are organized in a neat fashion, which allows everything to be manipulated and changed easily. This is done through the use of structs. Structs really allow us to give attributes to certain "things" or "objects" in the game. There are separate structs constructed for the player, the zombies, and the bullets.
The player's attributes include the x position, y position, direction, walking status, and alive status. The x and y position are pretty self explanatory, as it indicates where on the screen the main character is located (x and y coordinates indicate position of bottom left pixel of main character). The direction is needed because each direction has a different image for the character. For example, when the direction is left, the image switches to the main character looking left. If the direction in the struct indicates up, the image switches so the player is looking up. This attribute is mainly necessary for the player to look as if he were walking in a certain direction instead of it just being a constant image like a rectangle moving on the screen. The walking status is needed to make the player look as if it were walking, for each direction, there are two images of the player. One with the right leg up, and one with the left leg up, so if the two are switched back and forth, it creates the illusion of the player walking. The alive status is necessary in order to check if the game should continue, the only part of the program that switches the alive status of the player are the collision detection functions, which are run in order to check if a zombie has collided with the player. Below shows the code for setup of the struct.
struct player_t{
	int xpos;
	int ypos;
	uint8_t direction;//0=UP,1=RIGHT,2=DOWN,3=LEFT
	uint8_t walk;
	uint8_t alive;//0 = dead, 1 = alive
};
typedef struct player_t player;
The zombies' attributes are fairly similar to that of the player, and it includes the x position, y position, alive status, and clear status. The x and y position work the same way as that of the player. However, the alive status of each zombie changes when the collision between a bullet and a zombie occurs. The clear status is used in order to clear the area of the screen that the zombie takes up once the zombie dies. When the zombie is declared "dead," the zombie no longer followers the player, but there needs to be something to clear the zombie off the screen or else if the zombie dies, the zombie will still be on the screen, but stationary. The reason the walking status and direction of the zombie is not declared is because the direction depends on the user's movement around the screen, as the zombies follow the player. This means that the direction of the zombie and image for the direction is updated in a different function in a different way. Below is the setup for the zombie struct.
struct enemyT1{
	int xpos;
	int ypos;
	uint8_t alive; //0 = dead, 1 = alive
	uint8_t clear;//1=Not Cleared, 0=Already Cleared
};
typedef struct enemyT1 enemy_type1;
The attributes of the bullet are similar to the previous ones, but they are used in a different way. The attributes include the x position, y position, direction, alive status and clear status. These attributes are exactly the same as the ones mentioned above, but because the bullets are constantly moving after the user initially shoots, the direction is used to a different extent. After the shoot button is pressed, user input is not needed to make the bullet move to the end of the screen or to kill a zombie. This means that the direction is needed in order to tell in which direction the bullet should be redrawn on the screen. For example, if the direction was shot towards the right, the program now knows to always update the bullet so that it moves to the right by one pixel at a time instead of going in any other direction. Below is the setup of the bullet struct.
struct shot {
	int16_t xpos;
	int16_t ypos;
	uint8_t alive; //0 = dead, 1 = alive
	uint8_t direction; //0=UP,1=RIGHT,2=DOWN,3=LEFT
	uint8_t clear;//1=Not Cleared, 0=Already Cleared
};
typedef struct shot Gun_Shot;
The Levels in Zombieland were created in a way that makes it effortless to add additional levels. The game has 15 levels and is arranged as an array of struct. The level struct includes the level number, enemy number, enemy speed, countdown, and deploy time.
The level number just specifies which level is being created. The enemy number specifies how many zombies are being deployed in the level. The enemy speed indicates how fast the enemy moves relative to the player. The player speed is at 1, so if the enemy speed was set to 2, the zombies would move twice as slow as the player. If it was set to 3, the zombies would move three times slower than the player. The countdown determines how long it takes for the first zombie to appear from the sides of the screen. The deploy time specifies the amount of time that passes for each additional zombie to be deployed. Below is the code for the setup of the level struct.
struct stage {
	uint16_t levelNum; //Specifies the which level player is on
	uint16_t enemyNum;//Specifies the number of enemies for current level
	uint16_t enemySpeed;//Specifies speed(relative to player)-Higher# is slower speed
	int32_t countdown;//Countdown to deploy new enemy
	int32_t deployTime;//Specifies time between enemy deployments
};
typedef struct stage Current_Lvl;
The best part about the way the levels are set up is that it is incredibly easy to create new levels. To do so, all that must be done is add an additional level struct within the array of structs. There is a random initialization at the beginning that has a specific seed number. This means that there is no need to specify where each zombie comes from because that is done automatically by the program. However, because the seed number is constant, the positioning of where the zombies come from remains consistent between restarted game plays. Another thing to mention is that the last level struct in the array must be specified with a level number of 0 to indicate that there are no more levels, so if a user gets past all the levels, the program knows to display a "You Win" screen. Below is the code for the initialization of the levels in the game. Keep in mind that if you wanted to make a different game from this one, all that needs to be done is changing the numbers or adding new ones.
Current_Lvl Stage_Info[17] = {
	{1,3,3,5,100},
	{2,4,2,5,100},
	{3,6,1,5,75},
	{4,8,2,5,75},
	{5,10,2,5,50},
	{6,12,3,5,50},
	{7,15,3,5,25},
	{8,20,3,5,25},
	{9,22,3,5,20},
	{10,30,3,5,20},
	{11,32,3,5,15},
	{12,35,3,5,20},
	{13,40,3,5,20},
	{14,40,3,5,15},
	{15,45,2,5,10},
	{0,0,0,0,0}//End of all levels indicated with 0s
};
A significant part of the game is having the zombies follow the user anywhere on the screen. The reason that an algorithm has to be made is because the location of the user cannot be predicted before hand, as the user has total control of where he or she wishes to go.
Because of this, some type of system needs to be implemented that always stays consistent. The system that was already integrated with the screen was a coordinate system. With this, we will be able to see how many pixels horizontally and vertically each zombie is from the player. Knowing this, it is easy to determine where each character is because of the x and y position attributes that were set for the zombies and the player within their respective structs.
The way the algorithm was developed was to check the change in y and the change in x (zombie position minus player position). From this, is the absolute value of y was greater than the absolute value of x, then the program knows to move vertically. What determines if the zombie should move one pixel towards the top or towards the bottom is determined by whether y is positive or negative. This is how the horizontal movement works for the zombie as well. Below is the function that determines which way the zombie should go.
for(int i = 0; i<numChasers;i++){
    if(chaser[i].alive == 1){
    //Check to see if enemy should move in Y direction
	if(mag((chaser[i].xpos+8)-(shooter.xpos+8)) <= mag((chaser[i].ypos+8)-(shooter.ypos+8))){
	//Check to see if enemy should move down
		if((chaser[i].ypos+8)-(shooter.ypos+8) < 0){
			chaser[i].ypos++;
			if(chaser[i].ypos > 160)chaser[i].ypos=160;
			    ST7735_DrawBitmap(chaser[i].xpos, chaser[i].ypos, Enemy1Front[Epos].walk, 16,16);
			}
	//Check to see if enemy should move up
		else if((chaser[i].ypos+8)-(shooter.ypos+8) > 0){
		    chaser[i].ypos--;
		    if(chaser[i].ypos < 23)chaser[i].ypos=23;
		    ST7735_DrawBitmap(chaser[i].xpos, chaser[i].ypos, Enemy1Back[Epos].walk, 16,16);
		}
	}
    //Check to see if enemy should move in X direction
	else if(mag((chaser[i].xpos+8)-(shooter.xpos+8)) > mag((chaser[i].ypos+8)-(shooter.ypos+8))){
	//Check to see if enemy should move right
	    if((chaser[i].xpos+8)-(shooter.xpos+8) < 0){
		chaser[i].xpos++;
		if(chaser[i].xpos > 113)chaser[i].xpos=113;
	        ST7735_DrawBitmap(chaser[i].xpos, chaser[i].ypos, Enemy1Right[Epos].walk, 16,16);
	    }
	//Check to see if enemy should move left
	    else if((chaser[i].xpos+8)-(shooter.xpos+8) > 0){
		chaser[i].xpos--;
		if(chaser[i].xpos < -1)chaser[i].xpos=-1;
		ST7735_DrawBitmap(chaser[i].xpos, chaser[i].ypos, Enemy1Left[Epos].walk, 16,16);
	    }
    }
}
The last major portion of the game is collision detection because it is what drives the bullets to remove the zombies. Collision detection is used when the bullets hit the zombies, and when a zombie hits the player. Although, it seems fairly simple, another algorithm must be used for this because all the live bullets need to be examined to see if they hit a zombie, and all the live zombies need to be examined to see if they hit the player. At any point in time, there are a variable number of zombies and bullets on the screen, which is why some type of pattern must be made to detect the collision for each of the zombies and bullets.
Similar to the following algorithm, the collision detection also uses the coordinate system to drive the functionality of the algorithm. Because each bullet is 7x7 pixels and each zombie is 16x16 pixels, it isn't too difficult to see when each object hits another. For example, if a bullet is traveling right, we check to see if the x position of the zombie and the x position of the bullet is less than 7. If the bullet reference position is above the zombie's reference position, the y position difference should be less than 16, and if the bullet reference position is below the zombie's reference position, the y position difference should be less than 7. The diagrams below clearly show how the collision detection function should be programmed.
Based on the diagrams, it's easy to see that the x and y positions both have to be within some sort of range for it to be considered a collision. If only the x positions or if only the y positions satisfy the condition for a collision, it still isn't considered one because both have to be true. Below is the function for the bullet and zombie collision detection.
void checkEnemyDead(){
	for(int i = 0; i < numBullets; i++){
		if(bullets[i].alive == 1){
			for(int j = 0;j<numChasers;j++){
				if(chaser[j].alive == 1){
					if(bullets[i].direction == 0){
//check if enemy dead for bullets going up
						if(mag(bullets[i].ypos-chaser[j].ypos)<5 && (mag((bullets[i].xpos+3)-(chaser[j].xpos+8))<7)){
							chaser[j].alive = 0;
							bullets[i].alive = 0;
							score = score+10;
							break;
						}
					}
					else if(bullets[i].direction == 1){
//check if enemy dead for bullets going right
						if(mag(bullets[i].xpos-chaser[j].xpos)<5 && (mag((bullets[i].ypos-3)-(chaser[j].ypos-8))<7)){
							chaser[j].alive = 0;
							bullets[i].alive = 0;
							score = score+10;
							break;
						}
					}
					else if(bullets[i].direction == 2){
//check if enemy dead for bullets going down
						if(mag(bullets[i].ypos-chaser[j].ypos)<14 && (mag((bullets[i].xpos+3)-(chaser[j].xpos+8))<7)){
							chaser[j].alive = 0;
							bullets[i].alive = 0;
							score = score+10;
							break;
						}
					}
					else if(bullets[i].direction == 3){
//check if enemy dead for bullets going left
						if(mag(bullets[i].xpos-chaser[j].xpos)<14 && (mag((bullets[i].ypos-3)-(chaser[j].ypos-8))<7)){
							chaser[j].alive = 0;
							bullets[i].alive = 0;
							score = score+10;
							break;
						}
					}
				}
			}
		}
	}
}
This type of collision detection is also how the zombie and player collision works, but the pixel length and widths differ a bit because both the zombie and player are 16 pixel squares. This means that the ranges that the x and y positions have to be in are altered. Below is the function for the zombie and player collision detection.
void checkShooterDead(){
	for(int i = 0; i<numChasers; i++){
			if(chaser[i].alive == 1){
				if(mag(chaser[i].xpos - shooter.xpos) < 13 && mag(chaser[i].ypos - shooter.ypos) < 13){
					shooter.alive = 0;
					return;
				}
			}
	}
}
You may have noticed that the ranges for the x and y positions seem to be weird values than what you think they should be. This is because each image has a black 1 pixel border around it. This makes it easier to move the images because if the image moves 1 pixel in any direction, nothing needs to be cleared on the screen, as the black 1 pixel border takes care of it. Below is a diagram of how each image is structured.
Congratulations, now you know how to make your very own handheld game console! Below is a link for the code on GitHub that was used for Zombieland. Because you now know how each of the major components work, you can now edit the game to make it your own or even create a totally different game using the major software functions shown above!


_3u05Tpwasz.png?auto=compress%2Cformat&w=40&h=40&fit=fillmax&bg=fff&dpr=2)

Comments
Please log in or sign up to comment.